We covered Options and Settings in the last module (Module 5). Whilst there are probably over 100 options and settings we’ve focused on the most important ones you’ll need to know about as you start out with TestComplete. Probably a bit of a tall ask to remember all of the settings we covered there. However, if you just get a feel for the key settings and project properties it’ll make your life easier as you progress with implementing TestComplete. What you will need to grasp in detail though is an understanding of Objects, their properties and their methods. And it’s Objects, Properties and Methods we’re going to take you through below.
If you don’t grasp the concepts of Objects and Methods you’re not going to get far with TestComplete. It’s absolutely critical to grasp these concepts. These are concepts that go much wider than just TestComplete. Grasp them though and a lot of TestComplete concepts will fall into place far faster.
If you’re wondering what Objects and Methods are in the first place then here’s a repeat of our very basic overview (from Module 1). You can skip this if you’re already happy with these concepts and move on to how to work with them in TestComplete if you’d prefer.
Objects can be thought of as processes, applications, windows, browsers, etc that are present on your system. They are things that are present on your system at any point in time. Some of these objects may be visible on your system (e.g. a window displayed on your desktop) or they may not be visible (e.g. a process running in the background). All objects will have properties and methods.
Properties can be considered as characteristics of the object. For example you ‘System (sys)’ object will have a property called ‘Hostname’. That property would have a value (e.g. The host name of your system).
Methods can be considered as actions that the object can carry out. For example if you have the CalcPlus application/object running on your system, this object could have the ‘close’ method. If this method is called then the object would be closed on your system.
If you’re still struggling with the concept of objects, properties and methods read the following analogy (slightly daft analogy but hopefully gets the point across):
Objects and child objects: You can think of yourself and your body as an object. As an object you have lots of child objects. You have a head, you have arms, you have legs, etc. These child objects have their own child objects. For example an arm has child objects like shoulder joint, elbow joint, wrist joint, forearm, top arm and hand.
Properties: Each object will have a number of properties. You have a height property. That property could have a value (for example 1.6 meters). You body will have a list of properties and each of it’s child objects will have it’s own list of properties too. Take your ‘arm’ object. We’ve seen that the arm has a list of child objects. The arm itself could then have a property called ‘Number of child objects’. The value of this property is 6 (the six child objects for the arm being the shoulder joint, elbow joint, wrist joint, forearm, top arm and hand). Other properties for the arm could be things like colour, texture, etc. All of these properties could have values.
Methods: These are the actions that the object can carry out. Your overall body object might have methods, or actions, like Sleep, Run, Walk, etc. Each child object may have it’s own set of methods too. So your arm object may have methods like bend, twist, raise, lower, etc
These principals apply in exactly the same way to everything on your computer or laptop. The top level object can be considered your computer system. This system has child objects which might be processes (like the notepad process running on your system). The notepad process then has child objects which can be windows that are displayed on your desktop. If we take the notepad window this window will have properties; like height, width, colour, title, etc. This window will have methods too. These methods are likely to include actions like ‘minimise’ and ‘maximise’.
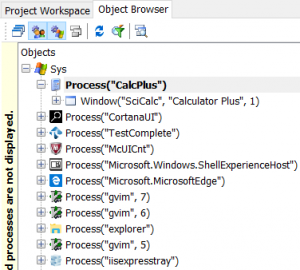 First off it’ll help if you know what the object browser in TestComplete can do for you. The object browser is TestCompletes view of your system. It’s how TestComplete see the structure and relationship between those objects. And it’s where TestComplete shows you the different aspects of those objects (their properties) and what those objects can do (their methods). All of this information is displayed and interpreted with a few key panels in the Object browser view. Those key panels are:
.
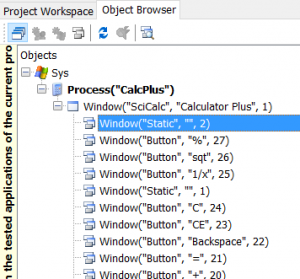
The Object Tree shows the list of objects, their relationships and hierarchy. Everything starts at the top with the ‘Sys’ object which represents your PC or Laptop System. Everything else is a child of this Sys objects. Child objects are either Processes, Windows or Browsers. Typically under the Sys process everything will be a process (e.g. your Calc process) and then under this the Calc process will have a load of window objects. It’s these window objects that are usually displayed on your desktop.
.
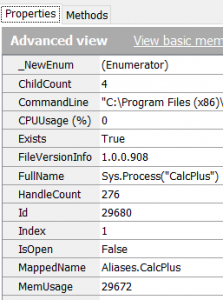 When you click or select an object the panel on the right allows you to look at the properties and methods for that object (selectable with the tabs). The Properties tab lists all the properties associated with the object you’ve selected. Properties can be read-only or read/write. If you see a little ‘o’ symbol next to the property then this means its a read and write property. You can actually click in the property value text box and modify the value (that value then reflected and changed in your application).
.
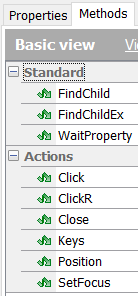 The methods tab lists all the actions that the object can carry out. Actions typically include things like click, focus, drag, etc. All the sorts of actions you’d carry out when you’re working with your application. You’ll also find more obscure methods that are specific to different object types. For example the Calc Plus process object has a WaitSwingObject method. I’ve no idea what that method does. And this highlights a good point. Each object will have a lot of methods. You’ll probably only find that you need to use 4 or 5 of those methods. There’s no point becoming familiar with all the different methods, just get familiar with the core methods. Which brings me on to the next point…
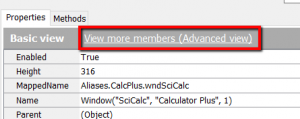
You’ll notice when viewing properties and methods that there’s a link to view more members (advanced view). TestComplete hides a lot of the properties and methods that it doesn’t think you’ll be interested in. However, if you need, or want, to see everything then click this link. You’ll see 10 times as many properties and methods for the object that you’re looking at. Best to stay in ‘Basic’ view for now though.
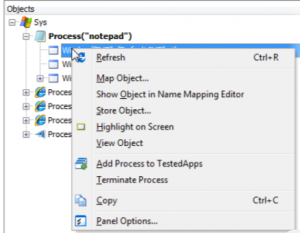 Another useful thing to know is the object browser context menu. Right click on an object and you’ll see a context menu with lots of useful options. These include:
Refresh – Reloads the object tree.
Map Object – Name Maps the selected object.
Show Object in Name Mapping Editor – Navigates to the Name Mapping Editor and selects the current object.
Store Object – Saves the object and its children in the Store.
Highlight on Screen – Places a highlight border on the selected window if the window is visible.
View Object – Captures a window in the Image Viewer.
Add Process to TestedApps – Adds the selected process (or parent process if a window is selected) to the TestedApps node.
Terminate Process – Immediately shuts down the selected process (not recommended)
Copy – Makes a copy of the text for the selected node in the Windows clipboard.
Panel Options – Navigates to the main menu’s Tools | Options page for the Object Browser.
Whilst we’re looking at objects and methods it’s worth saying a little bit about object naming conventions in TestComplete. In it’s simplest form we just need to use ‘dot notation’ to describe the path from the top of the object hierarchy down to the object we’re interested in.
For example when we’re looking at the full path to an object we’ll start at the top of the hierechy which is the Sys object. Then we’ll pick the next object down and add that to our path notation with a dot separating the two objects. Then repeat. So we’ll end up with something like this…
Sys.Process(“CalcPlus”).Window(“SciCalc”, “Calculator Plus”, 1).Window(“Static”, “”, 2)
Okay so that looks a little more complicated than I made out above. Let’s break it down.
If we start out like this…
Sys.Process().Window().Window
Then all we’re talking about is starting with the Sys object, then below that there is a ‘Process’, below that is a ‘Window’ and below that is another ‘Window’. However, if we take it like this you’re probably thinking there’s a lot of objects in my system that could match that naming. Word or Excel for example are processes running under the system object that have a window and underneath that another window.
If we were to use this naming convention we wouldn’t be able to uniquely identify an object. What we need is to fill in some detail in the brackets that narrow down what we’re trying to identify. Take this bit…
Sys.Process(“CalcPlus”)
Well that uniquely identifies the ‘CalcPlus’ process running on our system. That helps. Except it doesn’t help if we have more than one instance of CalcPlus running. In that case we need to identify the CalcPlus object with a unique index Id too. If we had two open instances of CalcPlus we’d see something like this…
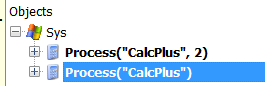
You can see here that with two instances of CalcPlus running we’re uniquely identify the two different instances with an attional attribute in the brackets which identifies the instance by an ‘index’ value. Index value 1 for the first instance (which isn’t needed in the brackets) and index value 2 for the second instance.
As we take this a step further down the hierarchy we’re using exactly the same principals. In the brackets define some properties of the child object that help to uniquely identify the object among other similar objects.
Sys.Process(“CalcPlus”).Window(“SciCalc”, “Calculator Plus”, 1)
So in this case we identify the “Window”, that’s a child of the process, by using the property of the window which is ‘SciCalc’. We also use a 2nd property that contains the value “Calculator Plus” and the “1” which indicates the index (or instance) of CalcPlus that we’re running. All of this together means we can uniquely identify this window amongst other windows that might be similar.
We can just keep going with this process to identify another windows under this with the following…
Sys.Process(“CalcPlus”).Window(“SciCalc”, “Calculator Plus”, 1).Window(“Static”, “”, 2)
Now we see another final child object, again a Window object, identified with some unique properties (“Static”, “”, 2).
Everything we’re doing here is based on meeting 3 key criteria to identify the object:
1. identify the object hierarchy (e.g. to find a specific object you need to identify the parent objects)
2. identify unique properties of that object (e.g. the WndCaption property which could be ‘Calculator Plus’)
3. and if that still doesn’t uniquely identify the object (because there are identical objects at the same level in the hierarchy) then use an index value to pick out the correct instance of the object.
So this provides us a way to uniquly refrernce objects and a naming convention that allows us reference those objects in our scripts. For example if you want to click the a button in CalcPlus you can define the button object name with this….
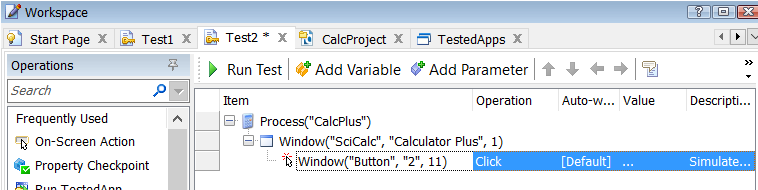
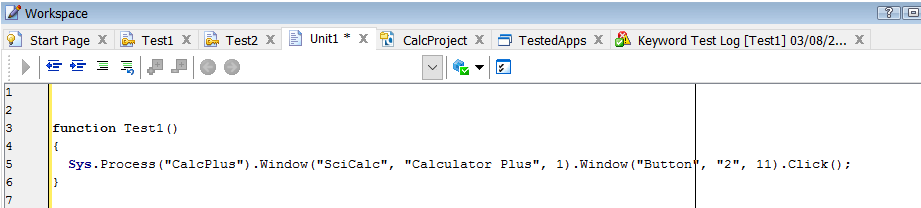
Sys.Process(“CalcPlus”).Window(“SciCalc”, “Calculator Plus”, 1).Window(“Button”, “2”, 11)
And then to click the ‘2’ button add the click() method to the end…
Sys.Process(“CalcPlus”).Window(“SciCalc”, “Calculator Plus”, 1).Window(“Button”, “2”, 11).Click()
Like this….
or even if you script it in a Python script you can do something like this…
Try it. As long as you have CalcPlus open you’ll be able to identify the object and click it.
Just to take this a step further you ought to be aware that this is just one way of naming your objects. There are two others. We can refer to this one as …
1. The ‘Sys.*’ naming convention
And the other two ways are….
2. ‘NameMapping.*’ naming convention
3. ‘Aliases.*’ naming convention
All are legitimate ways to refer to objects in your scripts. We’ll talk about the other 2 (Namemapping and Aliases) in later modules. Grasp this first method and understanding the other two will come quiet easily.