We made our way through Module 4 which covered the fundamentals of managing projects. Now we move on to look at some of the important options and settings you’ll find in TestComplete.
When it comes to options and settings in TestComplete there are 4 distinct areas you need to know about. These areas are:
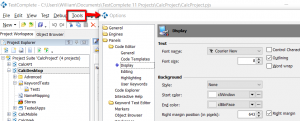
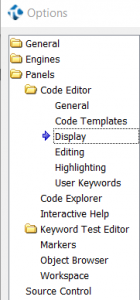
Options: [Click ‘Tools -> Options’ in the TestComplete menu bar] the settings that configure how TestComplete works and operates. These are like global settings that affect your general usage of TestComplete. They are independent of projects so that the options you select will apply regardless of the project that is open.
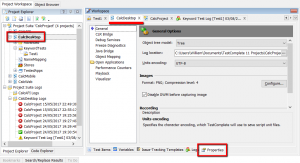 Project Properties: [double click the ‘Project’ node in the Explorer then select the ‘Properties’ tab at the bottom of the Project Workspace] these are settings that apply ONLY to the project that you are setting them for. So each project you open will have the same set of properties but you can set the values independently for each different project.
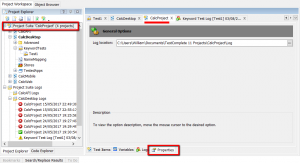 Project Suite Properties: [double click the ‘Project Suite’ node in the Explorer then select the ‘Properties’ tab at the bottom of the Project Suite Workspace] these are settings that apply ONLY to a Project Suite (remember that one Project Suite can contain one or more Projects). Each project suite will have the same set of properties but again you can set the values independently for each different Project Suite.
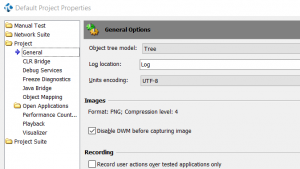 Default Project Properties: [click ‘Tools -> Default Project Properties’ in the TestComplete menu bar] when you create a new project it picks up a set of ‘default project properties’. It’s the same set of properties that every project contains. You can just think of the ‘Default Project Properties’ as the template that every new Project bases it’s initial Project Properties on.
That’s the four different areas of settings, properties and options you’ll find within TestComplete. In the next few paragraphs we’re going to highlight the most important of these. There are literally hundreds of others that we don’t mention here, but the ones we do mention are the ones you’ll find yourself coming back to time and time again.
General/Project/Default Language: The language used in new TestComplete projects by default. Usually set to something like Python, C# or JavaScript.
Engines/Log/Activate after test run – Automatically opens the test log tab when a test run finishes. Switch this off if you get annoyed at always been shown the log file at the end of a test run.
Engines/Log/Open logs in the same panel – un-select this and TestComplete will open every Log file in a new tab. Usually best to keep this option on so that TestComplete only displays one set of logs at a time.
Engines/Log/Show Log on pause – if you’re in the middle of a test run and pause the run this option allows you to display the log file during the pause.
Engines/Log/Store all logs – You can get TestComplete to delete some log files automatically (useful as they do tend to build up). Or alternatively you can opt to keep all your log files and delete them manually when you don’t need them.
Engines/Name Mapping/Update Name Mapping during test run – if TestComplete cannot identify a mapped object during the test run then it’ll try to add an entry automatically
Engines/Name Mapping/Map object names automatically – Automatically generates custom names for objects that you are working with where they have not yet been mapped.
Engines/Name Mapping/Use extended find when possible – tell TestComplete to look down through the hierarchy of objects if it can’t find an object at the level it first expects to find it at.
Engines/Recording/Automatically add applications to the Tested Applications list — automatically add applications started during recording to the Tested Applications list of your project.
Engines/Recording/Always start a new test – start a new keyword test or script routine when you initiate recording by selecting Record Keyword Test or Record Script on TestComplete’s toolbar or main menu.
Engines/Recording/Real-time mode – record the actual time intervals passed between user actions and insert them into the recorded test as the Delay operations
Engines/Recording/Record text input into simple editors as – TestComplete can enter text into your application in two ways. Keys which simulates you typing in the object. Or just setting the text property of the object. Pros and cons to both (which we’ll discuss later). If in doubt chose Keys.
Source Code Control – This allows you to configure integration with source code control tools like SVN and Git. Thus you can make sure all your project artefacts are maintained in a controlled manner. Check out on open, Check in on close, Bind new items to SCC, Show provider messages and SCC provider all options you can configure.
General/Record user actions over tested applications only – Make sure TestComplete only records actions on applications that are in the tested applications list.
PlayBack/Stop on error – Execution will end the moment an error condition is encountered and an error message written to the TestComplete log file
PlayBack/Stop on warning – Execution will end the moment a warning message is encountered and a warning messages written to the test log.
PlayBack/Error dialog – If this option is enabled, TestComplete will ask whether to stop the test run on critical errors.
PlayBack/Disable mouse – Disables the mouse before playing back script. Pressing Ctrl + Alt + Del enables the mouse.
PlayBack/Auto-wait timeout, ms – Milliseconds to wait for an expected object to become available, or for an unexpected window to close, before posting a timeout error.
PlayBack/Delay between events, ms – Milliseconds of delay between each command during execution.
PlayBack/Key pressing delay, ms – Specifies the number of milliseconds between each key press event.
PlayBack/On unexpected window – What to do if an unexpected window shows up during play back (options include Ignore unexpected window, Stop execution, Click on focused control, Press Esc or Press Enter).
The only option found here currently is the definition of the location that TestComplete should write the Project Suite execution log files to. Not really worth worrying about as the default setting here is rarely changed.
As already mentioned these properties include settings that are used by default for new projects and project suites created in TestComplete. The key settings and possible values are the same as discussed in above under Project Properties.
These are the core properties and settings that you’ll find useful when you start out with TestComplete. It’s worth becoming familiar with these as they will help you run your project smoothly. There are lots more to discover but stick with these to start with until you’re ready to go further.