On to tags and branching then. Tags allow us to give a more human-friendly name to a specific revision of our folders/files. Branching gives us the capability to create a copy of the folders/files in our repository and have a different copy to work on – without fear of corrupting our main copy.
As you’ve probably already grasped every time you commit a changed file to the repository SVN gives the repository a new, incremented by 1, revision number. In a reasonably sized project, over a year or two, it’s not long before those revision numbers get into the thousands or even tens of thousands. So you’re likely to get to the point where you have a stable set of files that you know are in good shape and the SVN revision number might be r2343. Not easy to remember. So we can use SVN’s tagging feature and tag that same revision with the tag v1.2 Far easier to remember and in line with the version number we could be using when we release our software.
Branching is one of the core features in SVN that allows us to work on a different instance of the files the files that are contained in the repository. Say you have a set of files in your repository that is working perfectly. They’ve been released into a production environment and nobody wants to risk changing anything just in case you break something.
Along comes your end user who says wouldn’t it be great if we could add some functionality to support X, Y, and Z. You and your team think pulling together a prototype version for this functionality would be a great idea. Your team wants to work together and collaborate on this so you want to continue using SVN for this new work. However, you don’t want to contaminate your existing repository (with all the working code) with a new prototype code that won’t work for some time.
What you need is a new copy of the files in your repository that you can make changes to without affecting the existing repository. Thinking ahead though you will want, at some point in the future, to combine this new prototype code with your existing working code.
These concepts of Tagging and Branching are explained in detail below. However, to support these capabilities we’ll need to prepare a new repository first.
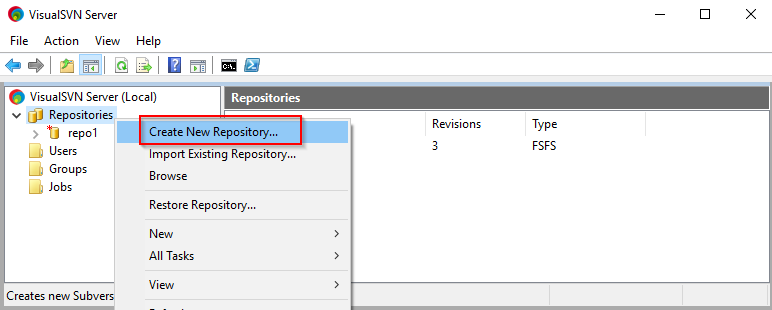
Lets prepare that new repository so that it’ll support a trunk, branches and tags. Head back to the VisualSVN server app and select create new repository:
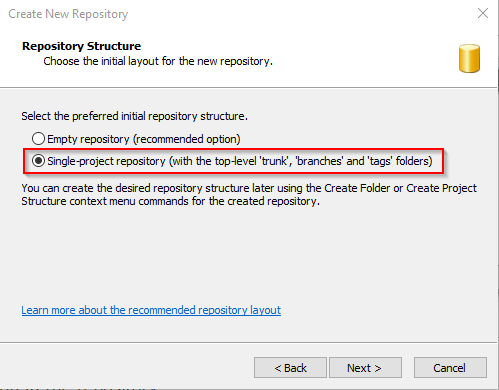
Follow the prompts, calling the repository something creative like ‘repo2’. Just make sure that on the ‘Repository Structure’ dialogue select the ‘Single-project repository option…
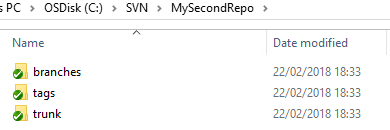
Note that we’re creating a repository here with Trunk, Branches and Tags folders. This is what gives us and SVN the capability to manage multiple instances of the same code/files. So, after you’ve created the repository you should have something like this on your Visual SVN Server…
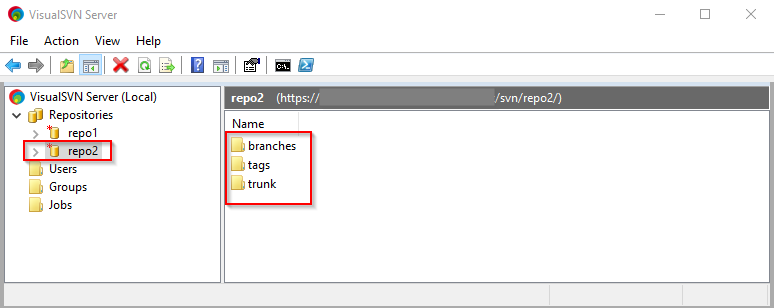
Now we have a repository with the required starting structure. Folders to contain the different types of file collections. Trunk to contain the project files that are stable that we don’t want to interfere with. Tags to contain sets of files that have been tagged with a label relating to a specific ‘revision’ (more on this later). And ‘branches’ where we’ll a separate instance of our files where we can work on our new prototype functionality.
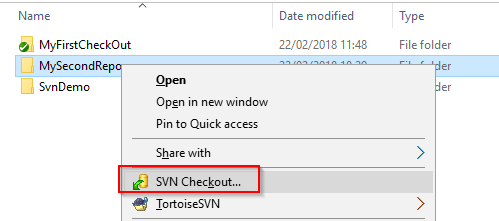
At this point we can check out the contents of the repository (which doesn’t actually contain any files yet) on to our local machine. So create a top level folder on your local machine:
Right click on the folder and select ‘SVN Checkout’…
And on the check out dialogue enter the URL of the repository (remember you can get this from the Visual SVN server). Defaults like ‘check out directory’ and revision should be left as they are.
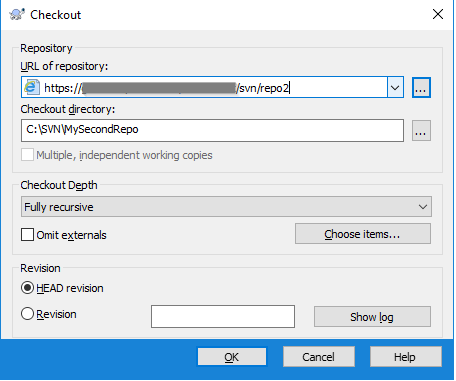
Your specific directory paths and URLs may differ slightly but we’re checking out the contents of ‘repo2’ to the new directory you’ve just created on your local machine. Now we’ll have the subfolder structure with branches, tags, and trunk from the checkout.
And now we’re ready to create some files and folders in the ‘trunk’ subfolder and check those in. It’s IMPORTANT that you create them in the ‘trunk’ subfolder like this:
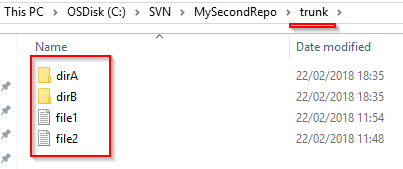
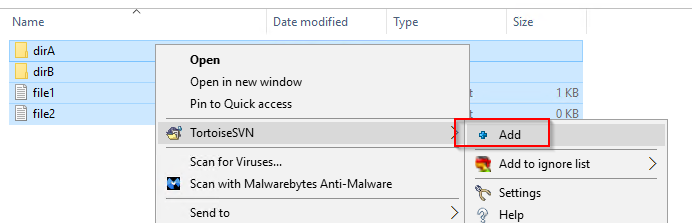
Doesn’t matter what you create in that directory… it’s just important that you do create the files/dirs in the ‘Trunk’ subdirectory. Now we need to tell our SVN system about these new files/folders and then commit those files and folders into the repository. Add the files/folders first…
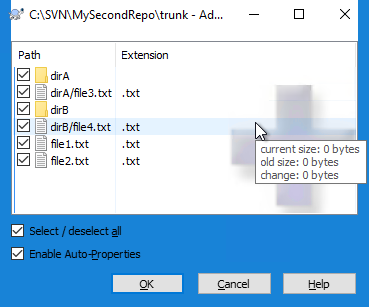
Confirm the files you need to add…
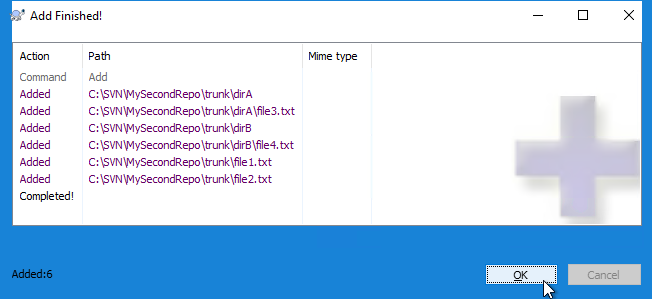
Accept the confirmations…
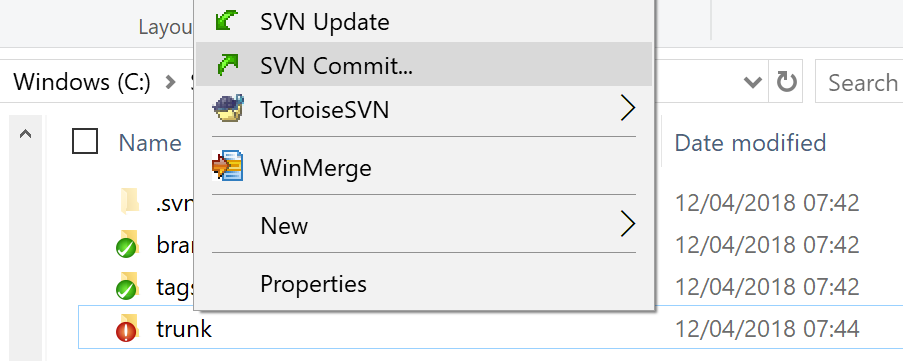
Then commit the files to the repository, adding a commit message as you walk through the commit dialogue boxes…
Once you’ve completed the commit we’re ready to start looking at adding branches to our code.
A branch then is a copy of the main code within the same repository. Essentially a separate set of files that you can work on independently. In the next section, we’ll look at the steps you take to create and use a branch.
Branching consists of 4 steps:
1. create and prepare the repository so that it supports a trunk and branches
2. check in your files and directories to the repository trunk
3. create the branch based on a set of files at a specific revision
4. check out the branch
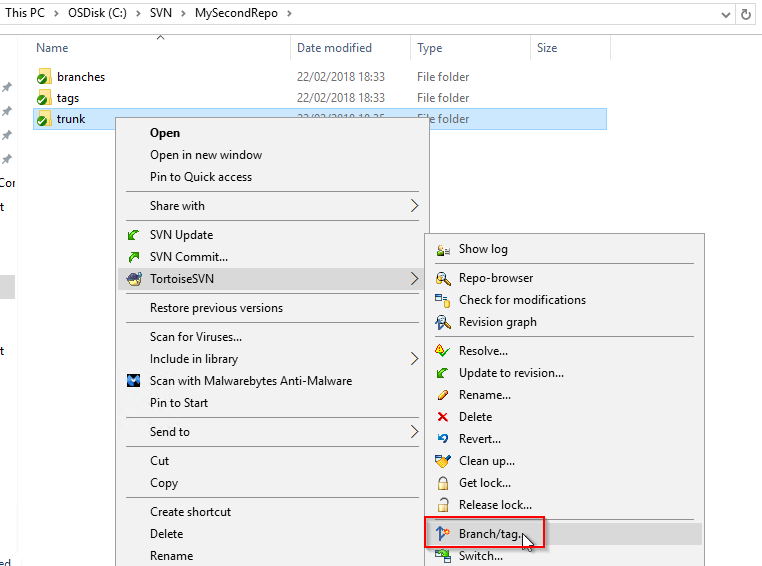
As we’ve completed steps 1 and 2 already we’re now ready to create our first branch. We’ll need to select the code we want to copy and make a branch of. We’ll bring up the Tortoise SVN context menu and select ‘Branch/Tag…’. This will allow us to create a copy of our code and place it in either the ‘branches’ or ‘tags’ subdirectories (‘branches’ in our case).
In the “Copy (Branch/Tag) dialogue box we’ll already see the correct ‘From WC/URL’ set but we’ll need to update the ‘To path’ so that it shows the ‘/branches’ directory. click on the ‘Elipse’ button for this and select ‘/branches’ directory. Then specify the name you want your branch to be called.
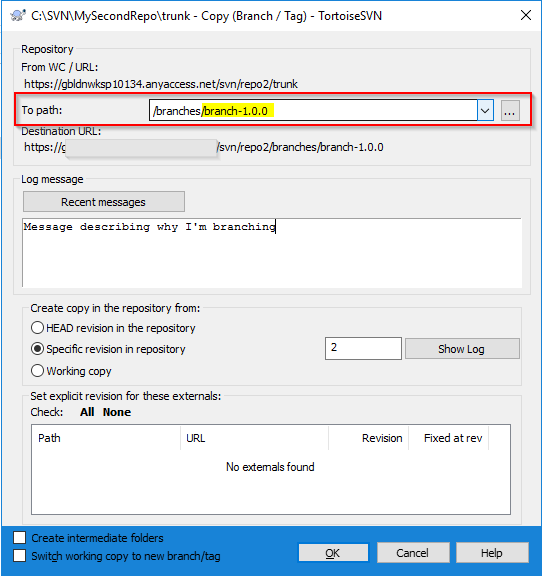
You can add a message if you like and select a specific ‘revision’ of the files in the repository. Once you’ve clicked on OK you’ll see the confirmation window.

From this, we can see that we’ve finished creating our copy as a branch. We’re warned that what we have as our working copy (which is what we’ve just copied) is still a representation of the trunk and NOT the branch. So any changes we make locally and check-in will be against the trunk and won’t be committed to the branch if we check them in.
What we need to do, if we want to work on our new branch, is either switch or check out a copy of the branch code from the SVN server. We’ll opt for the checkout.
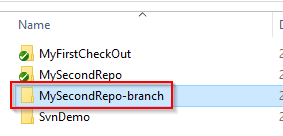
To check out this branch then we’ll create a new subdirectory in our workspace. In the example below, we’ve created ‘MySecondRepo-branch’…
Then we’ll check this new branch of the code out into this folder. Right click and select ‘SVN checkout…’
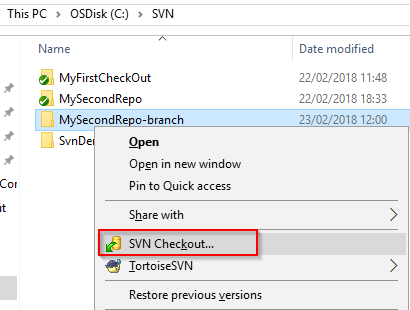
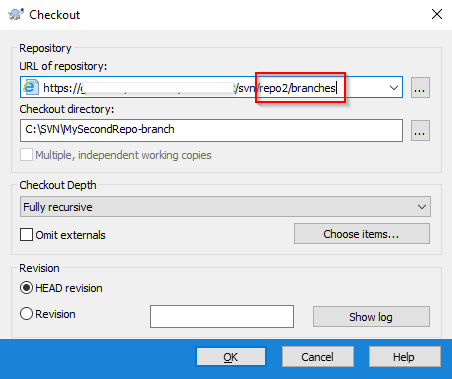
It’s the next part that’s key. We need to make sure we’re checking out the branch, so the URL specified needs to reference the branch. You’ll see in the example below the end of the url specified svn/repo2/branches
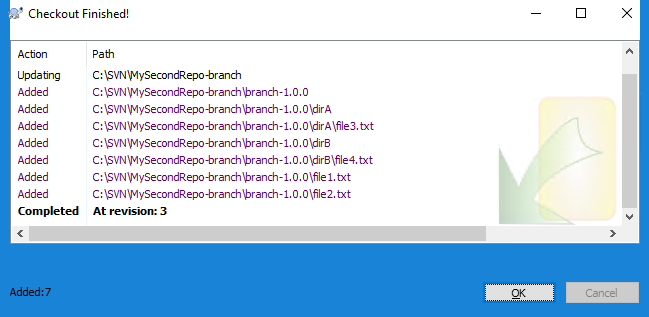
And once this check out has completed you’ll see the finished log showing the files checked out from the branch and the revision that branch is labeled as:
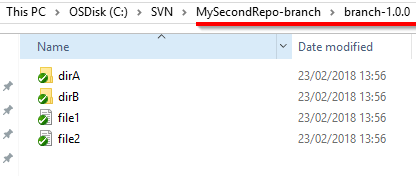
And we’ll see the new files checked out contained in the subdirectory ‘branch-1.0.0’
From here the concept of modifying and checking in code is exactly the same as we’ve seen previously when using code checked out from the Trunk. You make changes to your branch-1.0.0 instance of the code. You can commit those changes back into the repository (in the branch).
When you get to the stage where you’re happy with your prototype work that’s on the branch you’ll want to look at merging the changes on the branch into the Trunk (where your stable working version of the code resides). Essentially you’ll want to combine both sets of code and promote your working prototype code into the main stable version of the code.
Now we’re ready to give our code a tag. Essentially a more user-friendly label to a set of our files residing in the repository at a certain point in time. First then lets take a look at our local copy of the repository files and see what revision number SVN has given them.
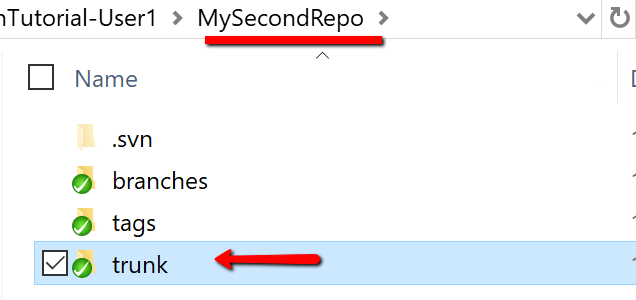
Find the ‘Trunk’ folder where you created your original set of files and committed them to the repository. For example…
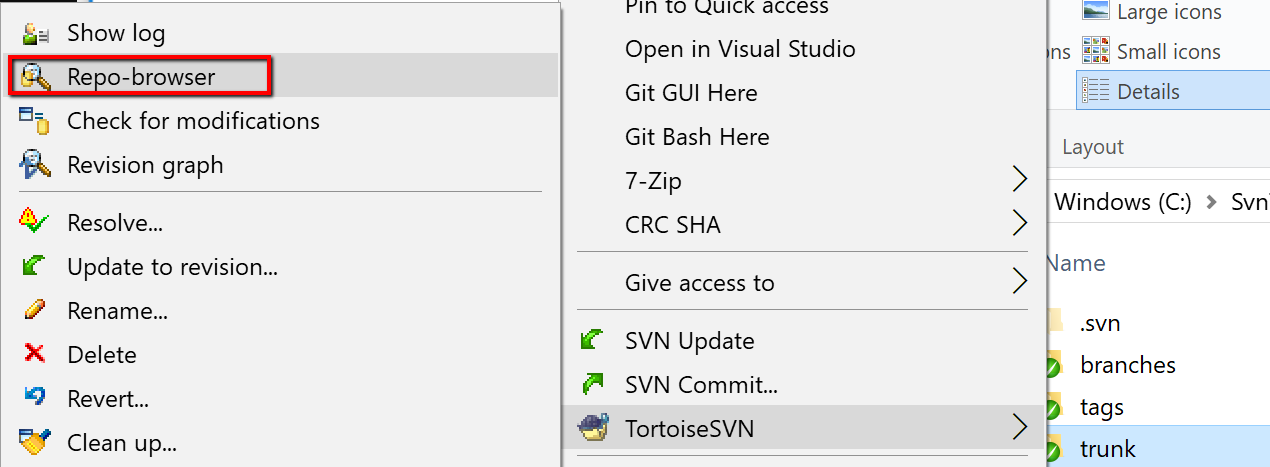
Then right-click the directory, select Tortoise SVN and then ‘Repo-Browser’
The dialogue box you get presented with should default to the repository you’re using (if not go to your Visual SVN server application and copy the repo url again).
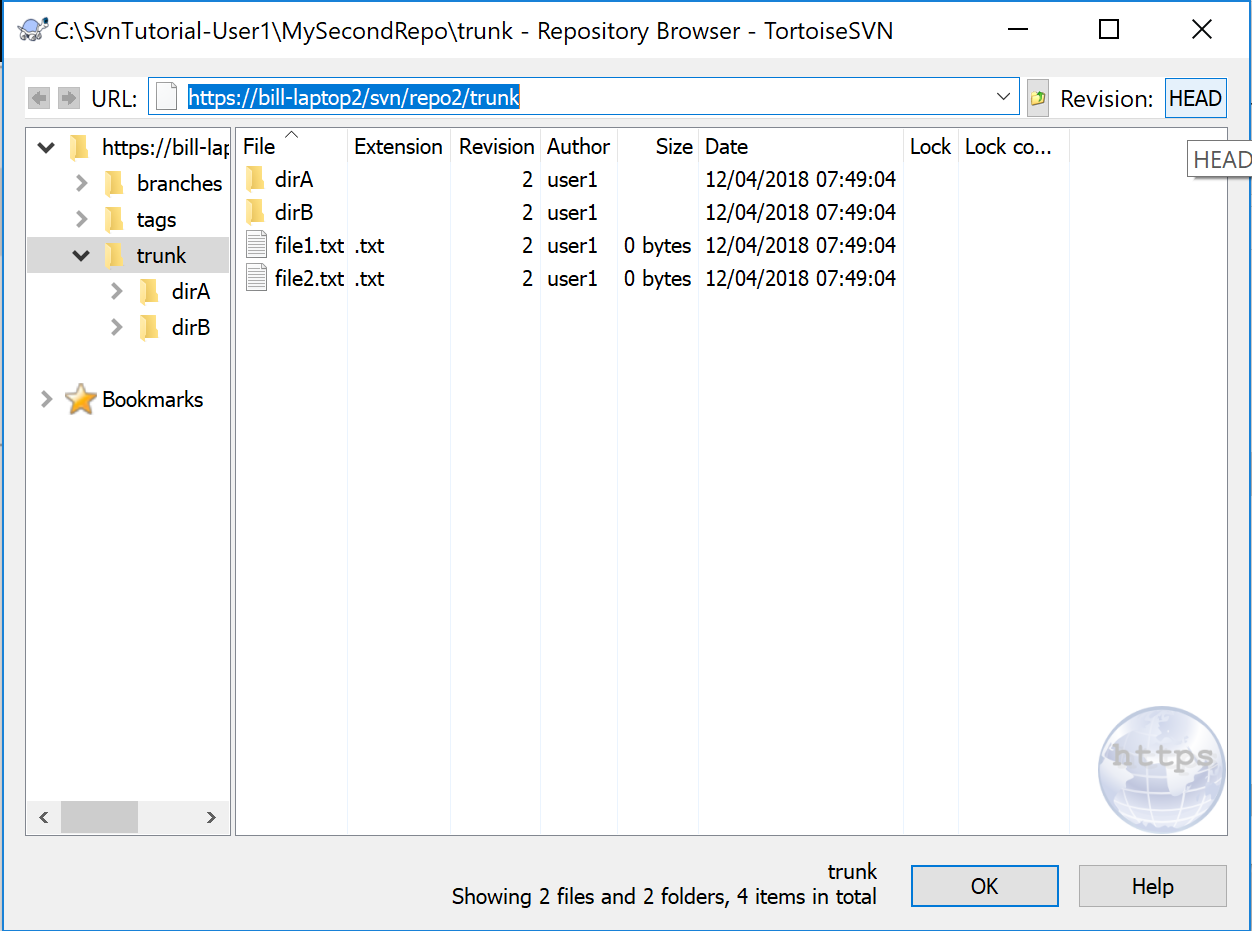
What you see here is the revisions of the individual files and the revision of the whole trunk part of the repository (if you hover your mouse over the ‘HEAD’ button you’ll see the main revision number). What we need to do is tag this particular revision so that it has a more user-friendly number/name that we can refer to.
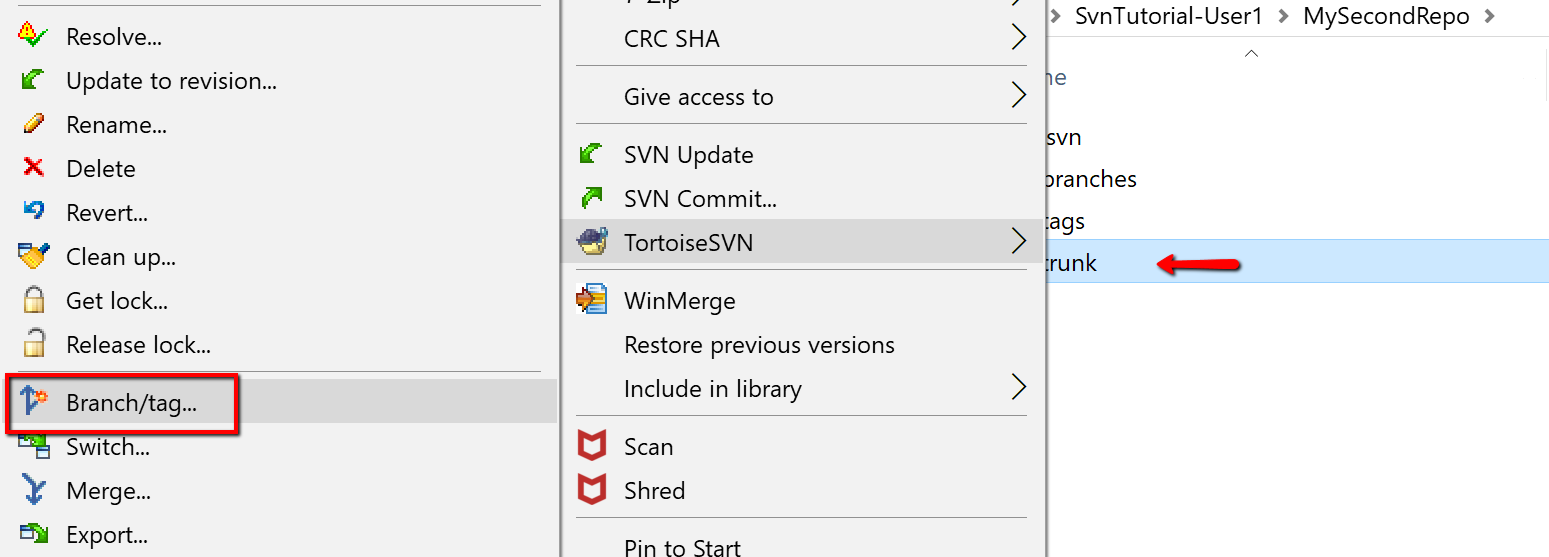
Right click on the ‘Trunk’ folder (we’re tagging the latest revision of the files in the Trunk – not the branch). Then select ‘Branch/Tag…’ in the Tortoise SVN submenu.
What we do with this Branch/Tag dialogue box is key now. Essentially Branching and Tagging are the same things in SVN’s eyes. We’re just creating a copy of the files at a certain point in time for a certain revision of the files. The different between Branching and Tagging is only that the completed copy is either to the ‘branches’ folder or the ‘tags’ folder in the repository.
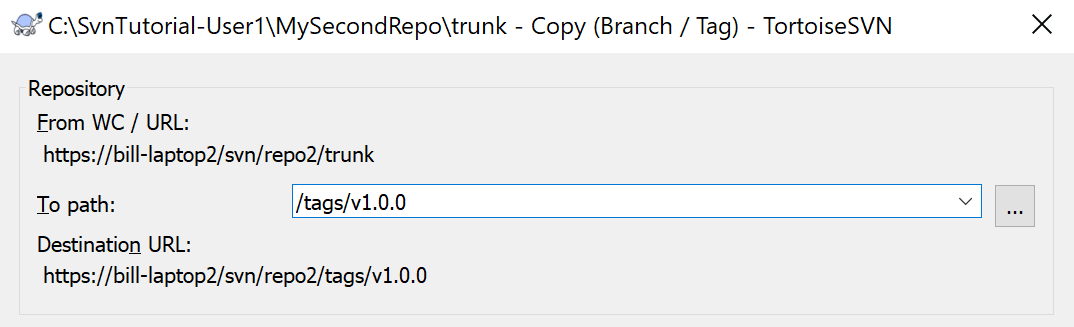
On our dialogue box then (the top part) we’re copying from our ‘trunk’ directory to our ‘tags’ directory. If you click on the ‘…’ button you can change the destination from ‘/trunk’ to ‘/tags’ like this…
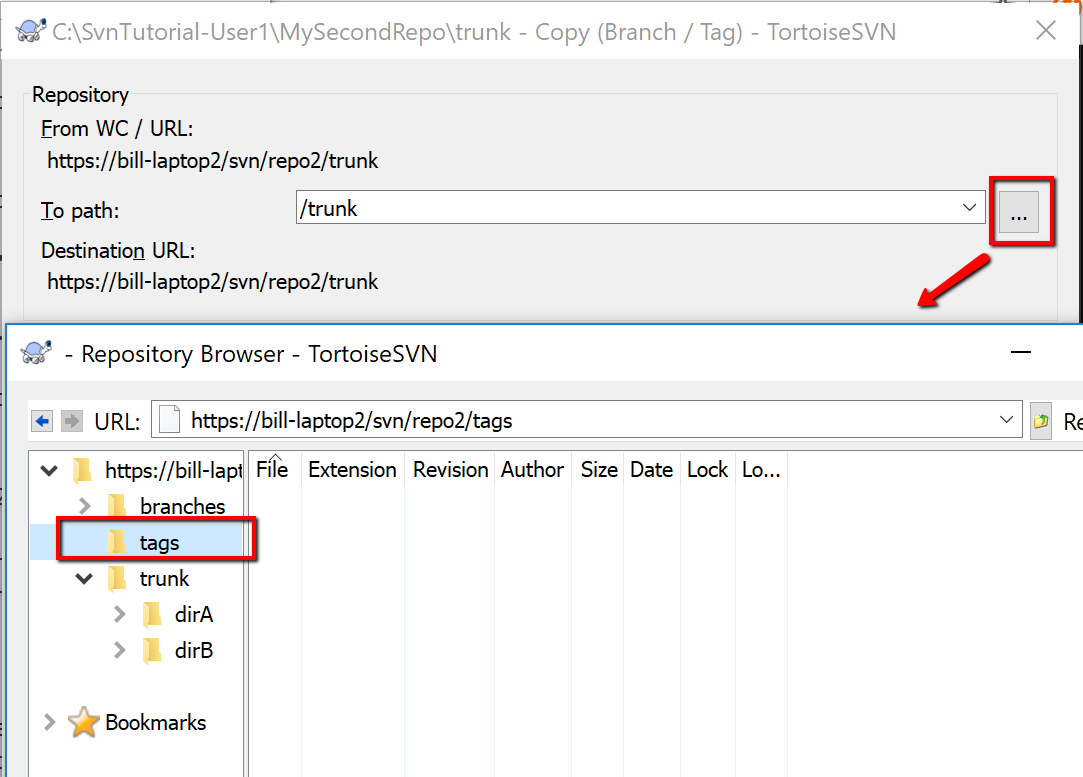
Then we need to append our Tag name to this ‘To path’ value. So we can add something like ‘v1.0.0’ in here like this…
Add a log message and make sure you pick the current revision of the files that you want to tag. The revision number should default to the latest revision with ‘Specific Revision in Repository’ selected already.
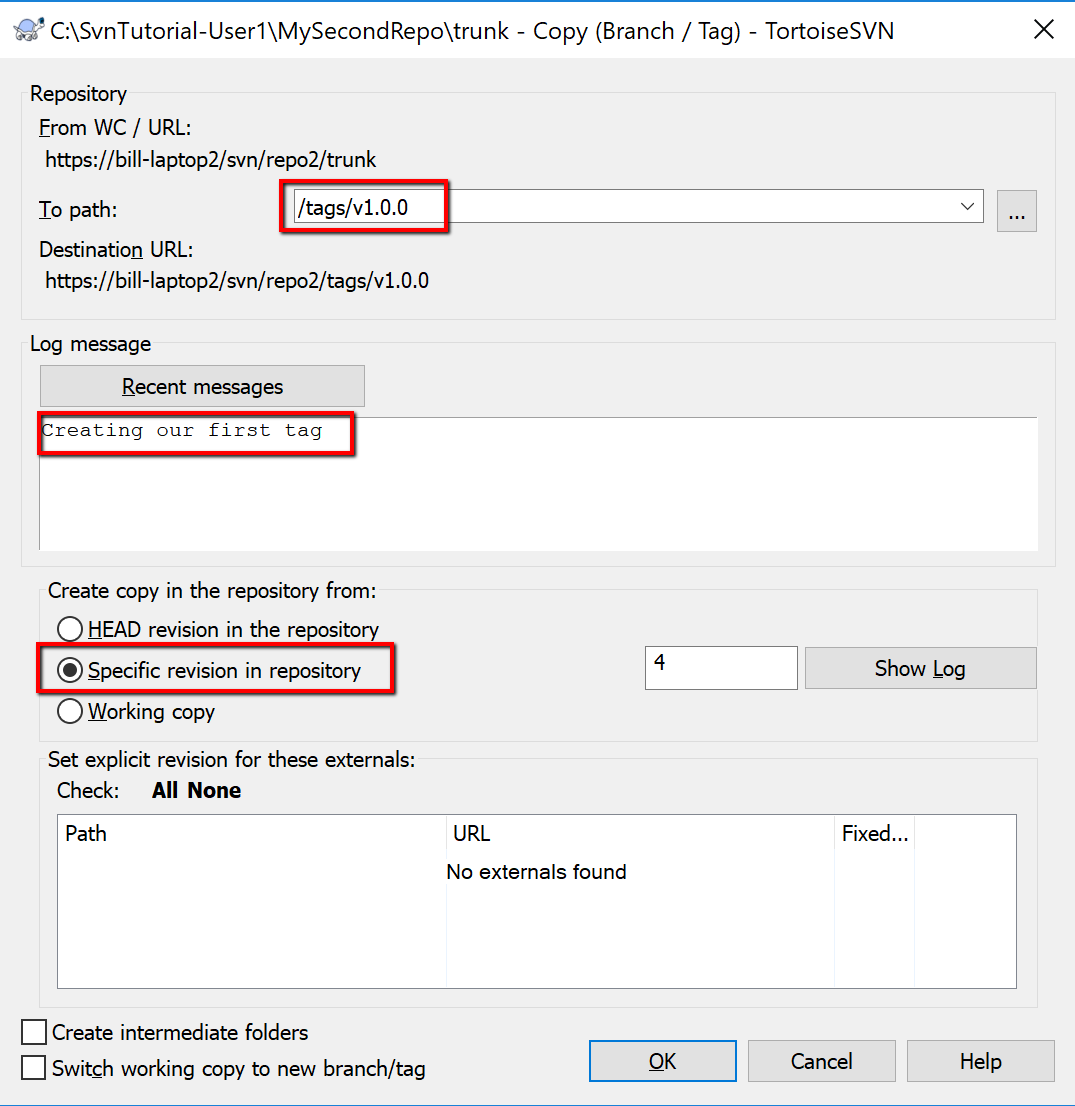
At which point you should see the confirmation dialogue box showing the completion of the tag operation:

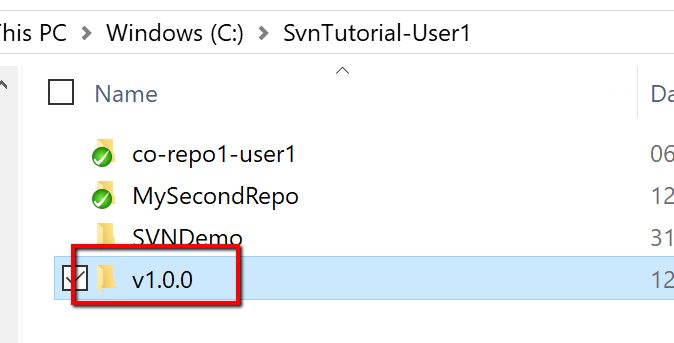
After clicking okay on what we can do is check out that ‘tagged’ revision of our files into a new directory. So we’ll create a new subdirectory at the top level in our workspace and give it the name of the tag we used earlier (e.g. v1.0.0)
Then right-click on this directory and select ‘SVN Checkout’
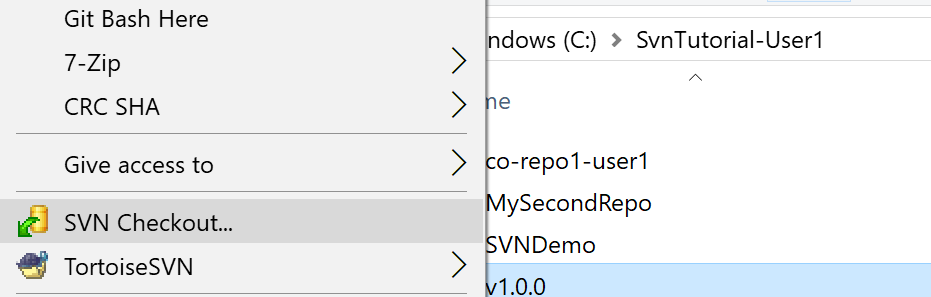
On the check out dialogue box, we’ll want to select the specific tag path within our repository. So click on the ‘…’ button for the ‘URL of repository’ section. Then in the Repository Browser make sure you select the tag name directory for the tag you created earlier.
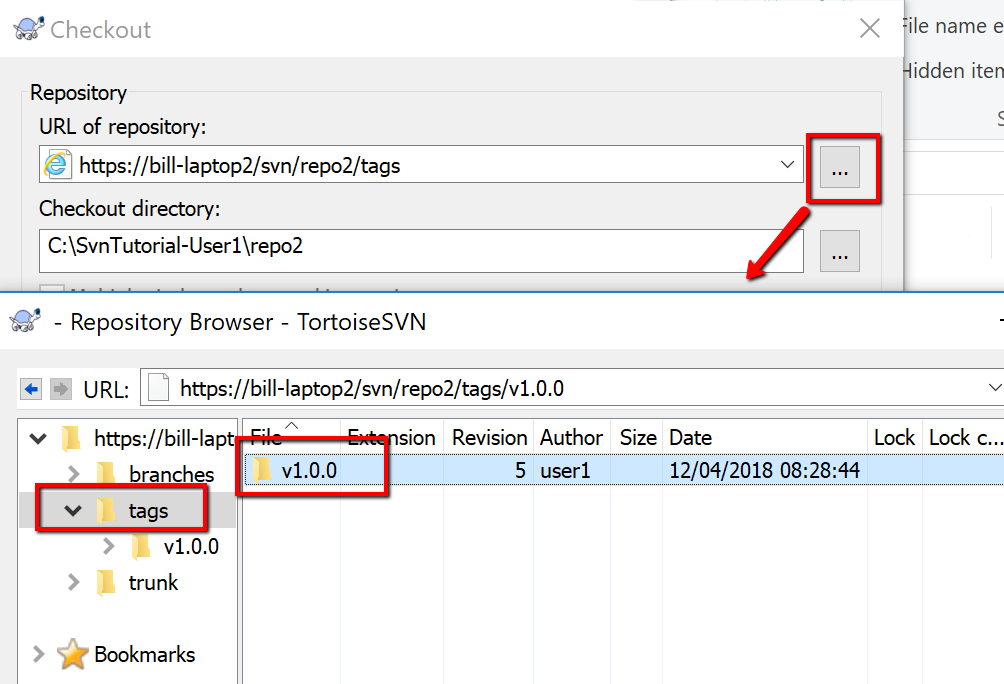
At which point you should have something like this…
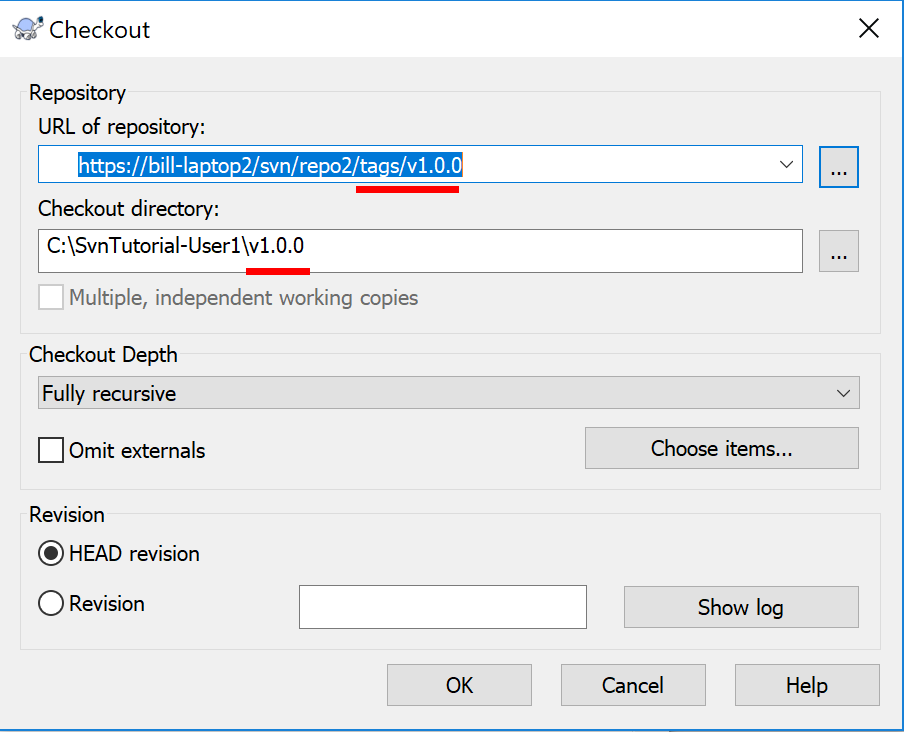
Which means we’re checking out a set of files from our repository that have been tagged with the name ‘v1.0.0’, and we’re checking them out to our subdirectory on our local system called ‘v1.0.0’. Click on OK and you should see the confirmation message that the check out has finished…
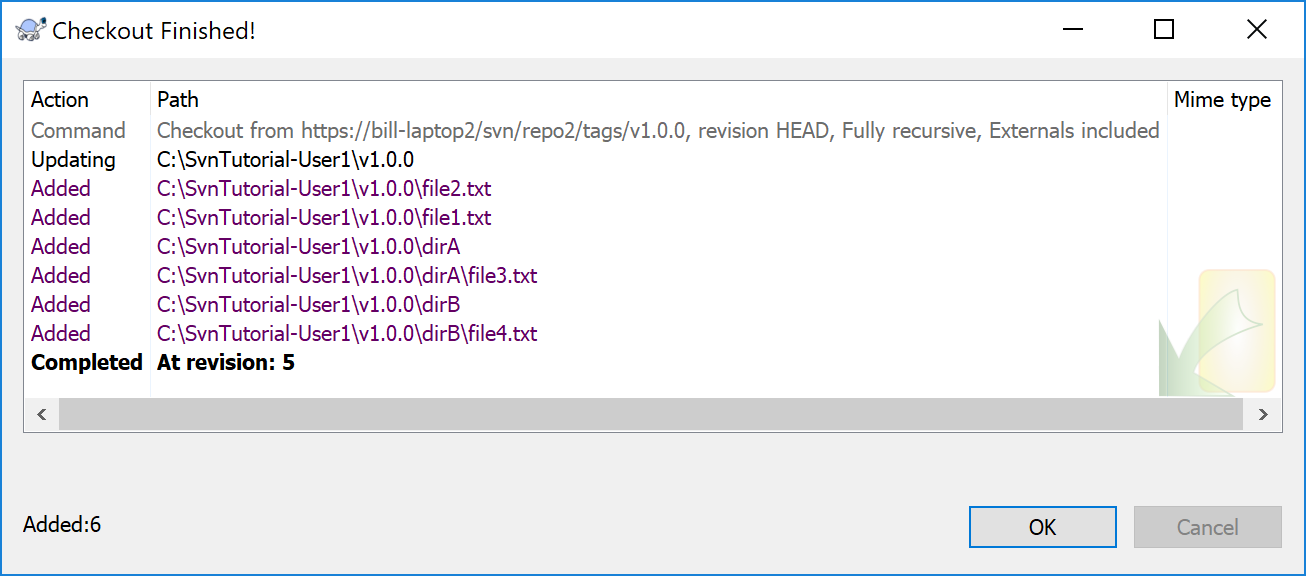
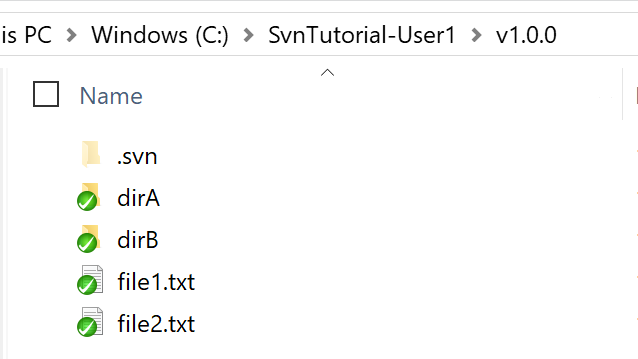
When you acknowledge this (click OK) and look in the ‘v1.0.0’ local directory you’ll have the set of files that relate to the revision you gave this tag too.
Now, regardless of what you do on the Trunk or any of the branches, if you check out this Tagged set of files you’ll always get the same revision of the files. A crucial capability if you want to be able to revert back to a known set of files at any point.
There’s a lot to branching and tagging. Branching especially. Branching can get very complex particularly when it comes to managing multiple branches and then merging code back into other branches. Hopefully, the basics we’ve covered here will get you started and help you grasp the main concepts. If you have grasped these concepts then it will put you in a good position to either start managing your own code with SVN and/or even joining an existing project that’s been using SVN for some time.