We covered Projects and Project Suites in our last module. Next up then we have Checkpoints and Stores. Checkpoints to check something at a point in our test execution. Stores to store things. Obvious really.
There’s no point in building out these projects and keyword tests if you don’t have some way of checking the expected results against the actual results you see. Check points do exactly that.
You can think of check points as the manual testing equivalent of defining your expected results and then checking what actually happens against them. The result being either a pass or a fail.
The Stores component in TestComplete is linked in quite closely with check points. Essentially the TestComplete Store is a place to keep some of those expected results.
For example you can keep images in your Store to do comparisons against when you run a test and call the check point. You can keep details about objects (like a list of the objects properties) and compare these properties during test execution against a baseline stored in the Stores.
Both of these concepts, Checkpoints and Stores, we’ll cover in this module. To start with though lets see how we can create a checkpoint and examine some of the different types of check points.
First off then lets look at how we create Checkpoints. There are two ways to do this:
1. As part of the recording process
If we go back and use one of our existing test cases we can use the append to test recording feature. We’ll append to the end of the test…..
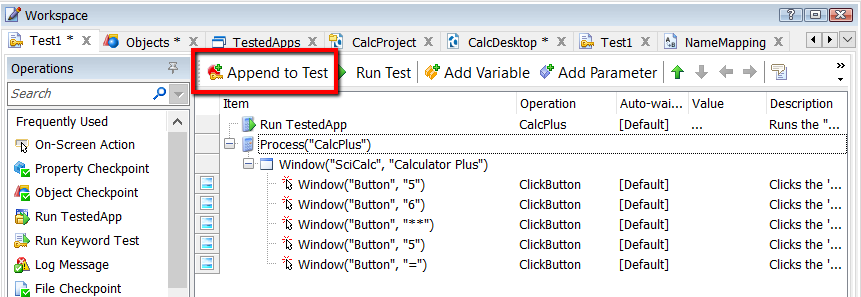
Then as part of the recording we use the Checkpoint button in the recording bar
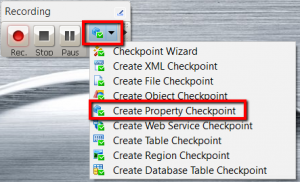
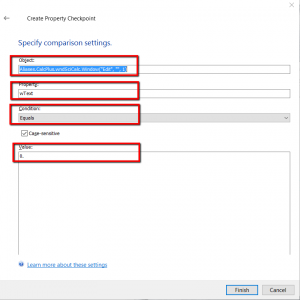
This presents us with the wizard for creating the property check point. Here we’ll specify the object we want to check, the property of that object we want to check, the expected value of that property and the condition it needs to meet.
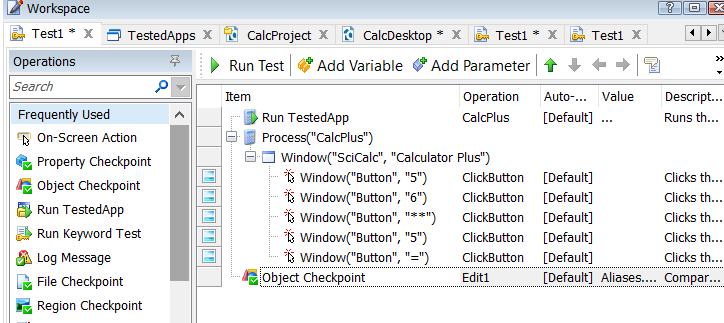
In the test this gives us the Property checkpoint test item:
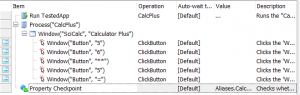
When, during the test execution, we get to this test item it’s here that TestComplete takes the object, property, value and condition and compares what we record with what is seen during the run. If everything matches then the checkpoint passes. If anything doesn’t match we get a fail.
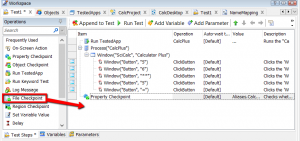
2. Using the Operations panel
The other approach to creating Checkpoints is using the operations panel. You can select a Checkpoint type from the operations panel and drag it on to your test case.
Once you’ve done that you’ll be taken through the Checkpoint wizard screens where you can specify the object, property, value and condition for the Checkpoint. Remember though that you’ll need your application under test open, with the specific object visible if you’re going to complete this process.
So what Checkpoints do you have at your disposal? And how best are they used? Well the most important, most commonly used ones are listed below for you.
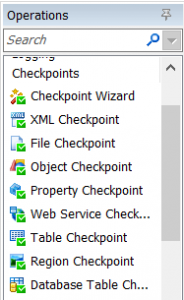
XML Checkpoint – allows you to define and save a base line XML file along with details about the parts of the xml file you want to compare. Being able to mask out parts of the comparison xml allows you to get quite creative with what you need to check for.
File Checkpoint – allows you to define and save a base line file. TestComplete can compare files. You can specify text files (along with a tolerance on number of bytes differences) or just do a direct like for like comparison if it’s a different file format.
Object Checkpoint – allows you to save property details about an object in the TestComplete store. Then on test replay compare the stored properties against the actual properties at run time. Again you get to select the properties you want to store and do the comparison on.
Property Checkpoint – this one only saves and checks one particular property of an object. Slightly different to the Object checkpoint where you can select a range of properties to check but you’ll find most of the time you only need to check one property. So this ones quick to setup and work with.
Region Checkpoint – this is the only check point that allows you to compare images. It comes with some clever features allowing you to mask areas of the image you want to compare and the capability to set some tolerances. We don’t recommend using image checkpoints (just because the whole concept of comparing images is a difficult one) but this is a good choice if you have no other options.
Those are the most important checkpoints. You may come to use Table, Database and Web Service checkpoints over time. The five we’ve outlined above will get you started though and support you for the majority of your test cases.
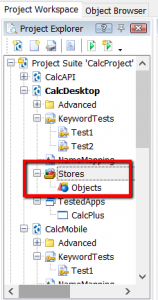
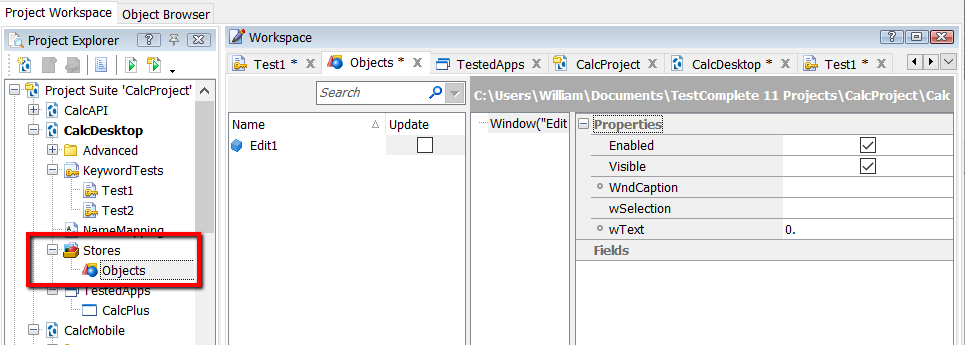
What you might have grasped though is that many of the checkpoints depend on having objects, images, properties etc saved in the TestComplete store. The Store entity in TestComplete can be thought of as a repository for other test items that aren’t your typical Keyword tests or scripted tests. It’s designed to hold objects like files, images, database connections, table data and xml data. It’s not just for objects related to Checkpoint expected results. It can be used else where in your test cases and scripts too.

To add new entities to your Stores you’ll first need to add particular Stores sub containers. You can do this by right clicking on the stores node and selecting ‘Add’. And from there in the dialogue box select the type of Item you want to store.

This will add the item type node to the Project Explorer under the Stores node.
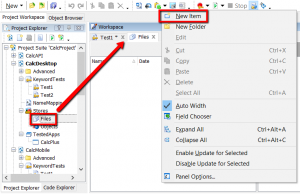
From here you can double click on the object type node (in project explorer) open the work-space. In the work-space you can right click to add new objects and view/modify existing objects.
So you’ll either add items to the stores automatically as you create Checkpoints or you’ll add new objects manually to your store following the process above. When you create Checkpoints you’ll identify objects in the stores as part of the process.
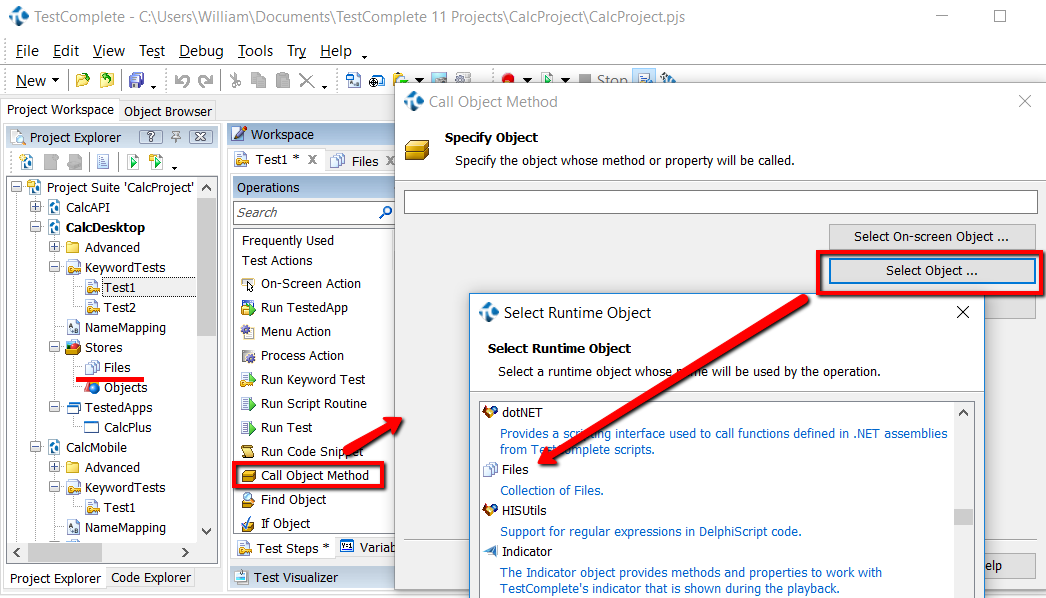
But you can also use objects from the stores as you create test steps. Many of the operations you add to your tests will allow you to select and act on Stores objects. For example the ‘Call Object Method’ operation gives you this wizard that allows you to pick objects such as Files, DB connections, etc (e.g. object types found under the stores node).
We’ve covered the topic of comparing expected and actual results in this modules. As part of that we’ve touched very briefly on the fact that the results from these comparison are displayed in the test logs that are generated in the test execution runs. In the next module we’ll look at these test logs in more detail.