We’re going to continue with our look at how to combine manual and automated tests with QAComplete and TestComplete. We’ve already seen how to install and configure the Test Agent which connects QAComplete and TestComplete. Now we look at how to setup automated tests and execute them.
You will need to configure the Test Manager Agent on the TestComplete clients machines before you follow these steps. More on this in
Bringing Manual and Automated Tests Together
Checking That Automation Hosts Are Available
At this point we should have the agent installed and running on the TestComplete client machine. This process should show in Task Manager on the TestComplete machine as
TestManagerAgent - Test Manager Agent
You can also check in QAComplete that the TestComplete host is available by viewing the ‘Test Hosts’ records.
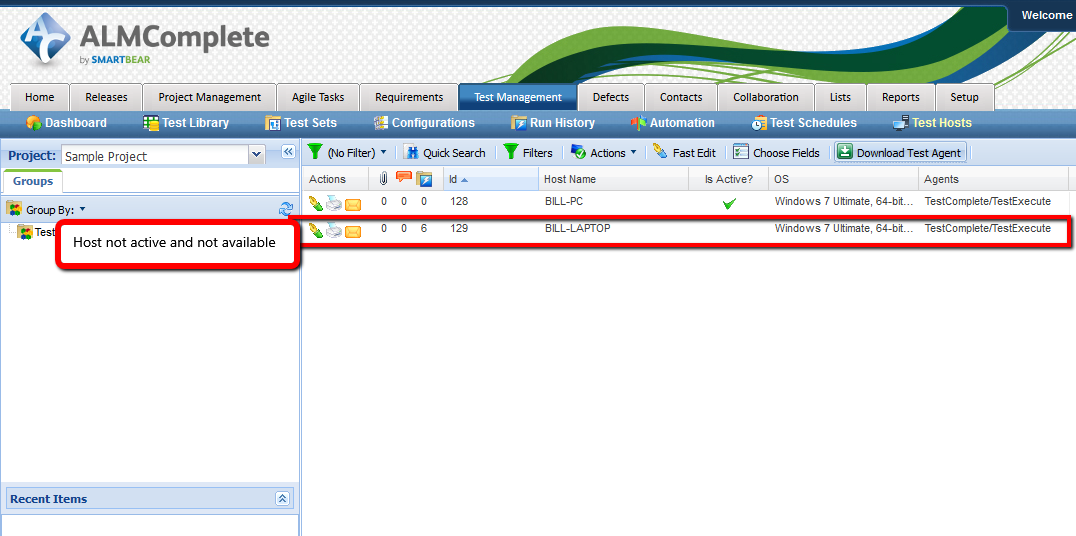
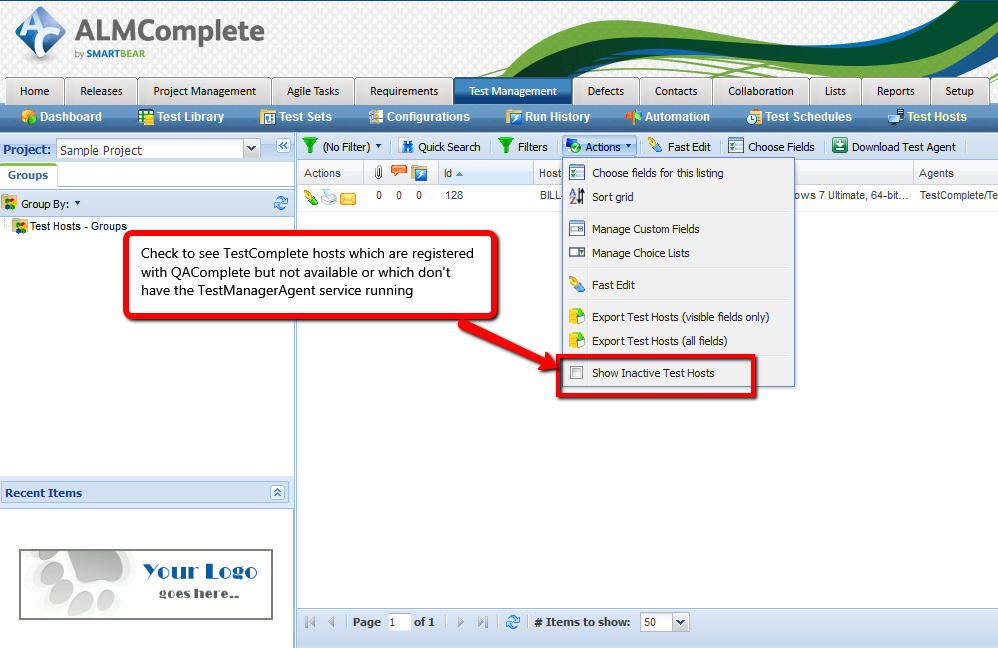
Note that if the host isn’t listed at all you may need to enable the ‘Show Inactive Test Hosts’ option.
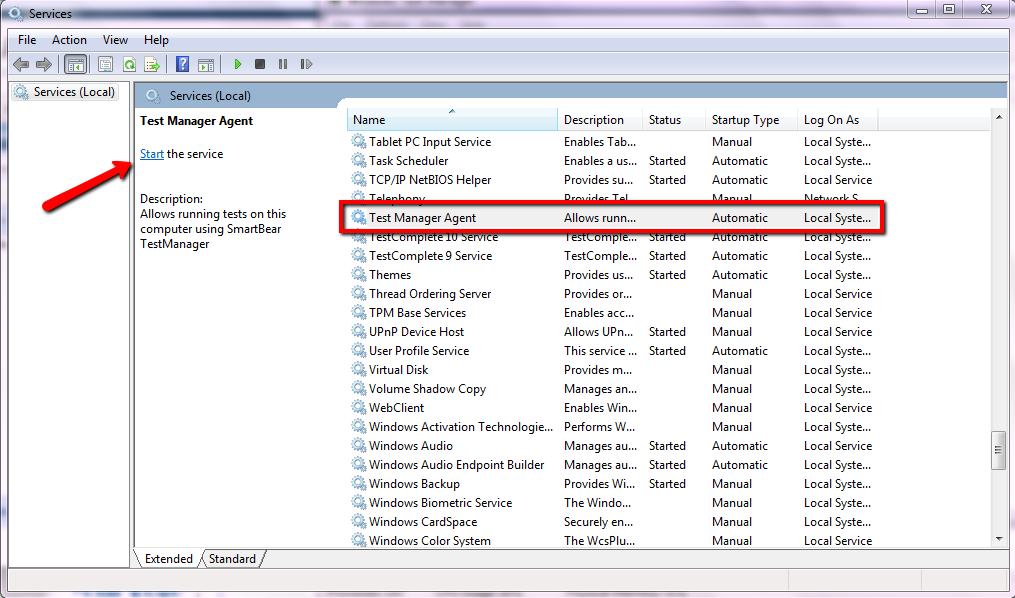
If the host isn’t active then you’ll need to start the service on the TestComplete machine. On the TestComplete machine Press Ctrl+Shift+Esc to display task manager and then click on the ‘Services’ tab followed by the ‘Services’ button. In the Services window click on the ‘TestManager Agent’ service and start the service.
If you have a lot of virtual machines running TestComplete (along with the ‘TestManager Agent’) then this ‘Test Hosts’ view in QAComplete is a really useful view. It lets you to see which virtual machines are active and available for you to run your tests on.
Creating An Automate Test
Now that our Test Hosts are ready we can start to add automated tests to QAComplete and then execute those tests from QAComplete. This is a 4 stage process.
- Package up the TestComplete project suite
- Define the Automated Test in the QAComplete Test Library
- Execution of Automated Tests – standalone
- Exeuction of Automated Tests – as part of a Test Set
Package up the TestComplete Project Suite
Key to this step is packaging up the TestComplete project suite. Note that this works only at the project suite level. You can’t zip up just the projects. It must be the whole project suite. To zip the project suite up follow these steps:
i. make sure you’ve defined the ‘Test Items’ you need and enabled them within your TestComplete project(s).

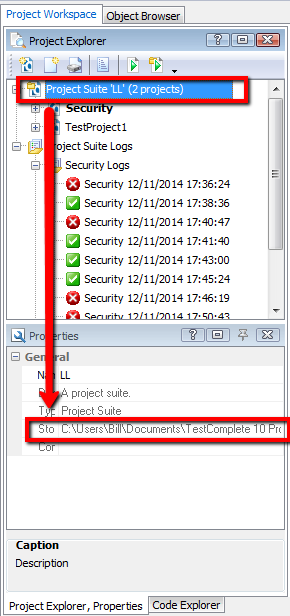
ii. find the location of your TestComplete project suite on the file system of your test complete machine.
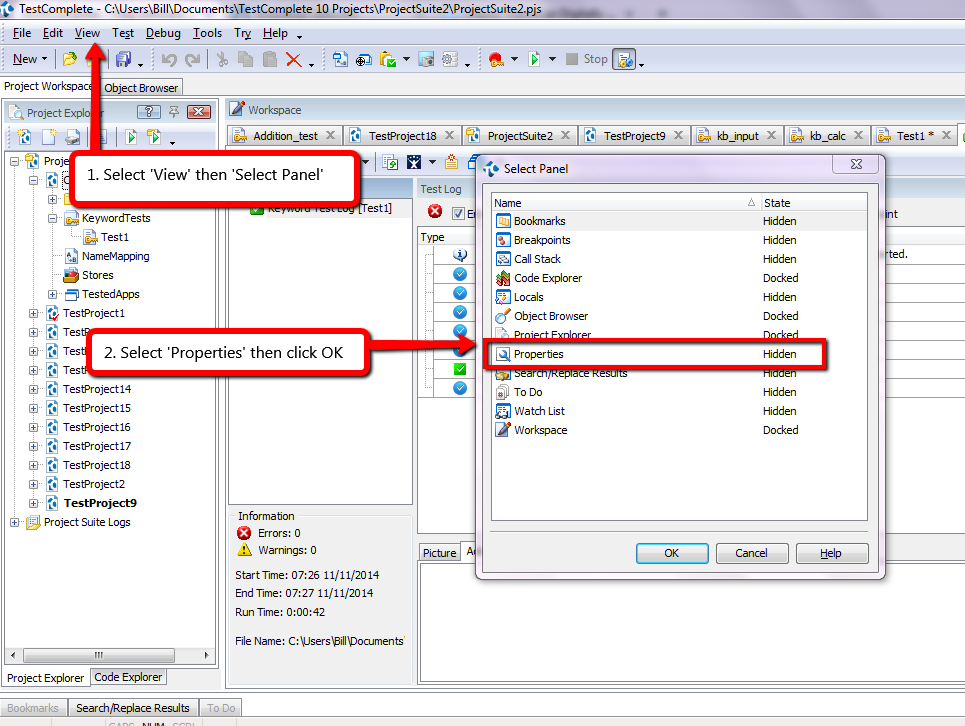
From here you’ll be able to see where TestComplete is storing the project on your file system.
iii. On the file system (or in TestComplete) remove the log files. You may want to back these up or copy them to a different directory if you need to keep them. For the purpose of creating this zipped up project suite we don’t want Mb’s of log files which are of no use in the zipped project.
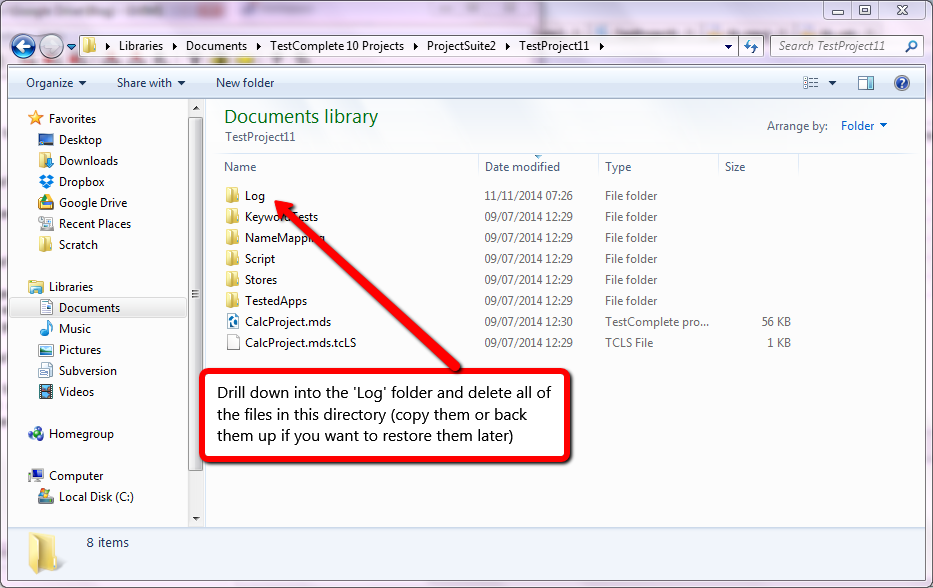
You will need to do this for all the projects in the project suite and the project suite log files.
iv. At the project suite level on the file system find the folder containing your project suite and zip up this project suite.
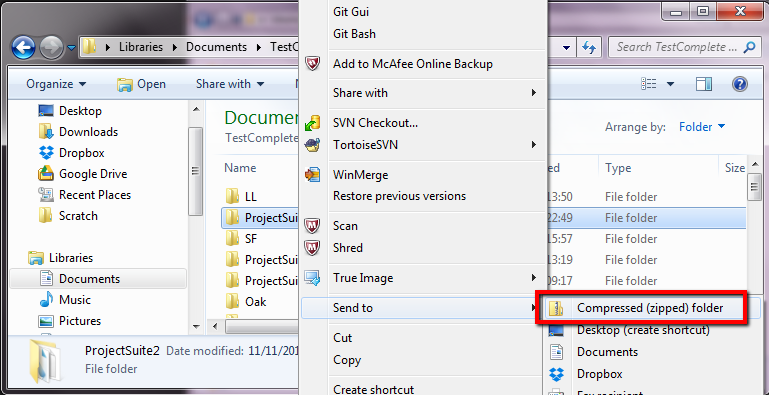
Note the name of the zip file (e.g. ProjectSuite2.zip) and remember where you’ve created this zip file.
Once we’ve zipped up the TestComplete project suite we’re in a position to create the automated test in QAComplete.
Define the Automated Test in the QAComplete Test Library
In this step we create the test case in the ‘Test Library’ area of QAComplete and then attach the zipped up TestComplete project suite to this test case.
v. First we need to create a new test. Navigate to the Test Management Library area in QAComplete and select ‘Add New’.
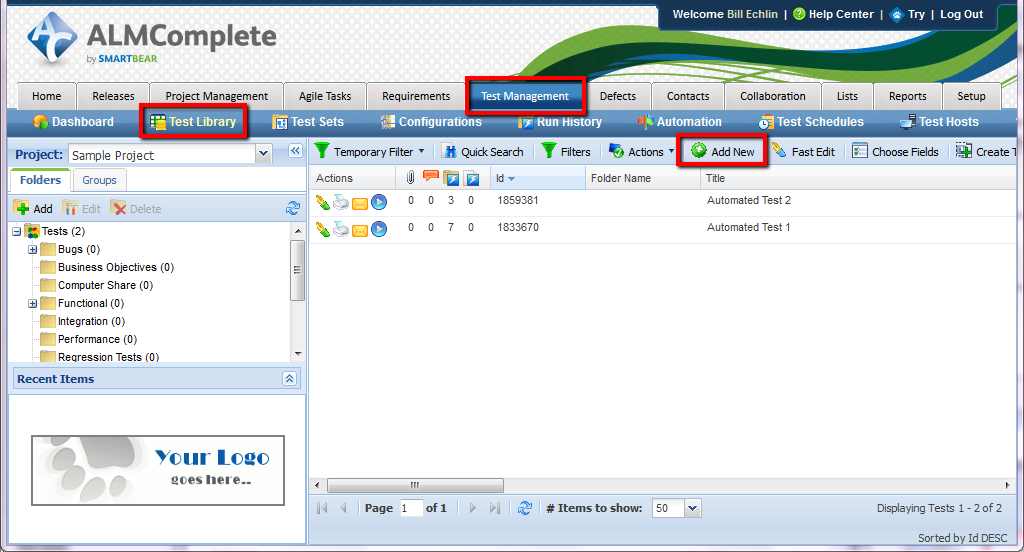
Then we need to define the usual meta data required to create the test case (e.g. Title, Description, etc). A couple of fields that are important though:
- Execution Type: set this to Automated
- Default Host Name: set this to the host that will be used by default to execute the automated test
Assuming you selected Execution Type = Automated then when you save the test case you’ll be taken to the ‘Automations’ tab for the test case. Here you’ll need to click ‘Add New’ to add a new TestComplete Project Suite.
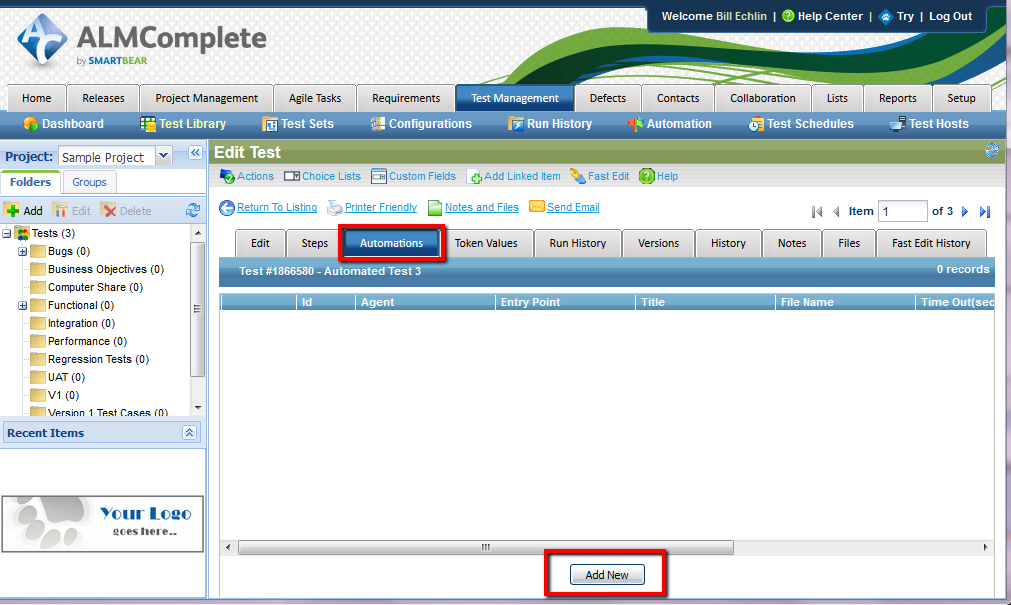
When adding a new TestComplete project suite to QAComplete you’ll be presented with the following 6 fields to complete:
- Title: either leave this blank and QAComplete will give this automated test the same name as the TestComplete project or define your own name
- Time Out: this is how long it should take to run the test. If it goes past this time out value then the test runner will stop running the test and move on to the next one.
- Entry Point: use this to identify a specific test or project to run. If you leave it blank the whole project suite will be run. Specify a specific test case to execute an individual test case or a specific project to run only one project.
- Agent: at the moment QAComplete only supports one type of test agent which is TestComplete/TestExecute. Other types of test agent are in the pipeline.
- Web Site Address or UNC Path: you can place the zipped up project suite file on a shared drive. In which case you’ll define the path to that location and the file name here. Alternatively…
- File Attachments: attached the zipped up project suite file to the QAComplete test case and upload the file to QAComplete
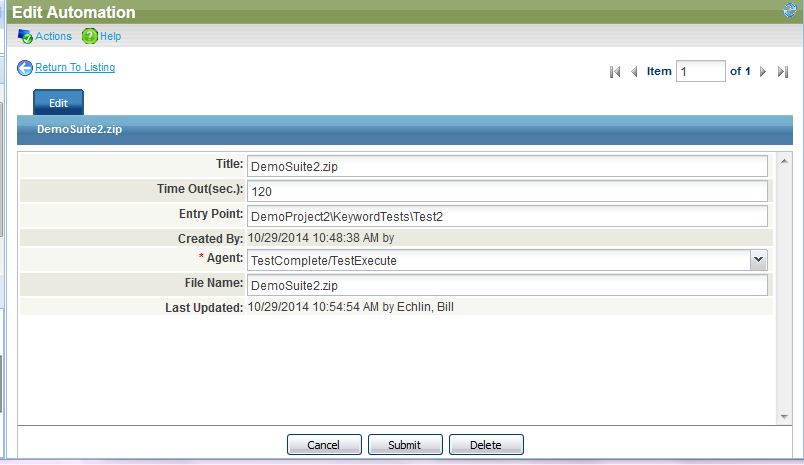
A completed record with a project suite zip file uploaded looks like this (the entry point in this example is at the Test Case level)…
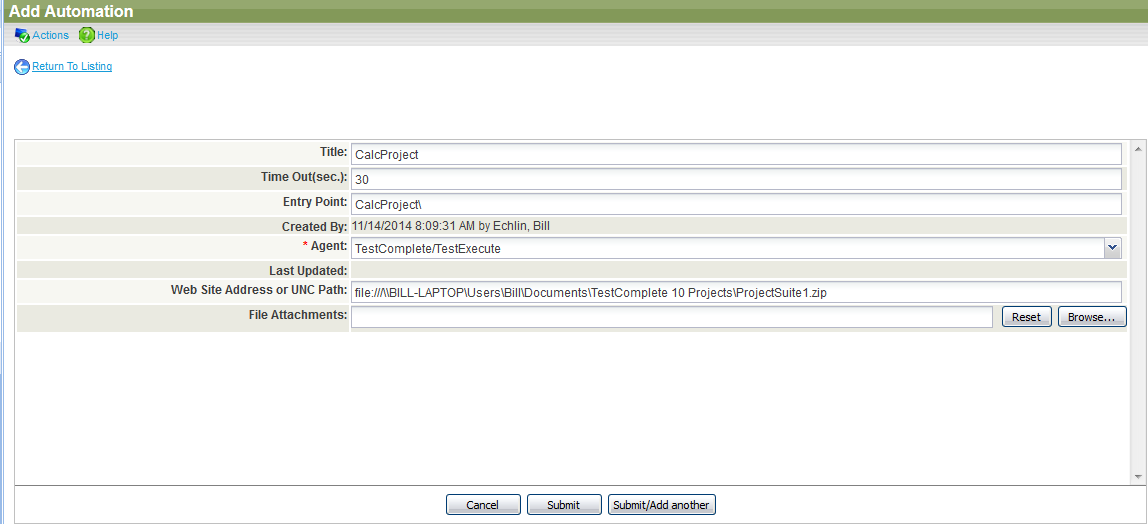
A completed record with a UNC path looks like this (The Entry point in this example is at the project level)…
At this point in time you can only add one automation project suite to a single QAComplete automated test case. In the future it should be possible to add multiple project suites to one test case. Each ‘automation’ instance then calling different test cases or projects within the project suite for execution. This is in the pipeline though.
Once we’ve defined the automated test in QAComplete we’re ready to execute the test, either as a standalone test or as part of a test set.
Standalone Execution of Automated Tests
To run the automated test case in isolation you click the run now button on the Test Case Library list view.
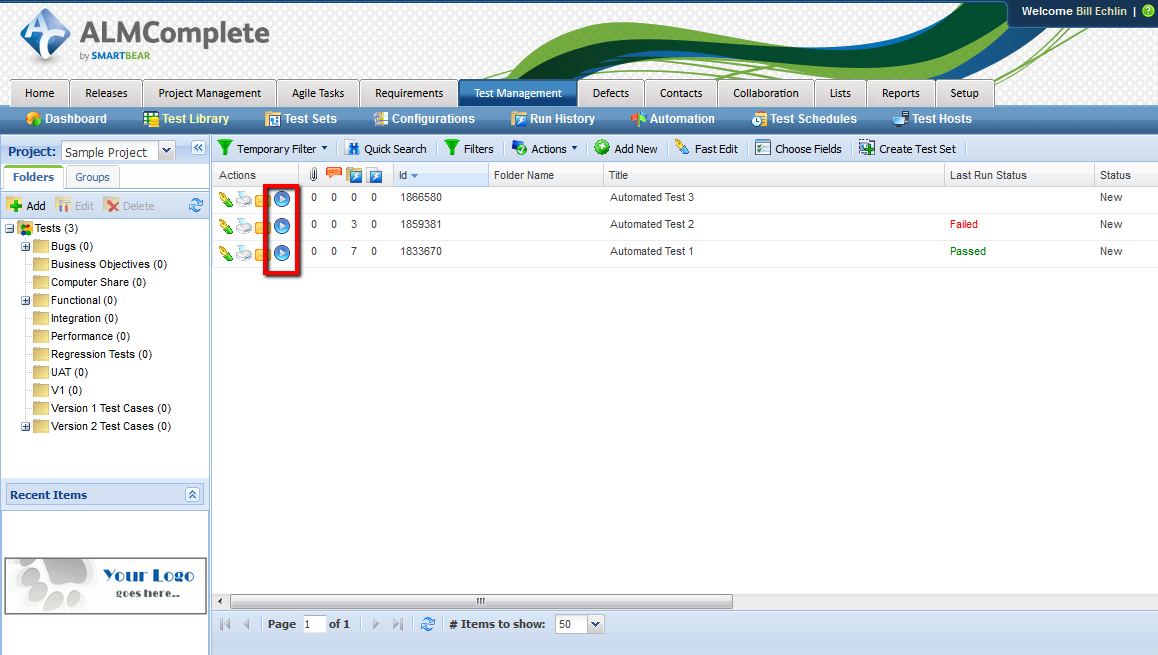
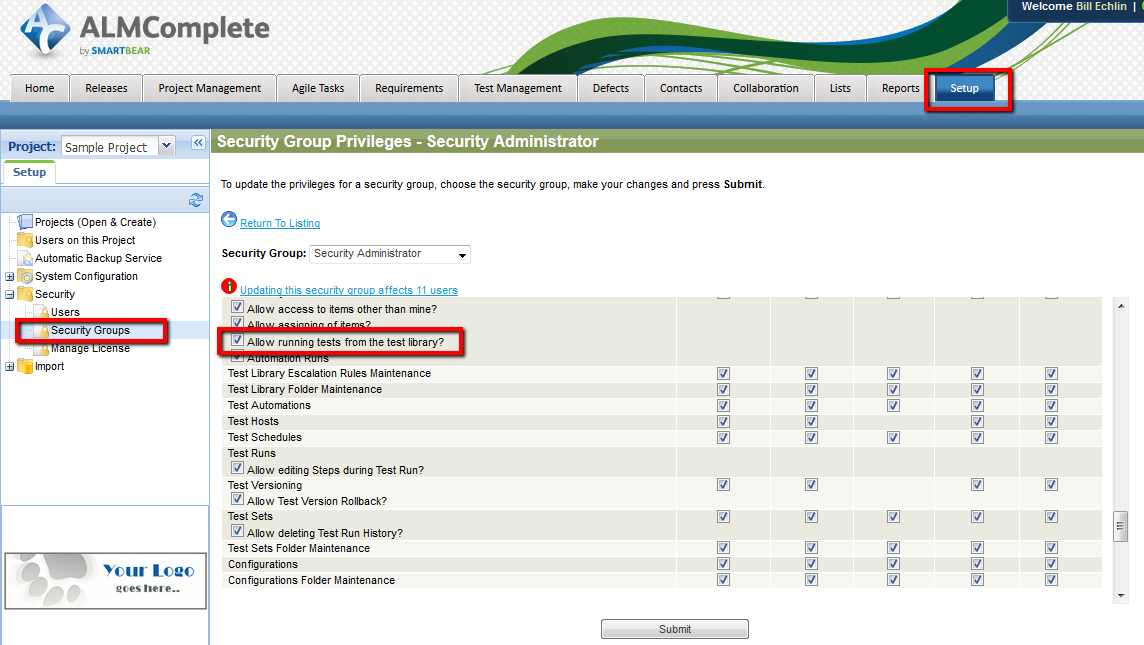
If you don’t see the run now button then you’ll need to grant the neccessary security privileges in the Security Groups area under setup:
When running in Standalone mode you will be presented with this Test Runner window:

1. The ‘Run By Host’ setting will default to the ‘Default Host Name’ you define in the Test Case. If you want to change this you can click on the current run host name and you’ll see a drop down where you can change the host.
Before you run the test make sure that TestComplete/TestExecute is closed down on the host machine. If TestComplete/TestExecute is already running on the host machine the test run will fail.
2. Click the run button in the Test Runner window.
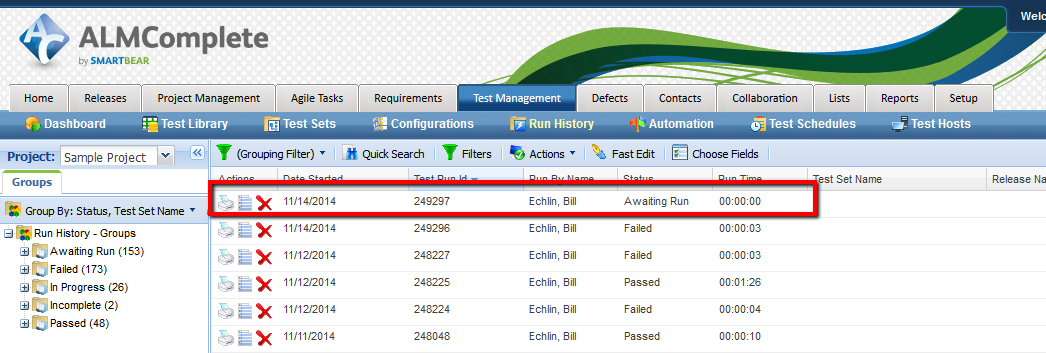
Not a lot appears to happen at this point in QAComplete but if you go to the run history area in QAComplete you’ll see a new run entry and the status of the run.
If you have access to the TestComplete/TestExecute host you should see TestComplete/TestExecute start up and the test project suite run.
Exeuction of Automated Tests as part of a Test Set
At this point you may have a number of different automated test cases defined in the test library. We can group these into Test Sets and run all of these automated tests in one run.
One quick way to create a Test Set is to search for the test cases in the Test Library and then click ‘Create Test Set’.
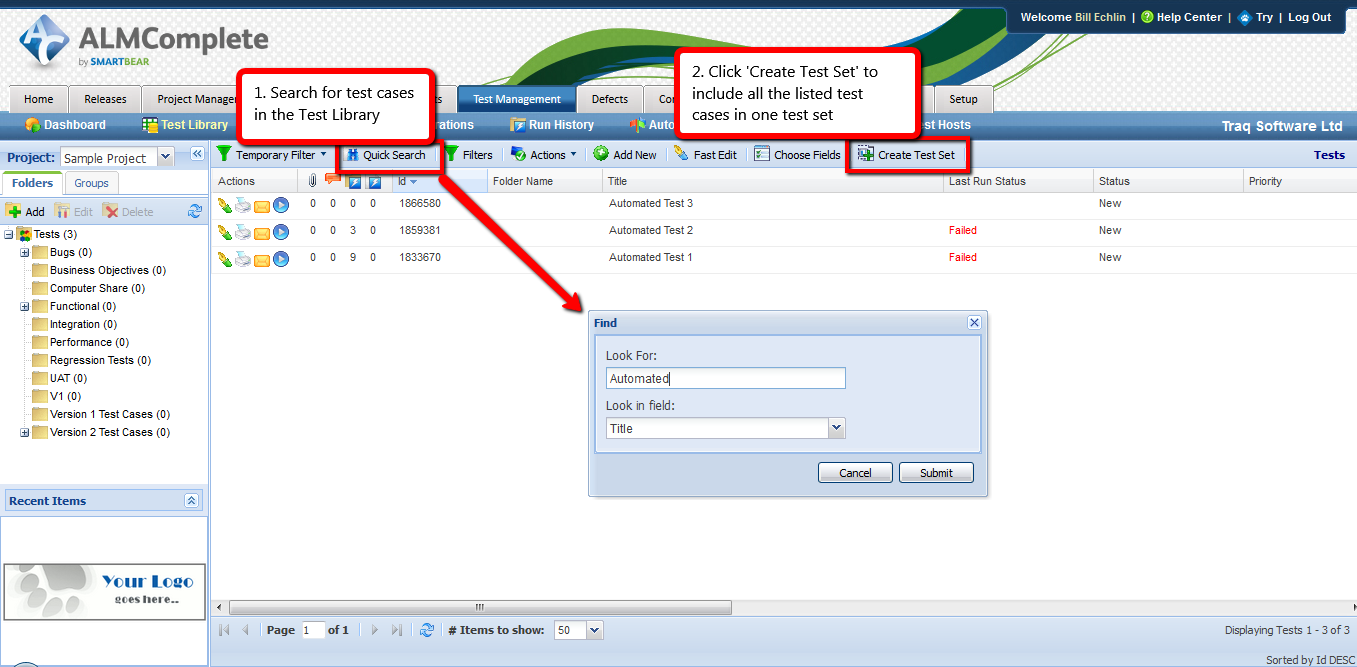
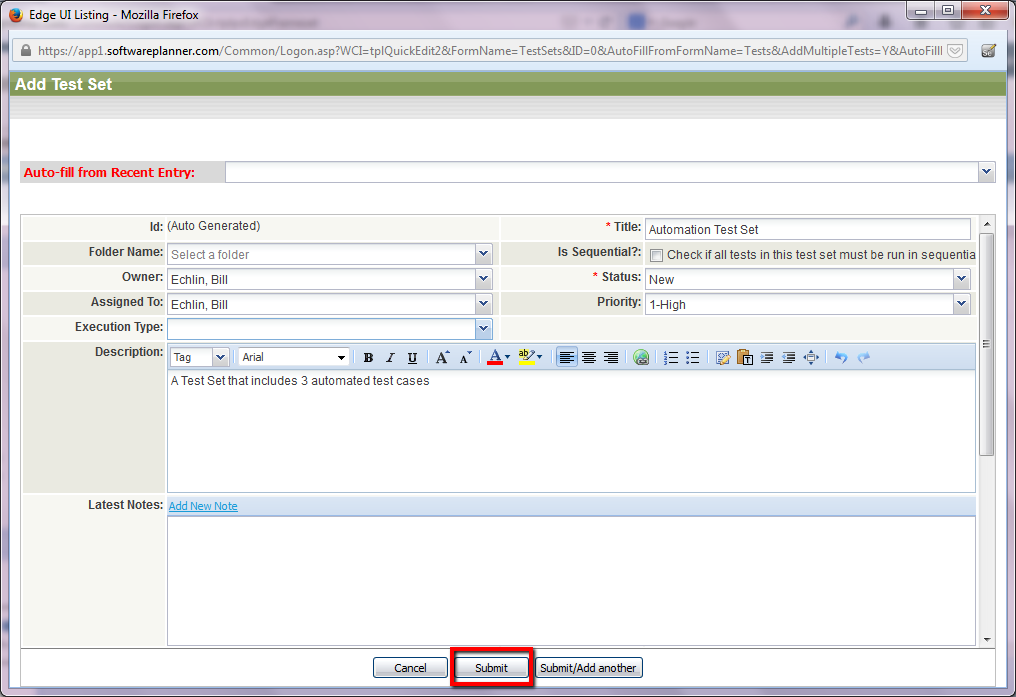
This gives you a new Test Set with your automated test cases already included in the Set. Give the new Test Set a name and enter any other meta data that’s important to you. Click submit.
Now when you go to the Test Set area in QAComplete you should be able to find your new Test Set and view the Test Cases included in the set.
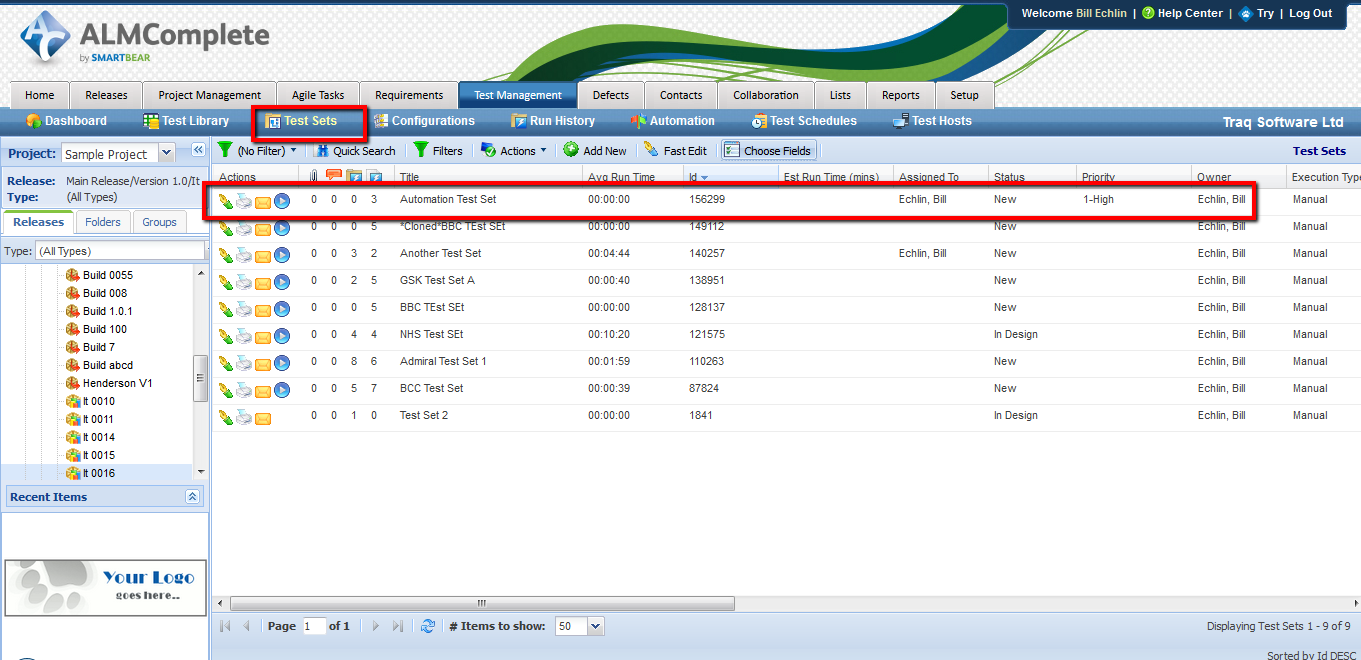
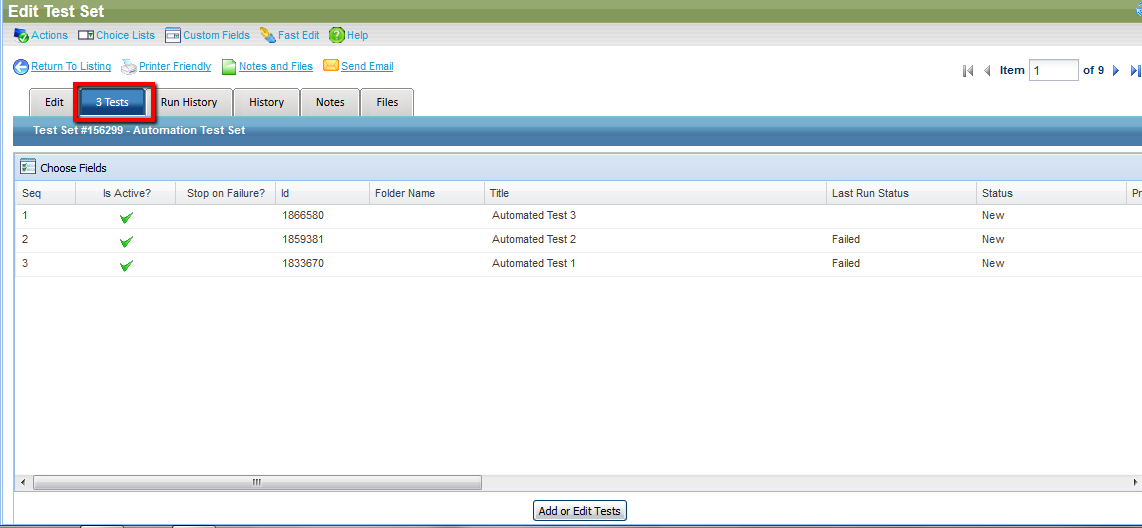
You have two options at this point:
1. Run The Test Set Immediately
You can either run the test set immediately by clicking on the ‘Run Now’ button:
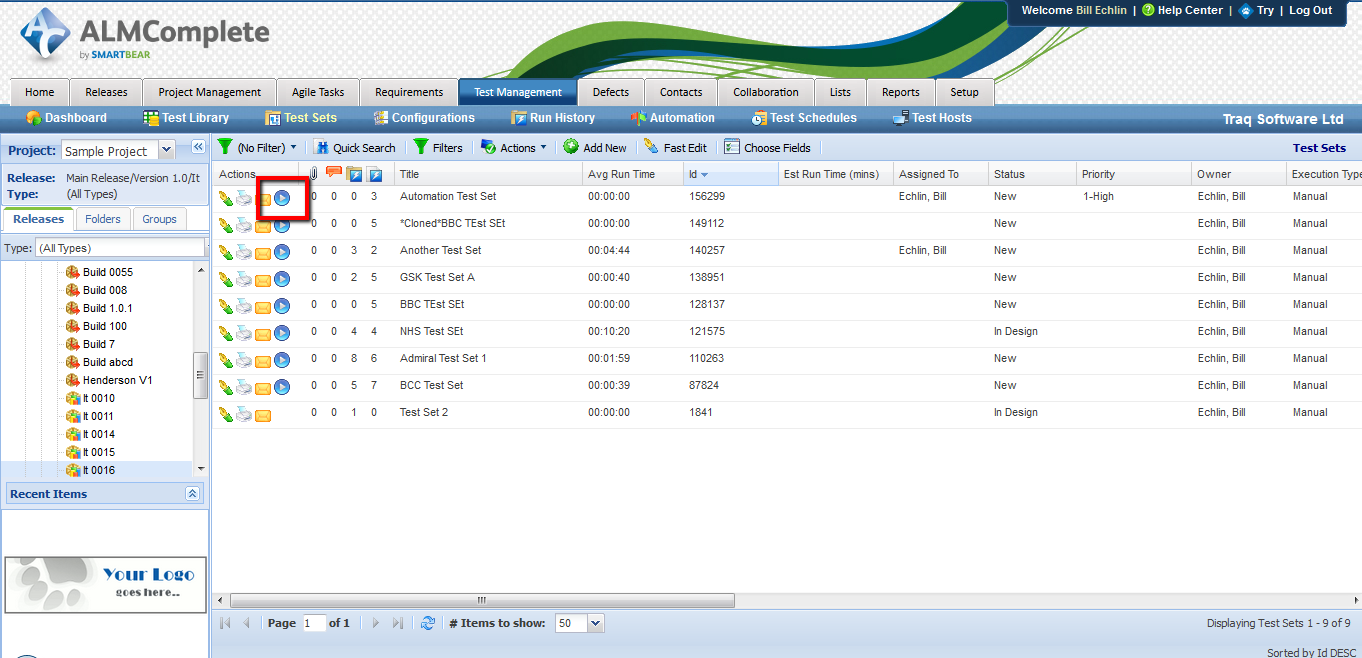
In which case you’ll need to specify the release and configuration you want to run these automated tests on.

Then select the hosts to run the tests on follow by ‘Run’.
 2. Setup a Test Schedule
The second option is to setup a test schedule.
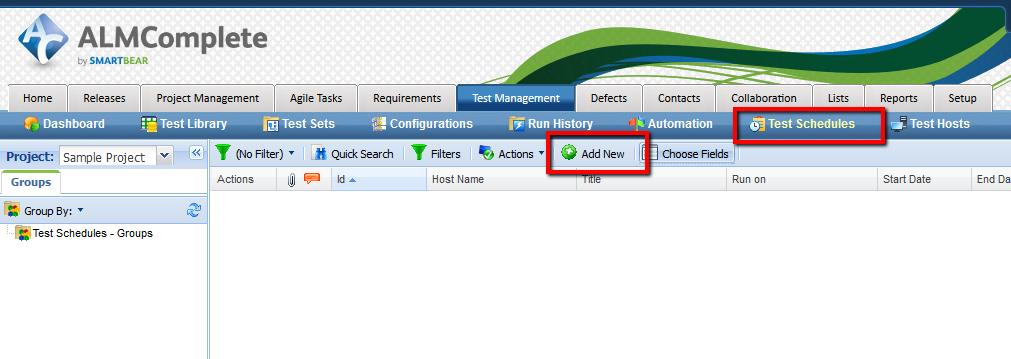
Where you define the Host Name you want the schedule to run on, Run days, Start time, End Time, etc.
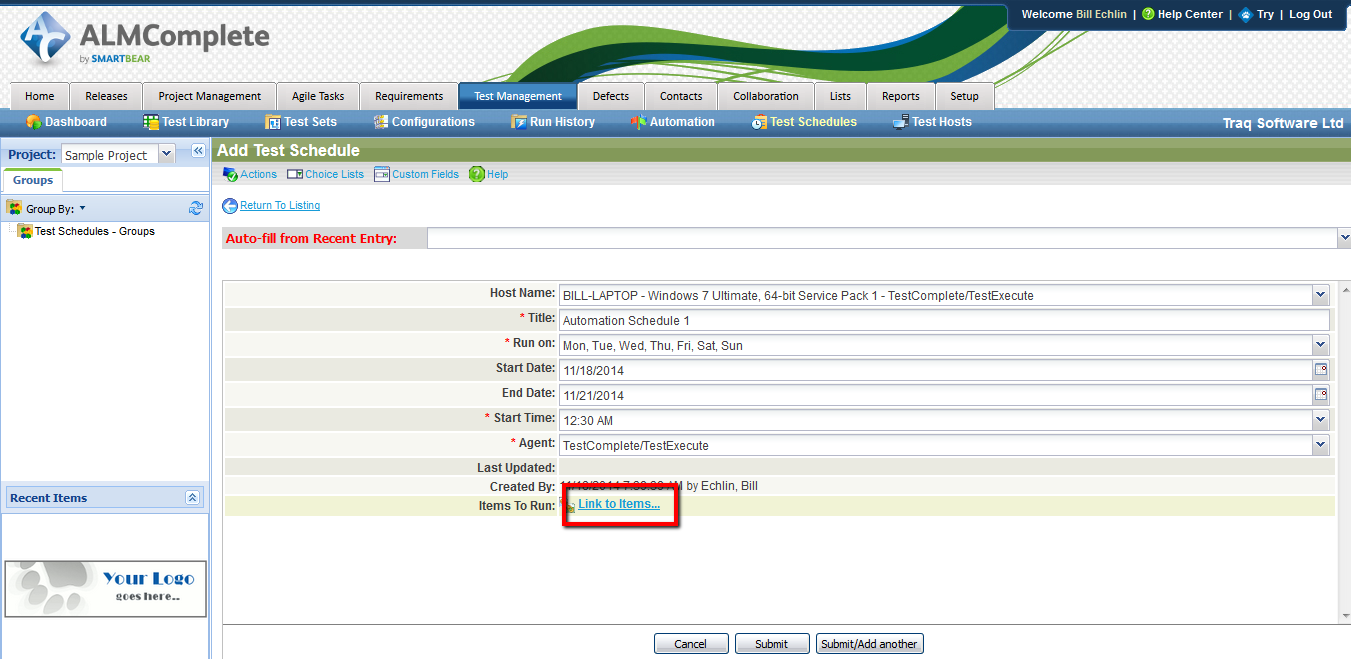
The important part here is the link to items. This is where you define the Test Sets and Test Cases that you want this schedule to execute.
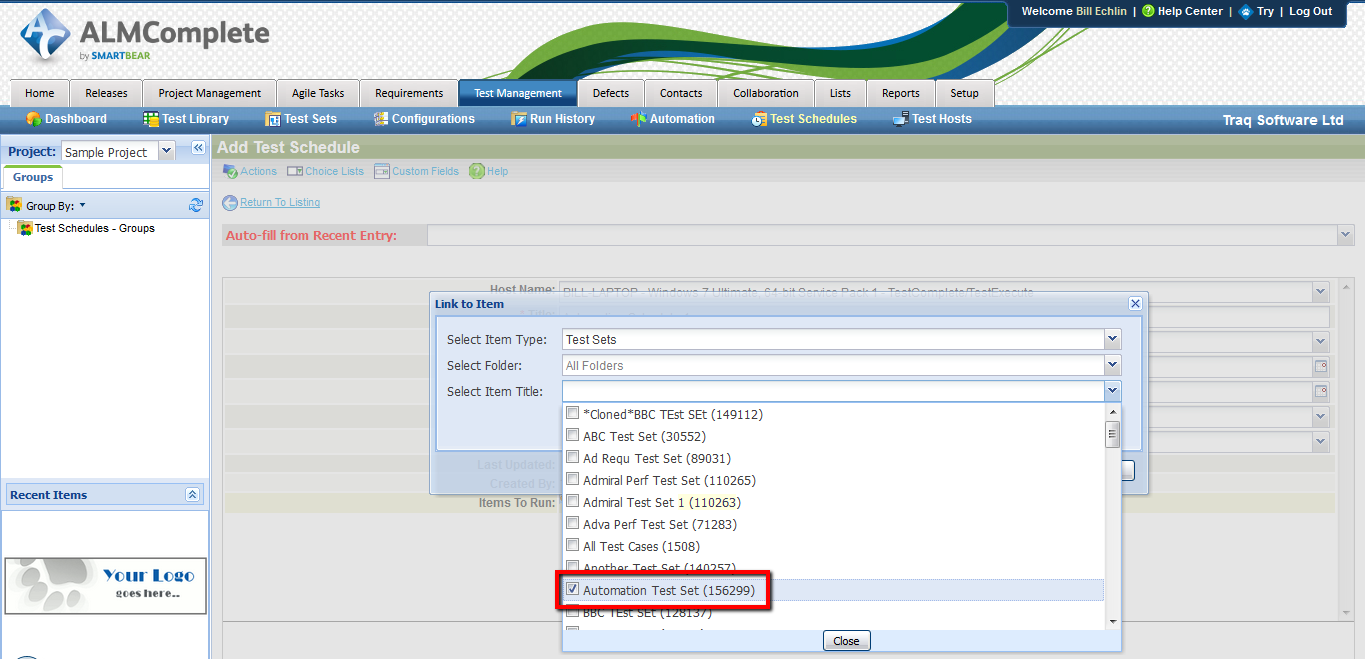
Once you’ve defined the schedule you can leave it to QAComplete to kick off the automatoin runs on the required hosts at the defined times.
Don’t forget that TestComplete/TestExecute needs to be closed down on the host machines in order for the automated tests to run. It’s also worth pointing out that you can mix automated and manual test cases in a test set. If you do this then an automation run will only execute the automated test automatically (obvious really) and then you’ll have to go into the test run to run the manual tests yourself.
Next up, run history, traceability and reporting. We looked at how combining manual and automated tests in QAComplete helps you with traceability to other artifacts like requirements and reporting on combined execution runs.
Looking for help implementing a scalable and maintainable test automation solution? Talk to us about our Accelerator package.
Download the Pdf brochure here
 Note that if the host isn’t listed at all you may need to enable the ‘Show Inactive Test Hosts’ option.
 If the host isn’t active then you’ll need to start the service on the TestComplete machine. On the TestComplete machine Press Ctrl+Shift+Esc to display task manager and then click on the ‘Services’ tab followed by the ‘Services’ button. In the Services window click on the ‘TestManager Agent’ service and start the service.
 If you have a lot of virtual machines running TestComplete (along with the ‘TestManager Agent’) then this ‘Test Hosts’ view in QAComplete is a really useful view. It lets you to see which virtual machines are active and available for you to run your tests on.
 ii. find the location of your TestComplete project suite on the file system of your test complete machine.
 From here you’ll be able to see where TestComplete is storing the project on your file system.
 iii. On the file system (or in TestComplete) remove the log files. You may want to back these up or copy them to a different directory if you need to keep them. For the purpose of creating this zipped up project suite we don’t want Mb’s of log files which are of no use in the zipped project.
 You will need to do this for all the projects in the project suite and the project suite log files.
iv. At the project suite level on the file system find the folder containing your project suite and zip up this project suite.
 Note the name of the zip file (e.g. ProjectSuite2.zip) and remember where you’ve created this zip file.
Once we’ve zipped up the TestComplete project suite we’re in a position to create the automated test in QAComplete.
 Then we need to define the usual meta data required to create the test case (e.g. Title, Description, etc). A couple of fields that are important though:
 When adding a new TestComplete project suite to QAComplete you’ll be presented with the following 6 fields to complete:
 A completed record with a UNC path looks like this (The Entry point in this example is at the project level)…
 At this point in time you can only add one automation project suite to a single QAComplete automated test case. In the future it should be possible to add multiple project suites to one test case. Each ‘automation’ instance then calling different test cases or projects within the project suite for execution. This is in the pipeline though.
Once we’ve defined the automated test in QAComplete we’re ready to execute the test, either as a standalone test or as part of a test set.
 If you don’t see the run now button then you’ll need to grant the neccessary security privileges in the Security Groups area under setup:
 When running in Standalone mode you will be presented with this Test Runner window:
 1. The ‘Run By Host’ setting will default to the ‘Default Host Name’ you define in the Test Case. If you want to change this you can click on the current run host name and you’ll see a drop down where you can change the host.
Before you run the test make sure that TestComplete/TestExecute is closed down on the host machine. If TestComplete/TestExecute is already running on the host machine the test run will fail.
2. Click the run button in the Test Runner window.
Not a lot appears to happen at this point in QAComplete but if you go to the run history area in QAComplete you’ll see a new run entry and the status of the run.
 If you have access to the TestComplete/TestExecute host you should see TestComplete/TestExecute start up and the test project suite run.
 This gives you a new Test Set with your automated test cases already included in the Set. Give the new Test Set a name and enter any other meta data that’s important to you. Click submit.
 Now when you go to the Test Set area in QAComplete you should be able to find your new Test Set and view the Test Cases included in the set.

 You have two options at this point:
1. Run The Test Set Immediately
You can either run the test set immediately by clicking on the ‘Run Now’ button:
 In which case you’ll need to specify the release and configuration you want to run these automated tests on.
 Then select the hosts to run the tests on follow by ‘Run’.
 2. Setup a Test Schedule
The second option is to setup a test schedule.
 Where you define the Host Name you want the schedule to run on, Run days, Start time, End Time, etc.
 The important part here is the link to items. This is where you define the Test Sets and Test Cases that you want this schedule to execute.
 Once you’ve defined the schedule you can leave it to QAComplete to kick off the automatoin runs on the required hosts at the defined times.
Don’t forget that TestComplete/TestExecute needs to be closed down on the host machines in order for the automated tests to run. It’s also worth pointing out that you can mix automated and manual test cases in a test set. If you do this then an automation run will only execute the automated test automatically (obvious really) and then you’ll have to go into the test run to run the manual tests yourself.
Next up, run history, traceability and reporting. We looked at how combining manual and automated tests in QAComplete helps you with traceability to other artifacts like requirements and reporting on combined execution runs.
Looking for help implementing a scalable and maintainable test automation solution? Talk to us about our Accelerator package. Download the Pdf brochure here