In the last module we saw how to create and structue our Jira Projects. In this module our objective is to understand why we need labels and priorities. We’ll also look at setting project priority values and label values. Finally we’ll see how we can search for issues based on labels and make bulk updates to our Jira issues.
Why Do We Need Labels and Priorities?
There are two other properties of an issue that will help you organise and track your issues. One is the ability to give an issue a priority category. The other is to give your issues one or more labels. Assigning lables and priorities helps you look, for example, for all your high priority issues that you might have labled as being relvant to a particular office.
For this example lets say we have our three projects:
ACME Delivery System
ACME Accounting System
ACME HR System
Each of those new systems are being rolled out across three sites:
London
Madrid
New York
And when we raise an issue to track a piece of work in Jira we want to assign the issues a priority based on these values:
High
Medium
Low
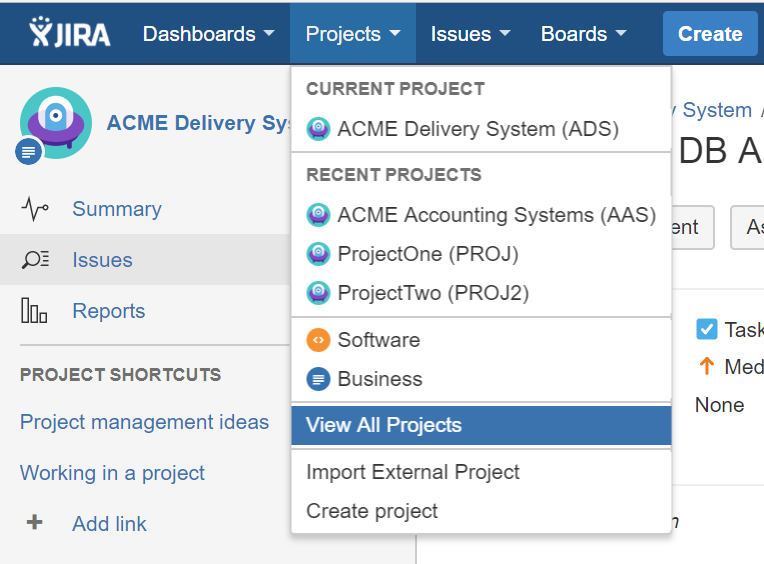
We’ve already set our Jira configuration up so that we have two Jira projects covering both Delivery and Accounting systems. You can see this when you select ‘View All Projects’ from the projects drop down menu:
Which shows our two projects:
What we need to do now is make sure that both of those projects support the Priority categories we need and the lables for the three sites. First off then lets setup the priorities.
Setting Project Priority Values
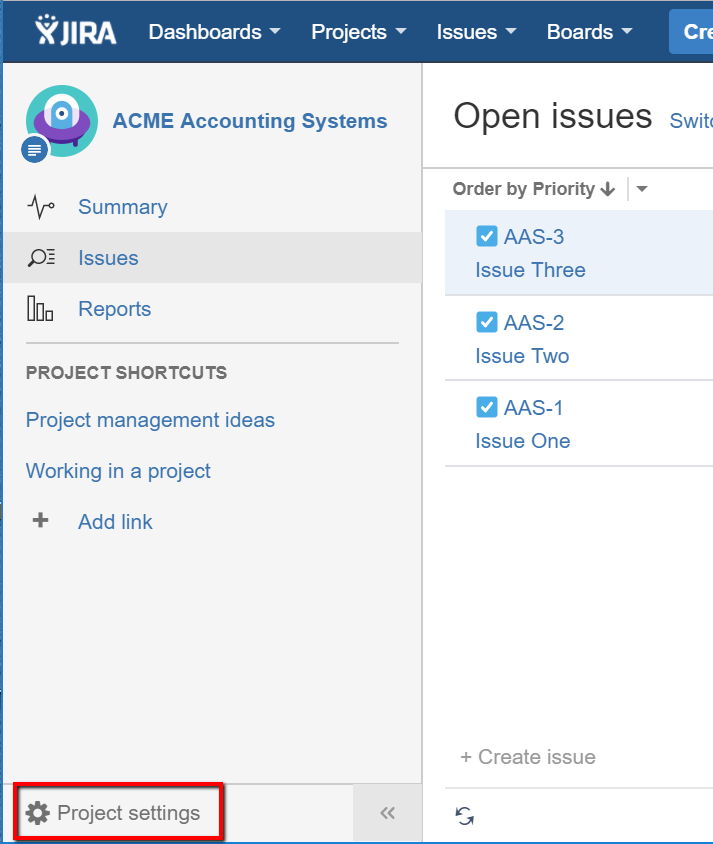
If you click on one of the project records in the list (from the ‘View All Projects’ menu item):
You’ll see the ‘Open Issue’ page for the Project and hiding down the bottom is the ‘Projecgt Settings’ option:
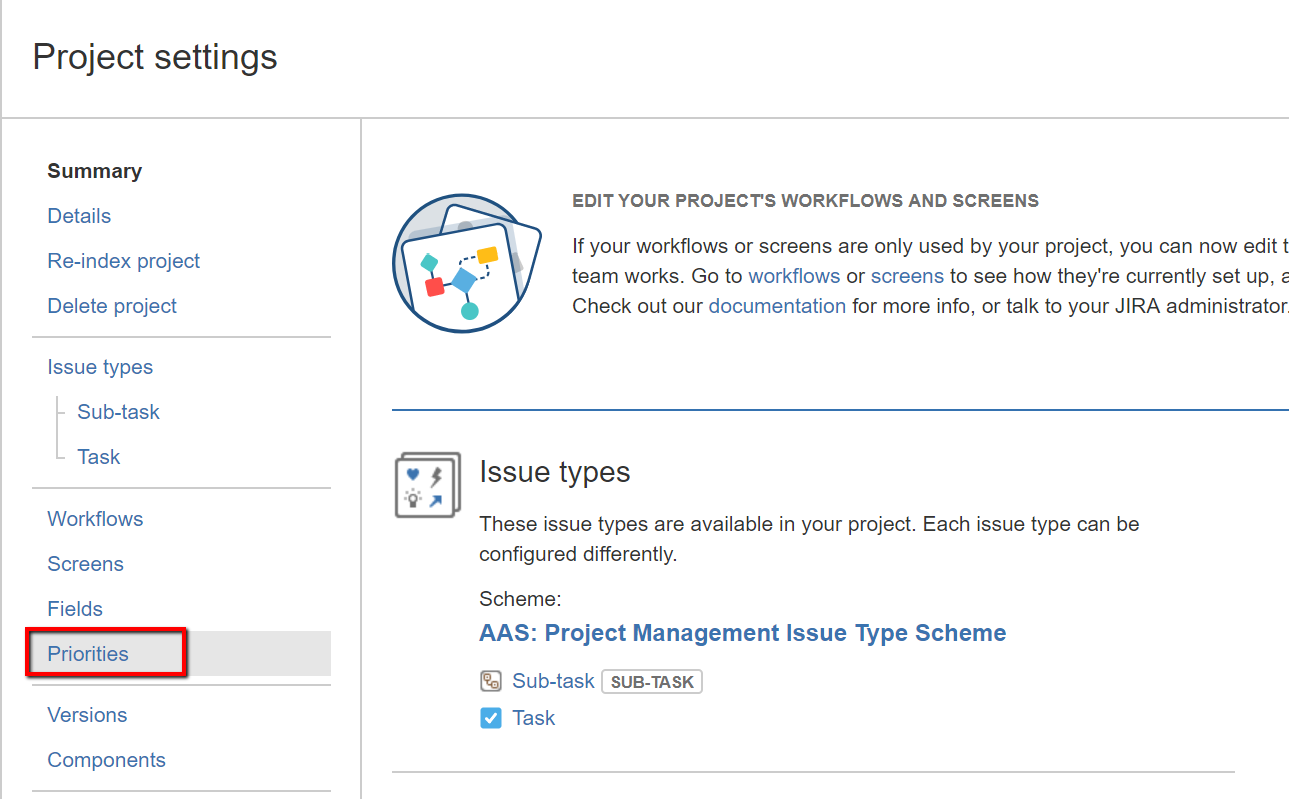
There’s a lot to the project settings page, most of which we’re not interested in. What we are interested in is the ‘Priorities’ section:
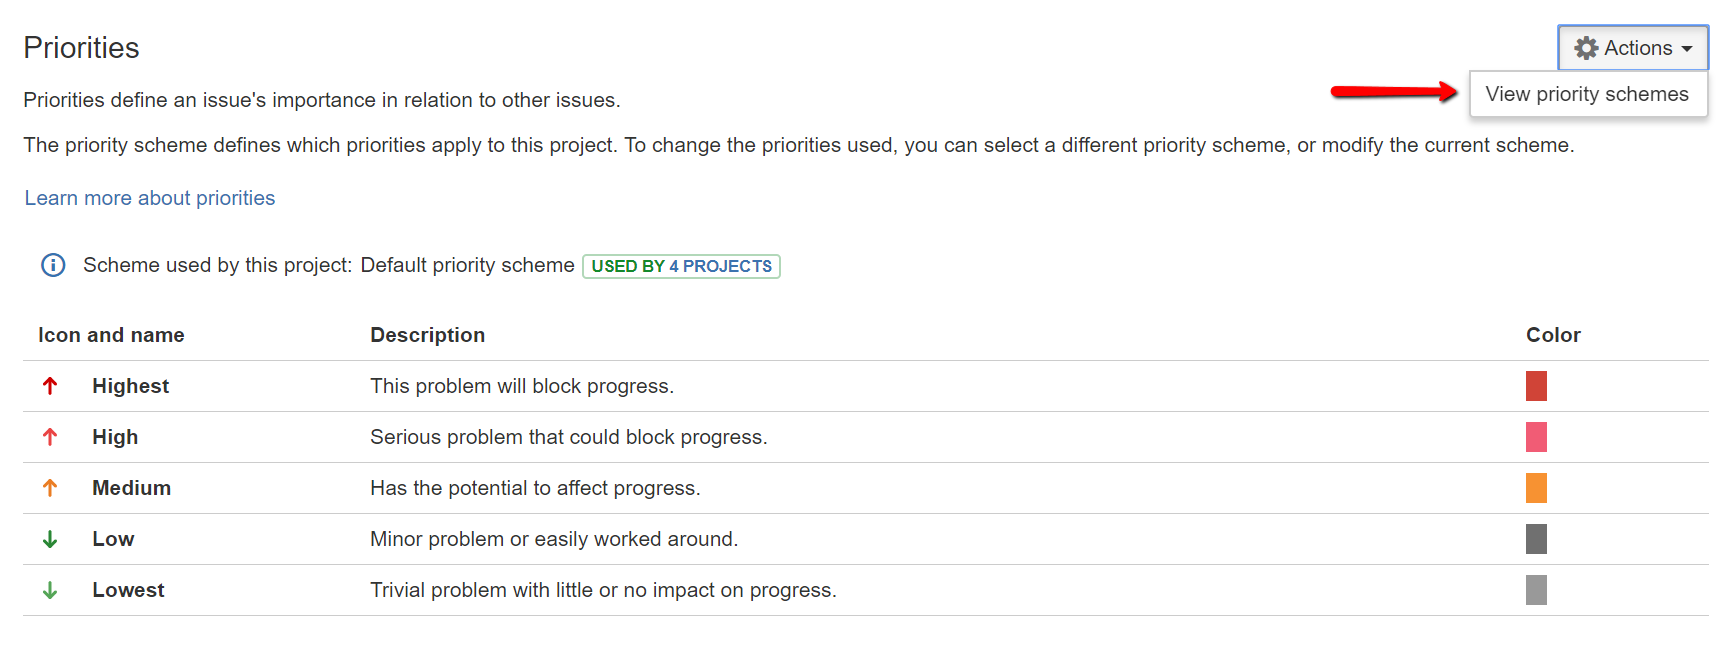
Clicking on this takes us to the settings page for the priorities. We’ll see here a list of all the priorities that have been configured:
This is just a list. We can’t modify them here. What you’ll notice though is the statement:
“Scheme used by this project:Default priority scheme – USED BY 4 PROJECTS”
What happens in Jira is that we define a ‘Scheme’ and that scheme is applied to one or more projects. So we’re not modifying specific priority values for just this one project. We’re going to be modifying a ‘Scheme’ and that scheme is applied to our projects. This makes life easier for us, because we only have to update the scheme and that’s applied to both our ACME projects.
Once we’ve selected ‘Actions’ and the ‘View Priority Schemes’ we’ll see a list of our Priority Schemes. At the moment just one listed, the ‘Default priority scheme’. What we’ll do is add a new ‘Priority Scheme’ so that we can apply this to both our ACME projects. So click on the ‘Add Priority Scheme’ button:
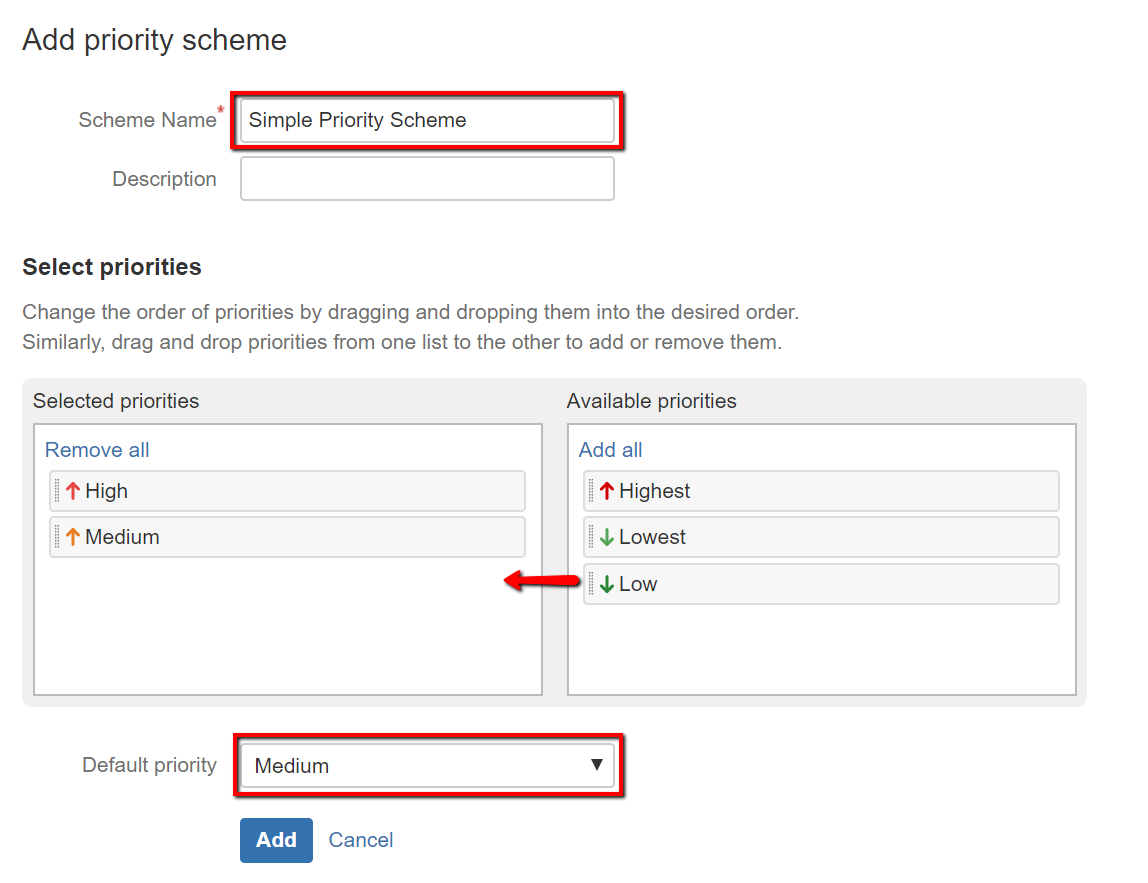
We’ll give the scheme a name (e.g. “Simple Priority Scheme”), add just the three priorities we need and set the default value.
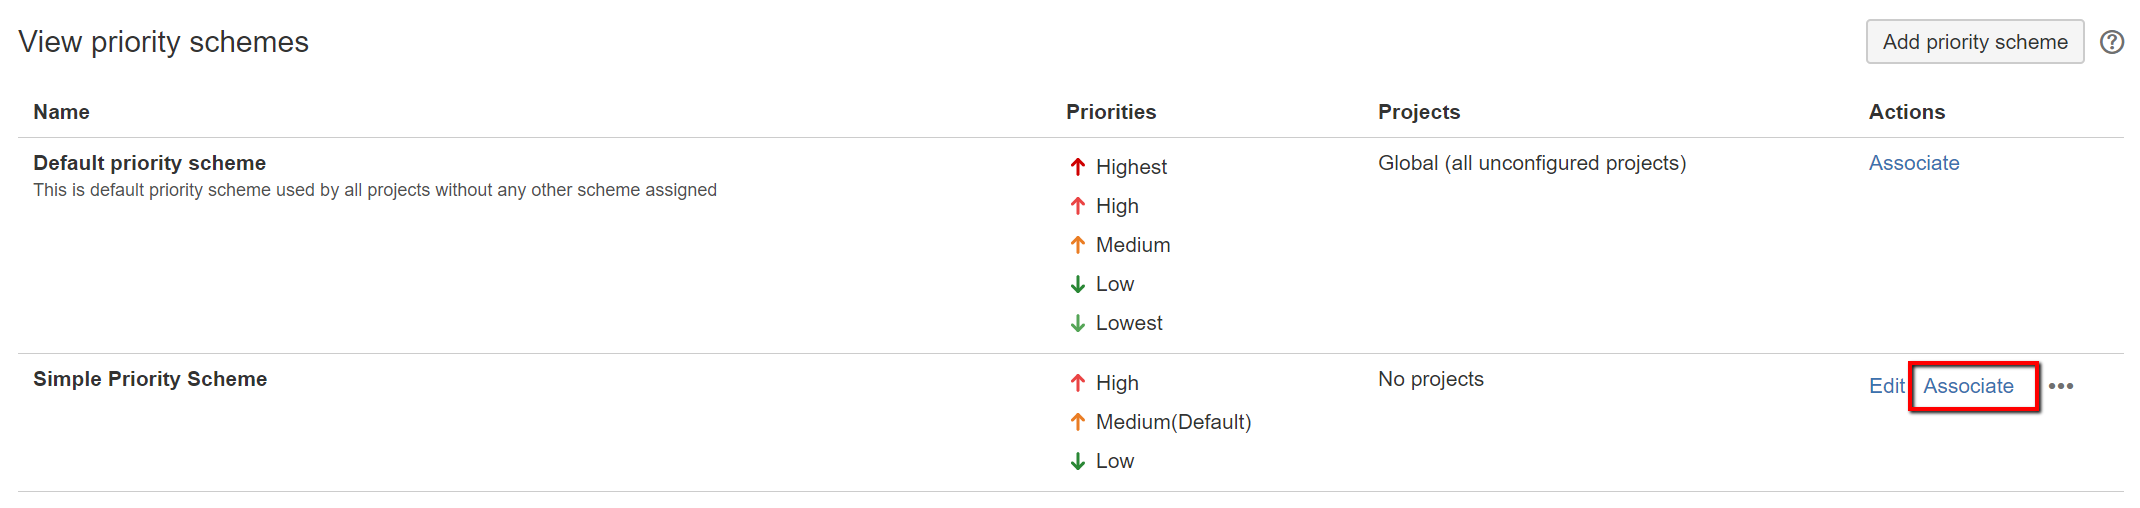
Once we’ve added this we’ll see our new scheme added on our view priority schemes page
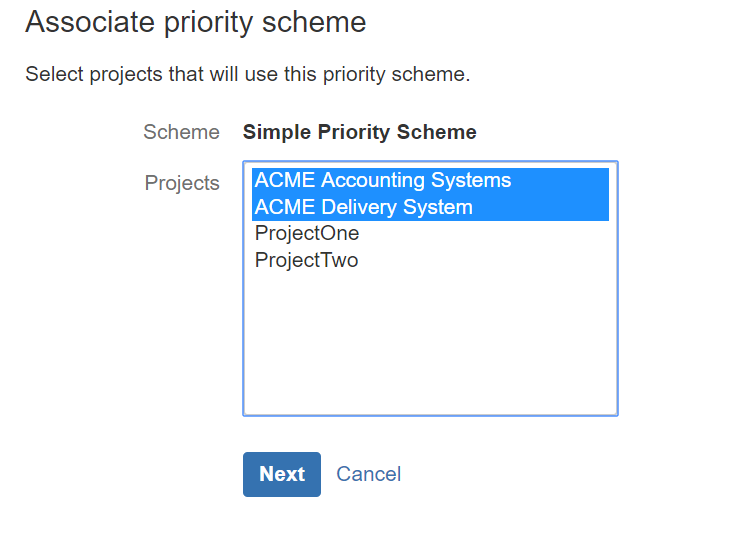
All we need to do now is associate it with our two ACME projects. Not un-surprisingly we click on the ‘Assoicate’ link on the right handside. And from here just select our two ACME projects followed by the ‘Next’ button.
On the ‘View Priority Schemes’ page we should now see confirmation that we have our three priority categories and that they are applied to our two ACME projects.
Next up then we need to look at our Labels.
Labels
We have the capability to prioritise our work through our issue records. Now we want to categorise and group them by some other criteria. In our example case that category is by ‘Site’. So an issue can either belong to Zero or many sites. We can do this by adding labels to our Jira issues.
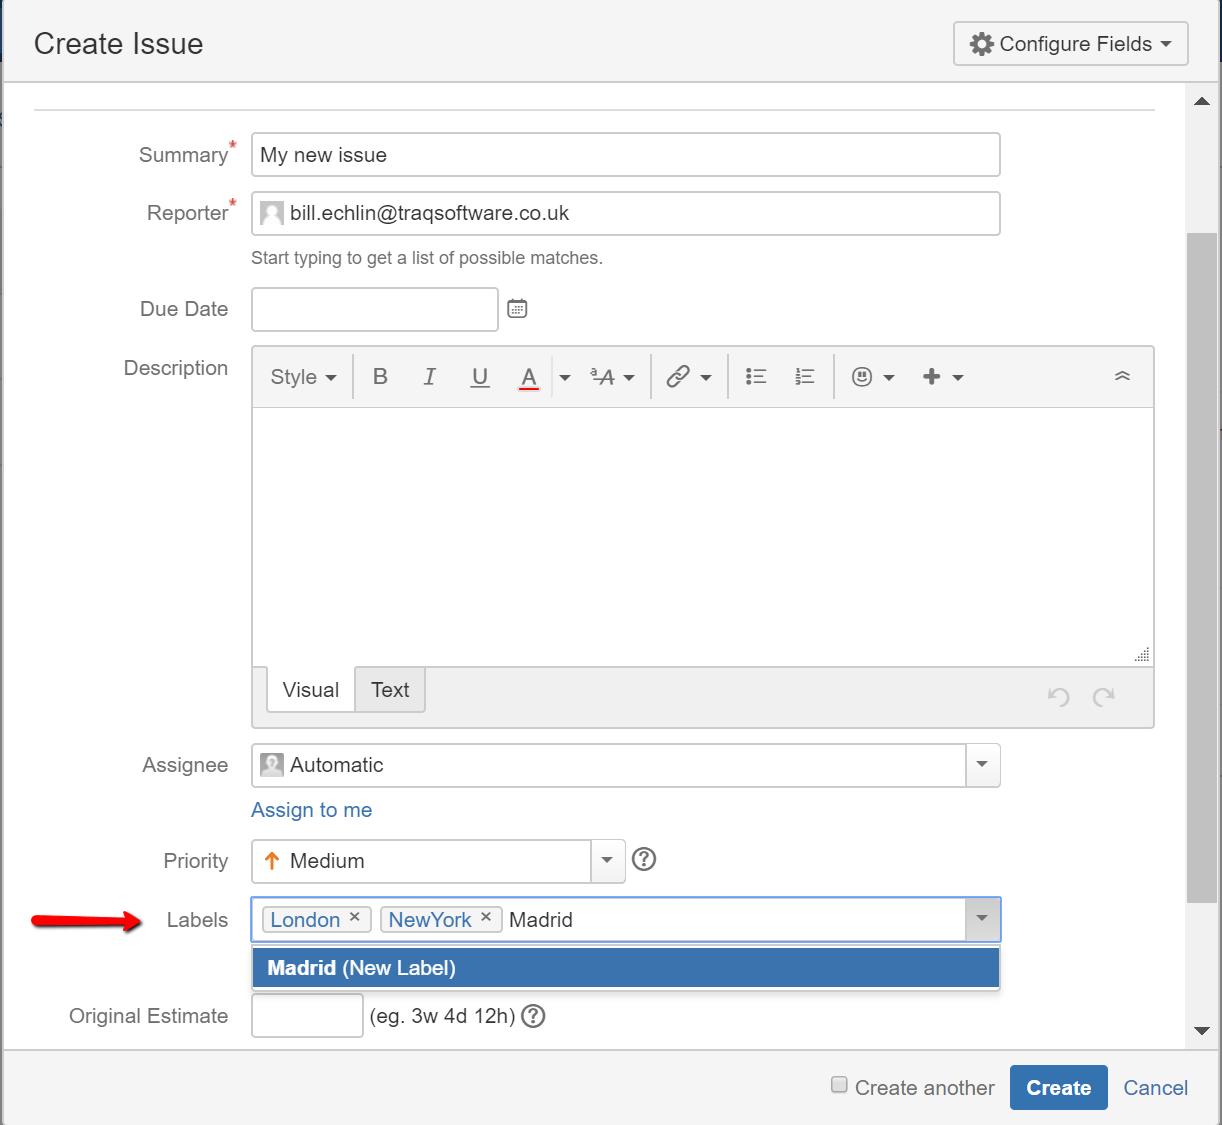
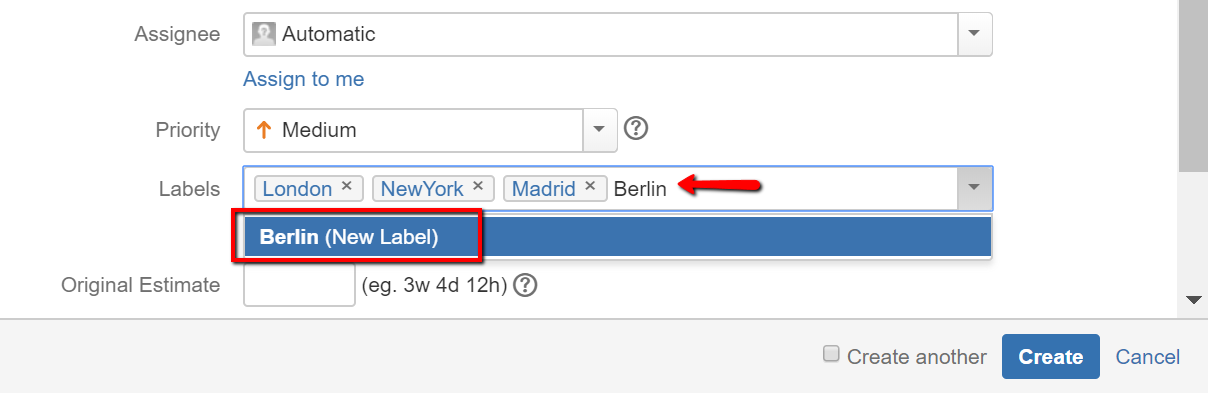
You can add a label when you first create the issue or when you’re viewing the issue. When you create the issue just start typing in the ‘label’ field…
A few things to note here. If similar labels already exist Jira will prompt you with suggestions. This helps keep your labels consistent. You can’t add spaced in Labels. So either use ‘-‘ symbols or use camel case with no spaces (e.g. “NewYork”).
Now the important point to grasp here is that any user can assign ANY label he or she likes to an issue. There is nothing to stop a user making up and entering their own lables. This is both a strength and a weakness to categorising your Jira issues.
It’s a strength because you don’t have the hassle of setting things up under the administrator account when you need to add a new category of lable. So you can just type in any label name you want. For example if we need to add a lable for our ‘Berlin’ office we just type in ‘Berlin’ in the label field in an issue to add it.
However, this strength of labels is also it’s down fall. That is you end up with lots of users just adding all sorts of labels. Jira will prompt you with suggested labels as you start typing (to encourage consistency) but there’s nothing to stop users mis-spelling label names or adding their own labels. This will seriously impact your ability to search and report on labels.
The key to managing this is regular maintenance of the labels added to your issues. We can maintain our lables using the search capability in Jira which we’ll look at next.
Searching for Issues
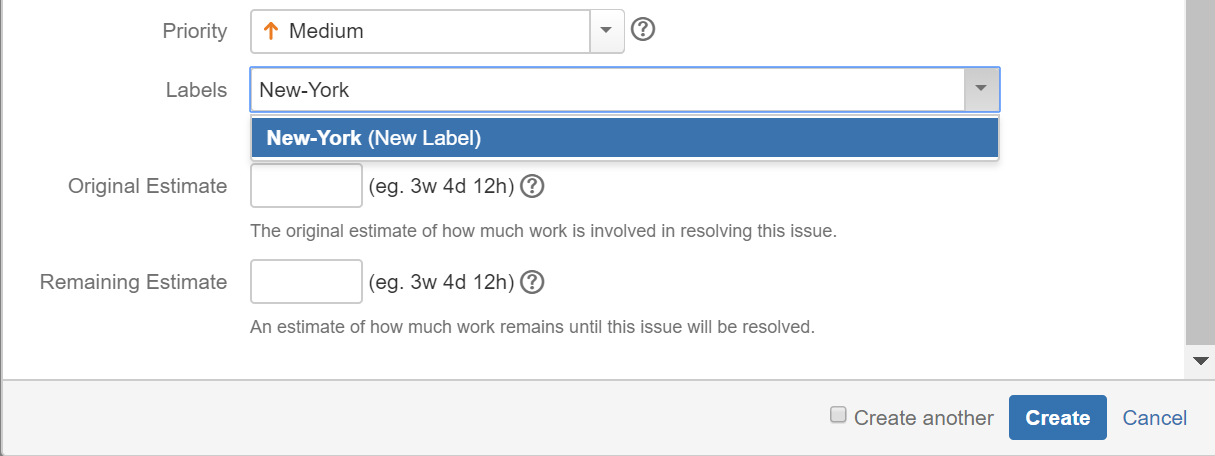
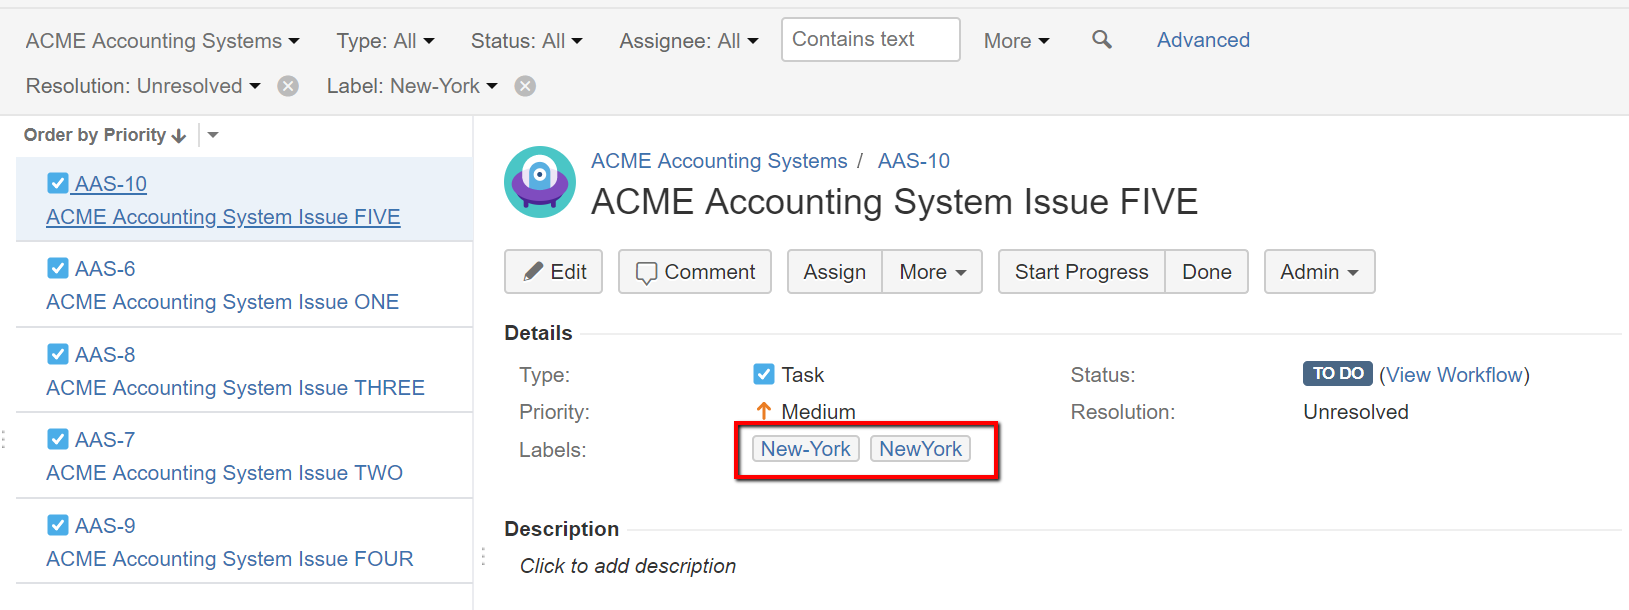
Sticking with our example then – we want to use the Jira search capability to maintain and tidy up the labels that have been assigned to our issues. In our example for a user has added the label ‘NewYork’ to an issue. A different user has added the label ‘New-York’ to their issue.
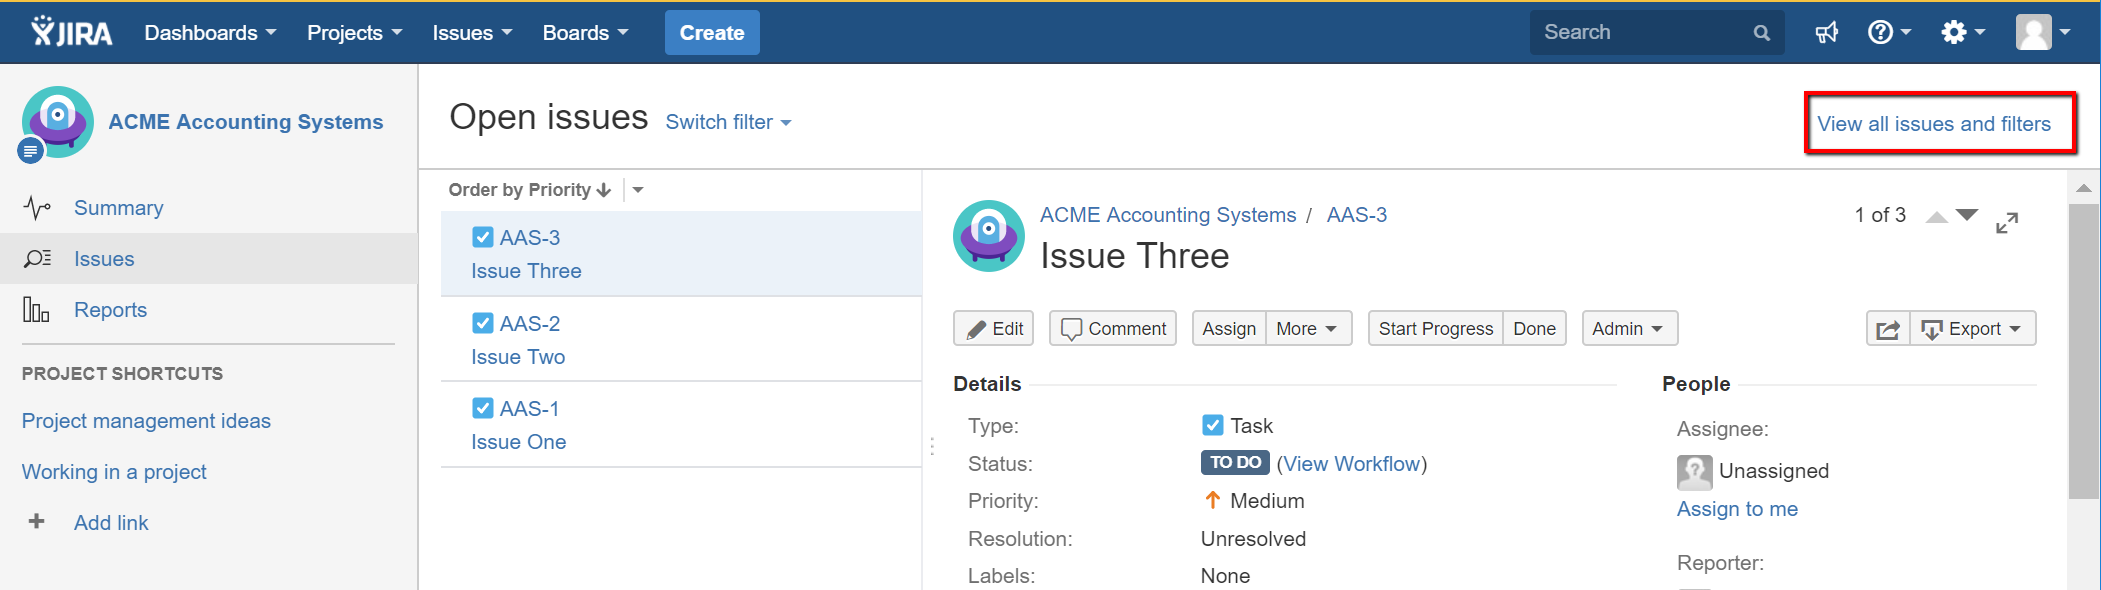
To start out lets use the Jira search capability to find our ‘NewYork’ labelled issues. First navigate to the search page in Jira. From the project page you can get there with by selecting the ‘View all issues and filters’ link.
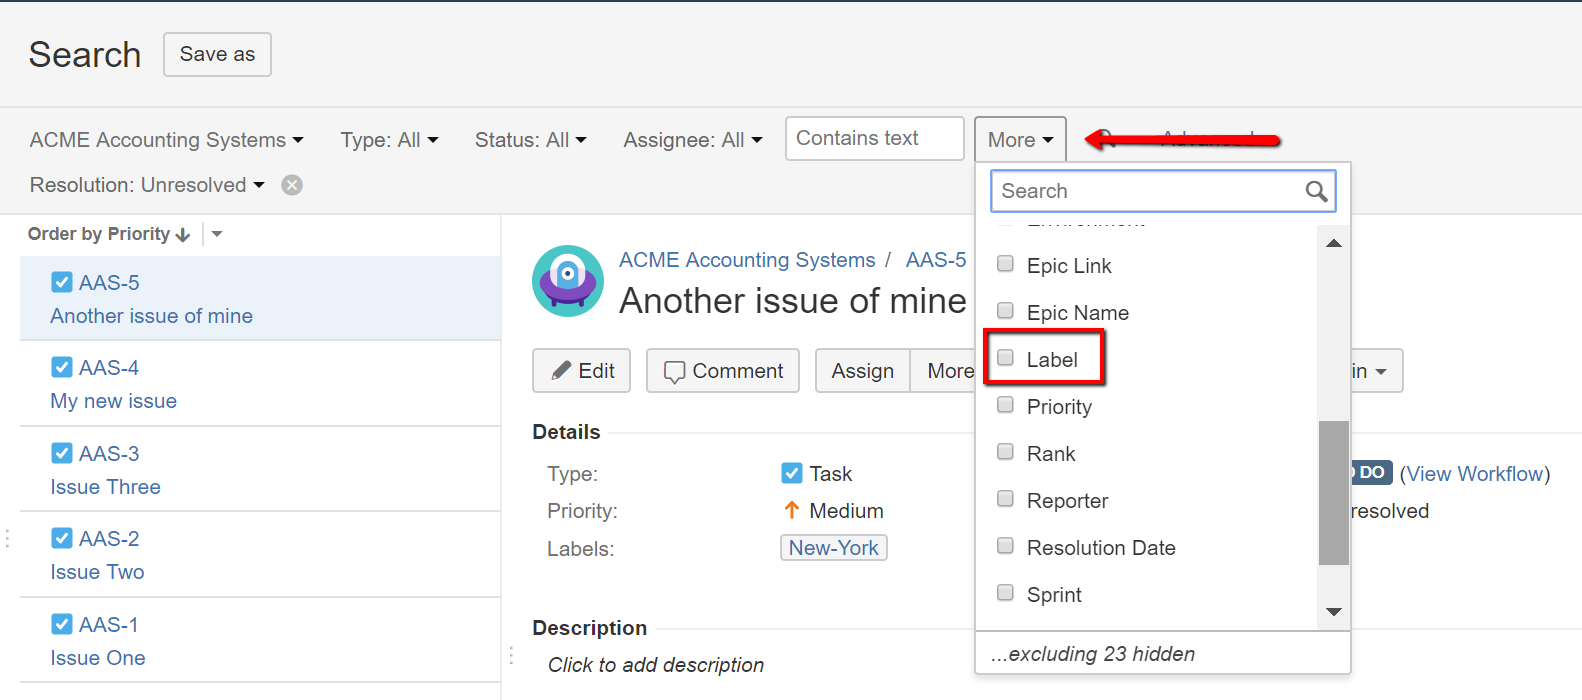
To search on labels we’ll need to add that option to our search criteria using the ‘More’ drop down box:
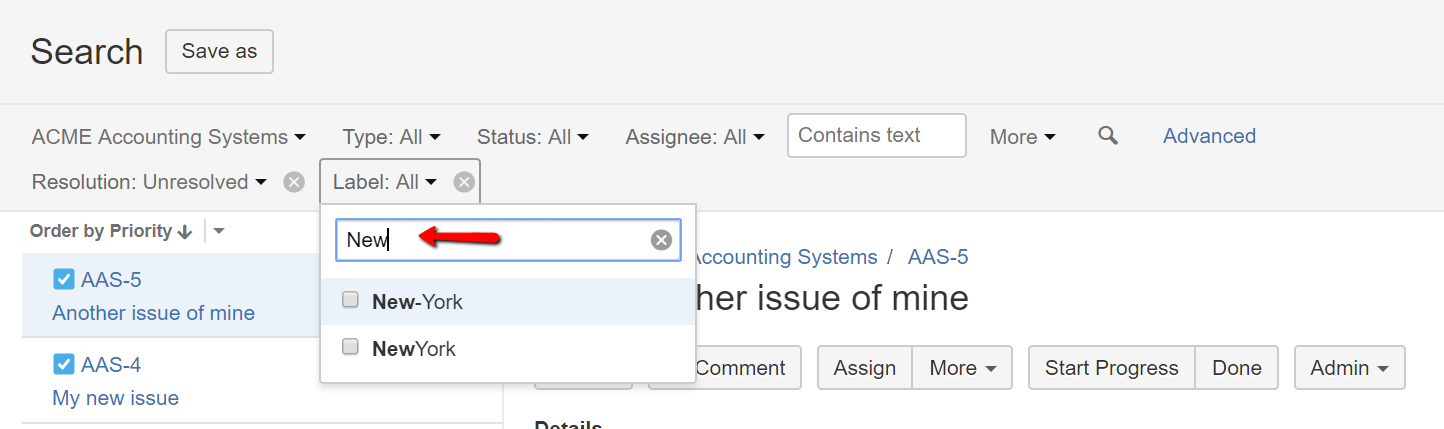
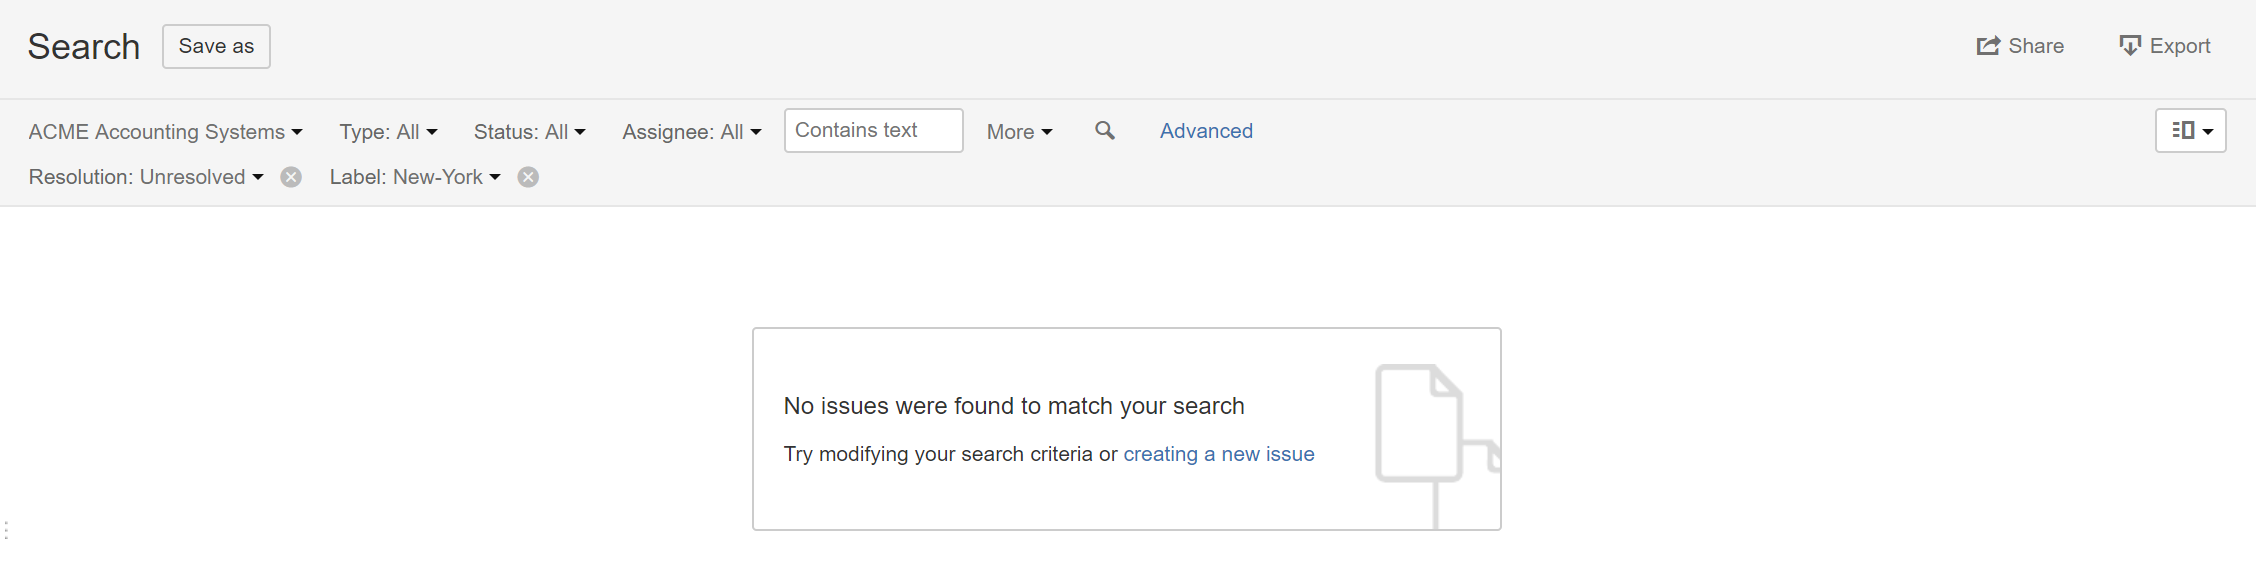
Once that’s selected we’ll be able to search for all our issues based on a label with ‘NewYork’. If you start out searching with the text ‘New’ you’ll see Jira shows us all the similar labels..
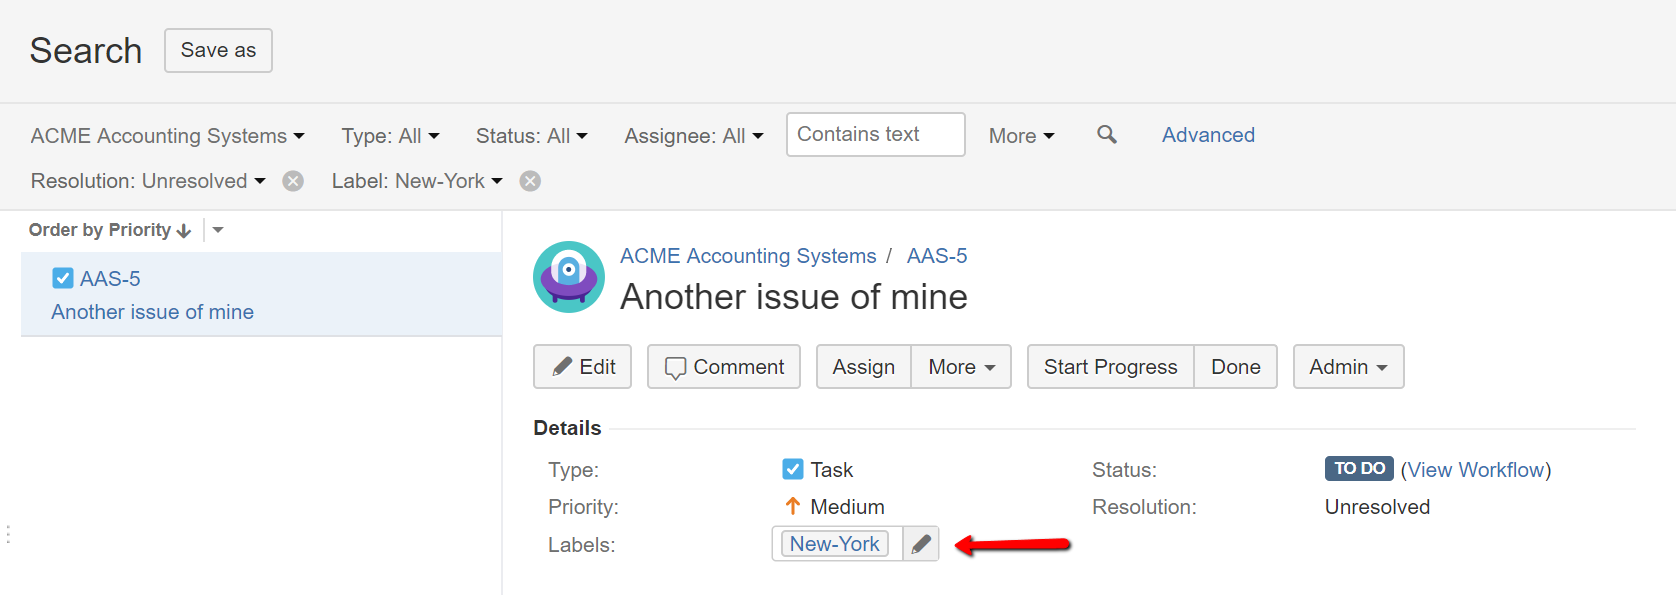
From here we can select just the label ‘New-York’ and modify this lable to rename it ‘NewYork’. Then we’re keeping everything consistent…
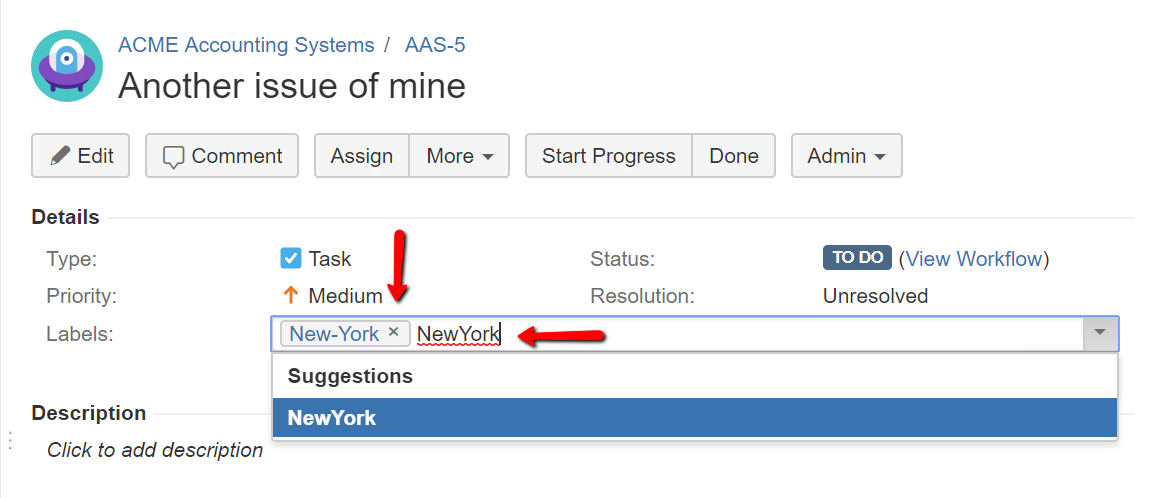
And modify the label by deleting it (click on the ‘x’) and re-typing as ‘NewYork’
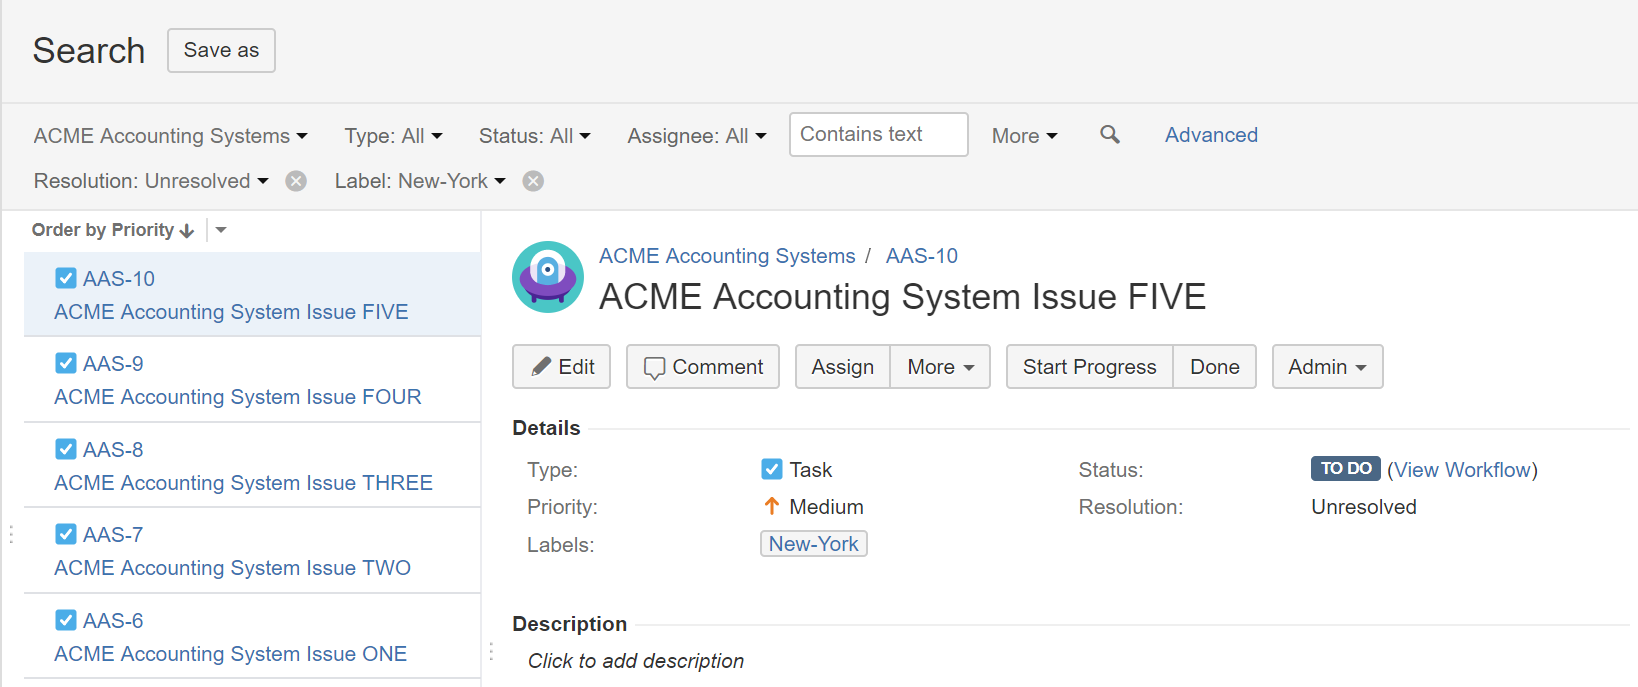
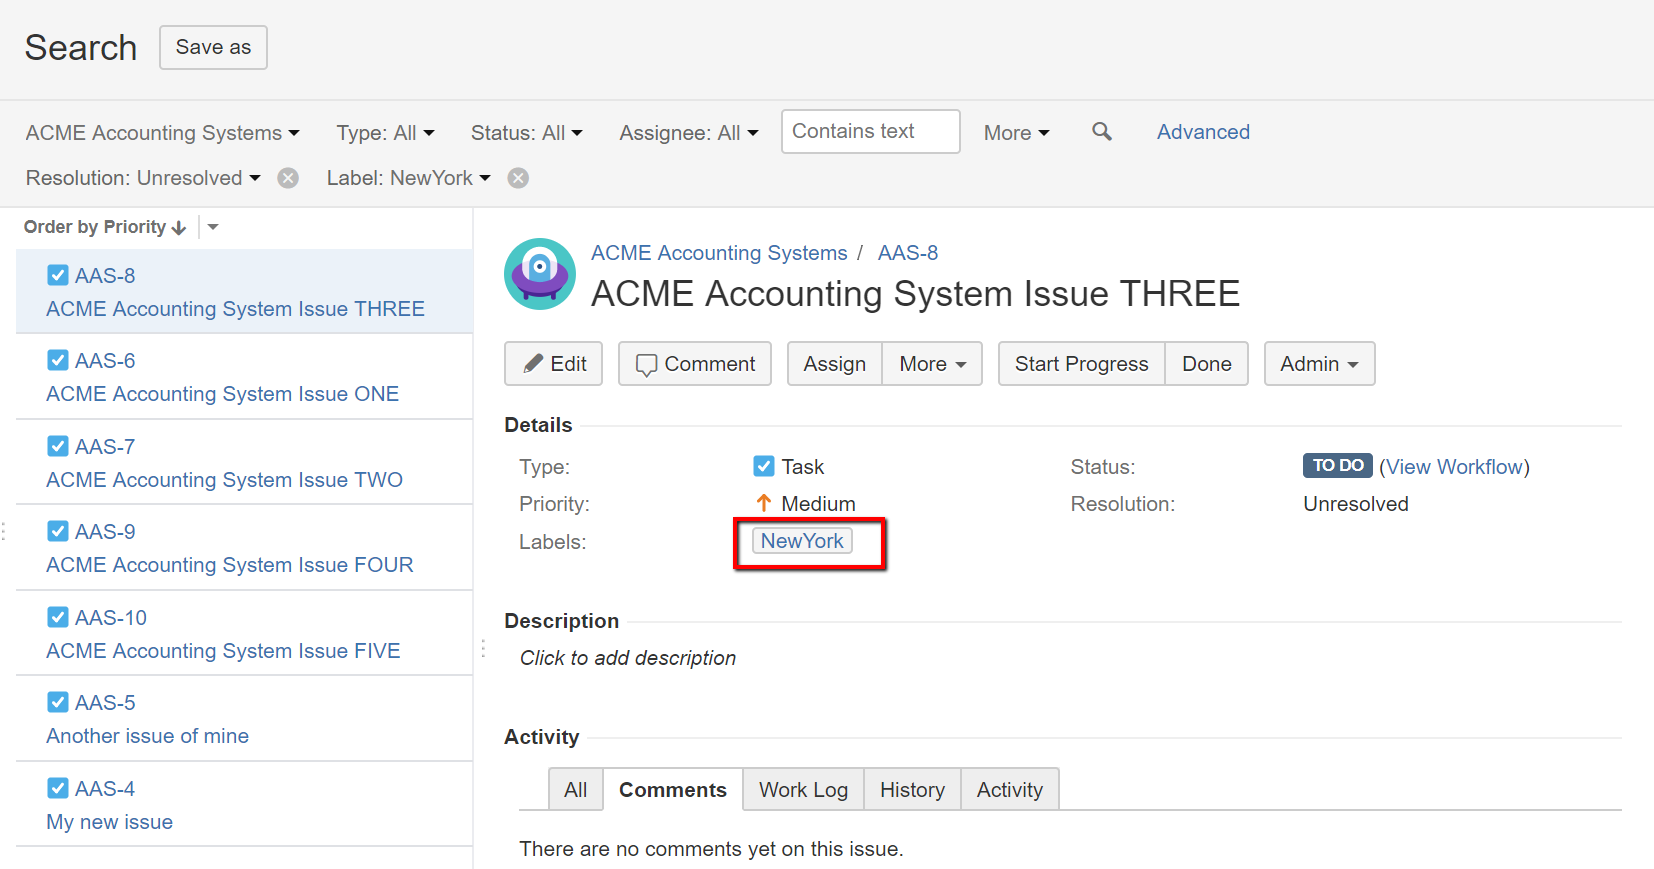
Now when we search for issues with the label ‘NewYork’ we get all our issues related to ‘NewYork’. Jira has even removed the label ‘New-York’ from it’s suggested labels list because nothing has the label ‘New-York’ anymore…
What happens though if you have hundreds of labels incorrectly specified? You don’t want to go through 100’s of issues updating them manually. For this we can use a bulk change.
Bulk Change
For a bulk change we use the same approach to identify the issues we want to update. We’ll make sure we’ve clicked the ‘View all issues and filters’ link (if it’s visible) and we’re on the issues search page. From this page we’ll apply the filter we need to identify the issues that need updating. In our chase we’re searching for labels with the text ‘New-York’.
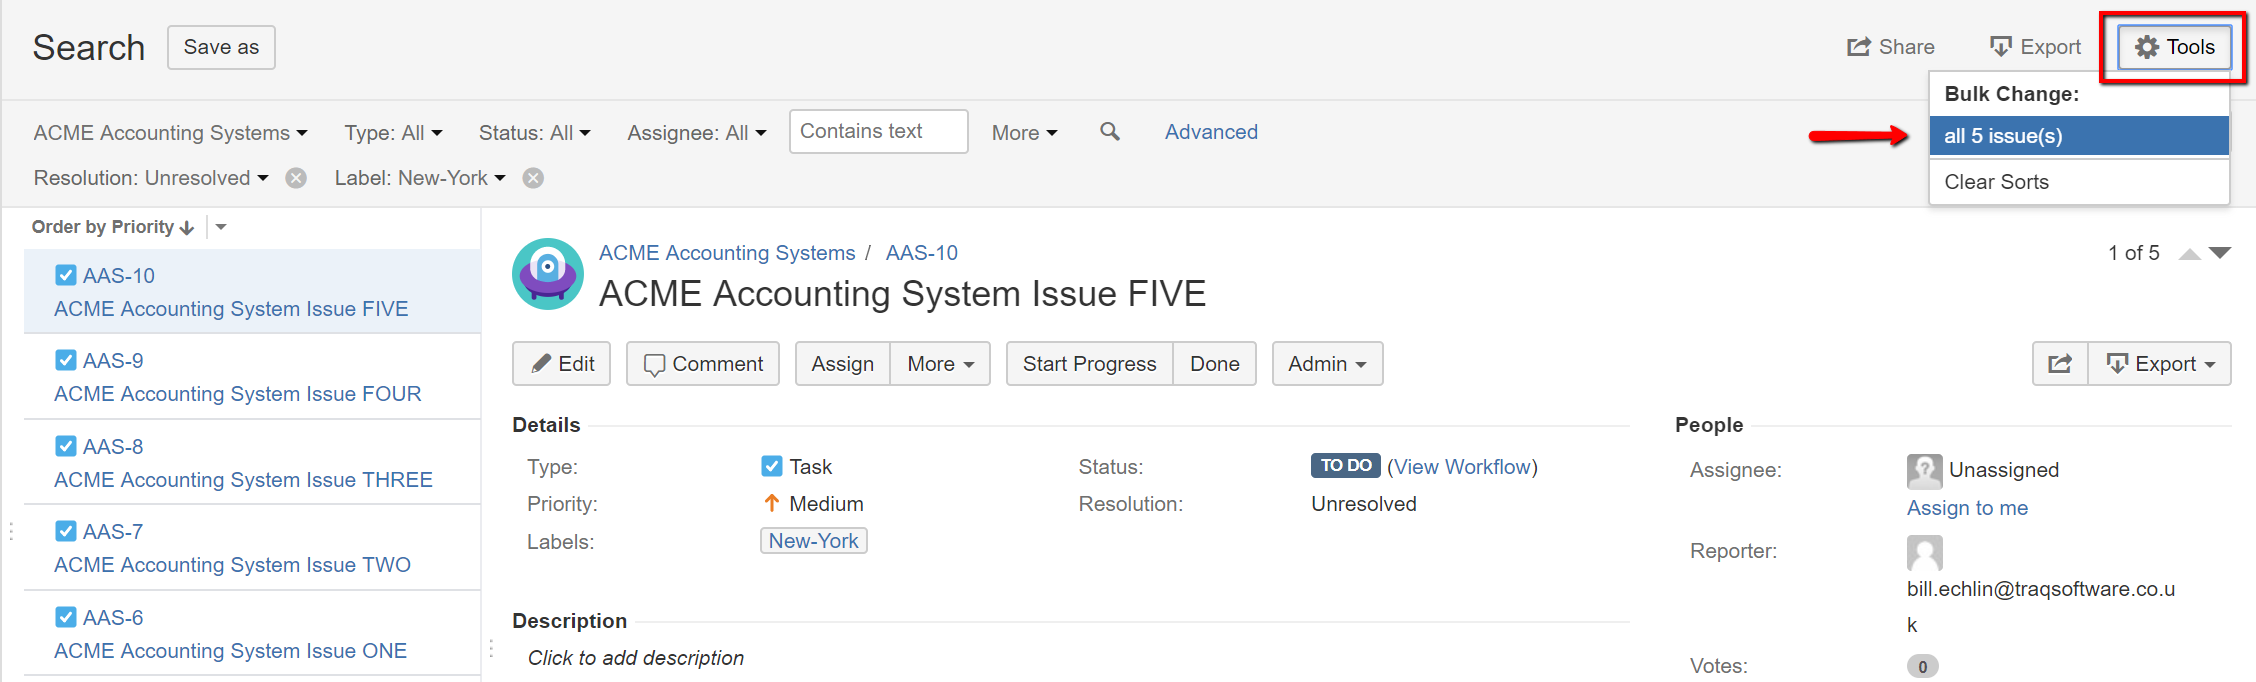
I’ve added another 5 issues to my system that have the wrong label. Our search has identified and pulled up these five issues that have the wrongly formatted ‘New-York’ label. So we need to change the label from ‘New-York’ to ‘NewYork’. This time round we’ll do it with ‘Bulk Update’.
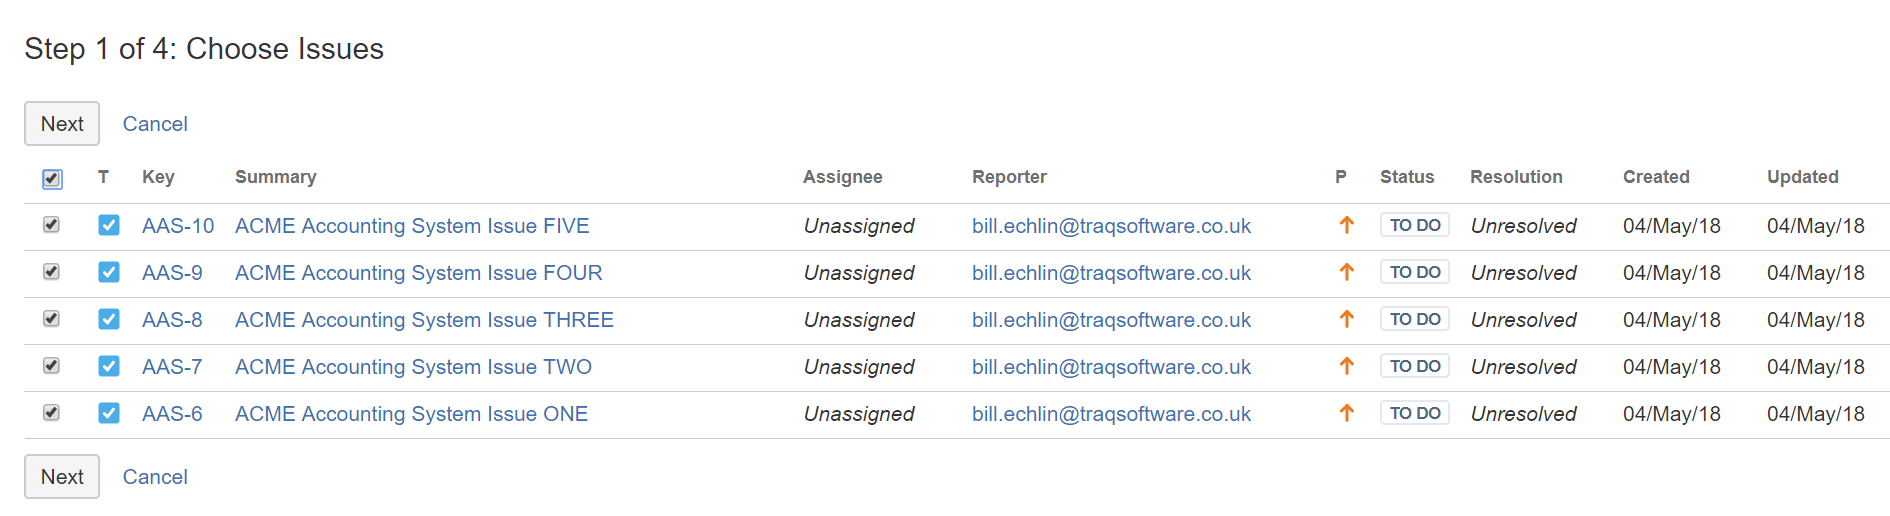
Select the ‘Bulk Change’ – ‘All 5 issues’ option. From here Jira will walk us through 4 steps. First we select the issues (all or just some of them):
Select all issues in the list and click ‘Next’. Then we select the operation. In our case that’s the ‘Edit issue’ operation.
Select ‘Edit issues’ and click next. The following ‘Operation Details’ screen lets us set updated field values for all the issues in our bulk update operation. On the operation details page we need to update the labels section.
Now the point to bear in mind here is that we’ll need to do this in two steps.
1. Apply the new label we want
2. Delete the old label we don’t want
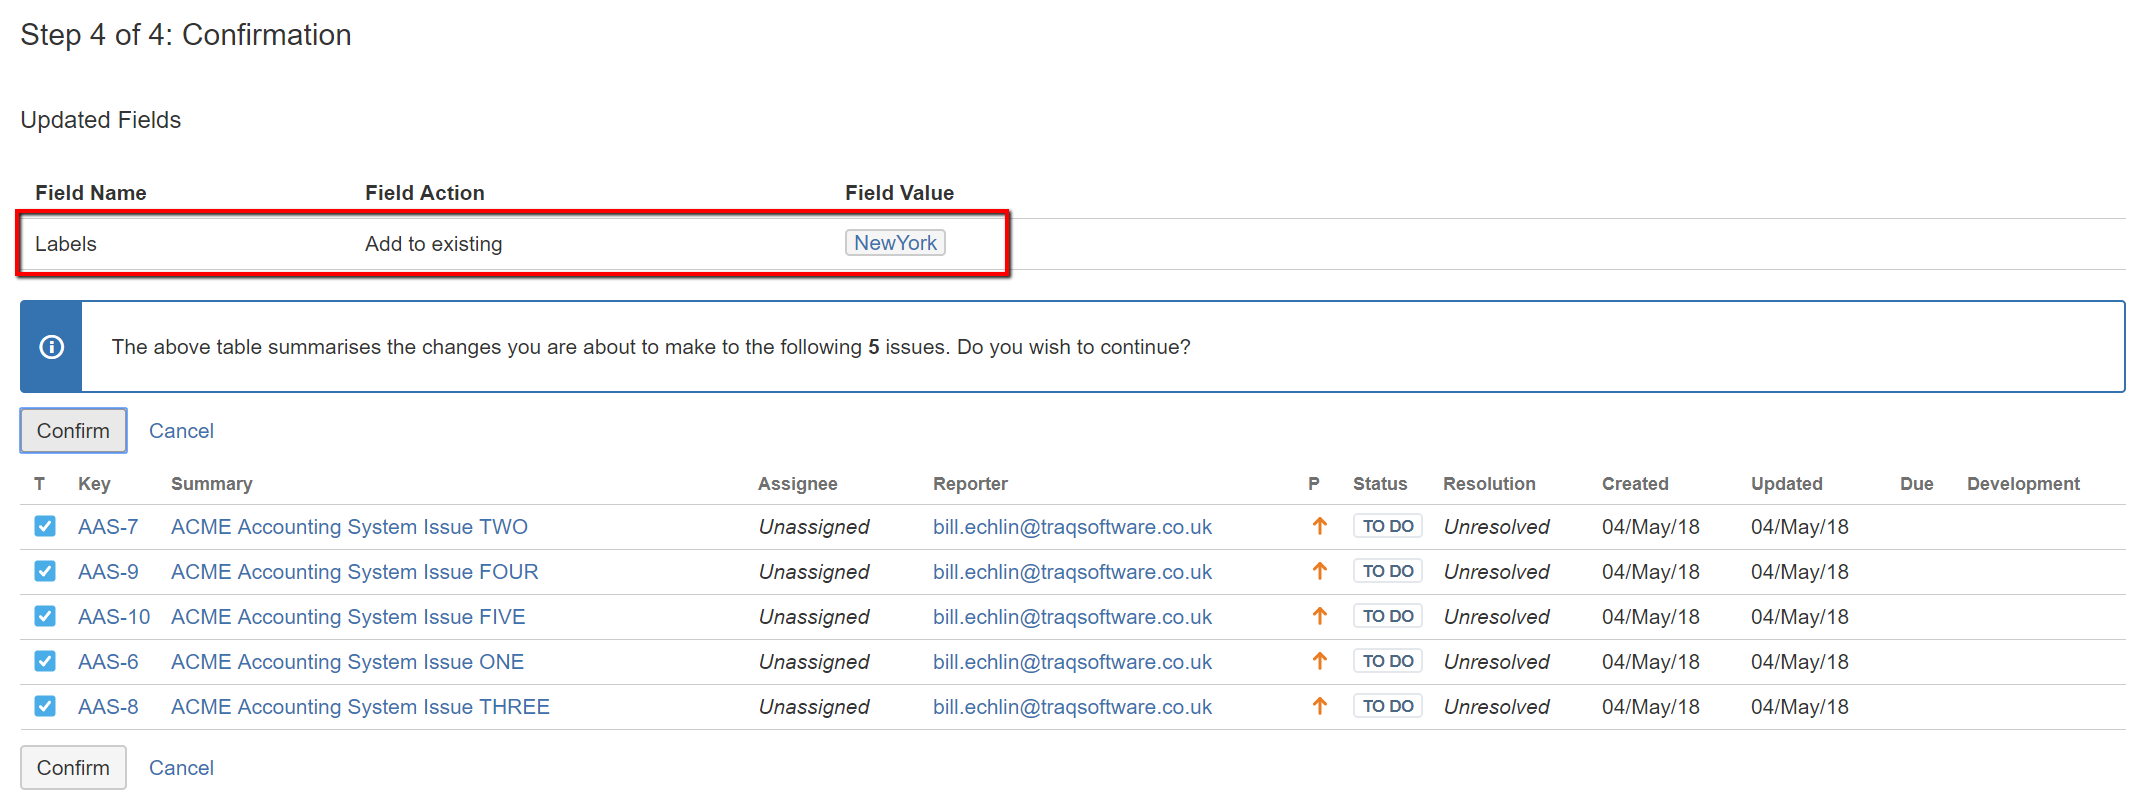
So first we’ll select ‘Change labels’ – ‘Add to Existing’ and we’ll add the correctly formated label ‘NewYork’
Click next and apply that change. At which point we should be on the ‘Confirmations’ screen.
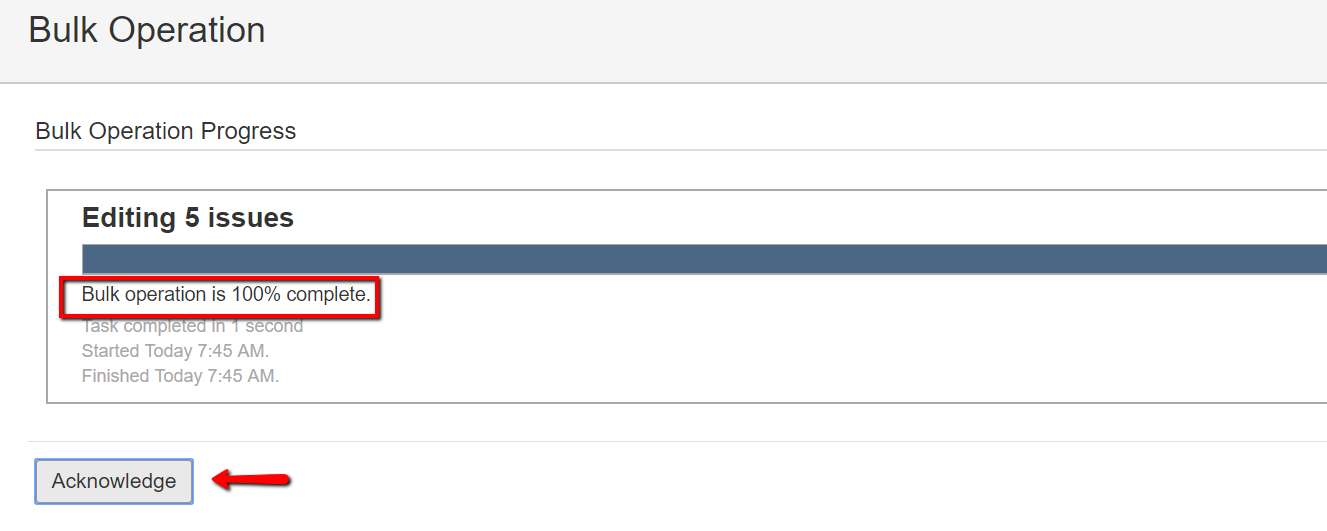
Check you have the right update defined and the correct list of Jira issues you want to update. Then click ‘Confirm’. At which point you should see the confirmation screen where you just need to ‘Acknowledge’ the update.
Now our issues should have both the correct label and the incorrect label applied.
Our search criteria for the incorrect label ‘New-York’ is still applied so we can continue again and run through the bulk update but this time round select the ‘Find and remove these’ options on the change label field.
Proceed to complete this bulk update and you should be back to the search page.
This time round though your search for issues with the label ‘New-York’ returns no results. So our replace operation has been successful. If we search for label ‘NewYork’ we get all our issues with the correct labels
Labels are incredibly useful, very flexibile and absolutly key to finding the issues that important to you and your team. However, they can quickly become unmanagable as you end up with millions (slight exageration) of differnt labels that are impossible to work with. The trick is keeping them clean and well organised using search and bulk update.
For us we’re all straight and organised on the label front now. We’ll quickly apply a slightly more advanced search to demonstrate the flexibility of Jira and then we’re done.
More Advanced Searches
For this example we want to look for issues that are related to ‘NewYork’ and have a ‘High or Medium’ priority we can add more parameters to our search criteria. Use the ‘More’ drop down to add the ‘Priority’ field and then set the search up as follows:
From this you can see that you can build up quite complex search criteria easily and quickly. Filtering on just the issues you need to focus on depending on properties like Labels and priority.
It’s this sort of advanced and flexible search capability that gives Jira it’s power. It’s incredibly easy to apply these smart searches and find exactly the issues you need to focus on. So whilst we’ve touched on some advanced topics here, like configuring priority schemes in Jira, understanding the basics of searching by Priority and Labels will serve you well.
 Which shows our two projects:
 What we need to do now is make sure that both of those projects support the Priority categories we need and the lables for the three sites. First off then lets setup the priorities.
 You’ll see the ‘Open Issue’ page for the Project and hiding down the bottom is the ‘Projecgt Settings’ option:
 There’s a lot to the project settings page, most of which we’re not interested in. What we are interested in is the ‘Priorities’ section:
 Clicking on this takes us to the settings page for the priorities. We’ll see here a list of all the priorities that have been configured:
 This is just a list. We can’t modify them here. What you’ll notice though is the statement:
“Scheme used by this project:Default priority scheme – USED BY 4 PROJECTS”
What happens in Jira is that we define a ‘Scheme’ and that scheme is applied to one or more projects. So we’re not modifying specific priority values for just this one project. We’re going to be modifying a ‘Scheme’ and that scheme is applied to our projects. This makes life easier for us, because we only have to update the scheme and that’s applied to both our ACME projects.
Once we’ve selected ‘Actions’ and the ‘View Priority Schemes’ we’ll see a list of our Priority Schemes. At the moment just one listed, the ‘Default priority scheme’. What we’ll do is add a new ‘Priority Scheme’ so that we can apply this to both our ACME projects. So click on the ‘Add Priority Scheme’ button:
This is just a list. We can’t modify them here. What you’ll notice though is the statement:
“Scheme used by this project:Default priority scheme – USED BY 4 PROJECTS”
What happens in Jira is that we define a ‘Scheme’ and that scheme is applied to one or more projects. So we’re not modifying specific priority values for just this one project. We’re going to be modifying a ‘Scheme’ and that scheme is applied to our projects. This makes life easier for us, because we only have to update the scheme and that’s applied to both our ACME projects.
Once we’ve selected ‘Actions’ and the ‘View Priority Schemes’ we’ll see a list of our Priority Schemes. At the moment just one listed, the ‘Default priority scheme’. What we’ll do is add a new ‘Priority Scheme’ so that we can apply this to both our ACME projects. So click on the ‘Add Priority Scheme’ button:
 We’ll give the scheme a name (e.g. “Simple Priority Scheme”), add just the three priorities we need and set the default value.
 Once we’ve added this we’ll see our new scheme added on our view priority schemes page
 All we need to do now is associate it with our two ACME projects. Not un-surprisingly we click on the ‘Assoicate’ link on the right handside. And from here just select our two ACME projects followed by the ‘Next’ button.
 On the ‘View Priority Schemes’ page we should now see confirmation that we have our three priority categories and that they are applied to our two ACME projects.
 A few things to note here. If similar labels already exist Jira will prompt you with suggestions. This helps keep your labels consistent. You can’t add spaced in Labels. So either use ‘-‘ symbols or use camel case with no spaces (e.g. “NewYork”).
Now the important point to grasp here is that any user can assign ANY label he or she likes to an issue. There is nothing to stop a user making up and entering their own lables. This is both a strength and a weakness to categorising your Jira issues.
It’s a strength because you don’t have the hassle of setting things up under the administrator account when you need to add a new category of lable. So you can just type in any label name you want. For example if we need to add a lable for our ‘Berlin’ office we just type in ‘Berlin’ in the label field in an issue to add it.
A few things to note here. If similar labels already exist Jira will prompt you with suggestions. This helps keep your labels consistent. You can’t add spaced in Labels. So either use ‘-‘ symbols or use camel case with no spaces (e.g. “NewYork”).
Now the important point to grasp here is that any user can assign ANY label he or she likes to an issue. There is nothing to stop a user making up and entering their own lables. This is both a strength and a weakness to categorising your Jira issues.
It’s a strength because you don’t have the hassle of setting things up under the administrator account when you need to add a new category of lable. So you can just type in any label name you want. For example if we need to add a lable for our ‘Berlin’ office we just type in ‘Berlin’ in the label field in an issue to add it.
 However, this strength of labels is also it’s down fall. That is you end up with lots of users just adding all sorts of labels. Jira will prompt you with suggested labels as you start typing (to encourage consistency) but there’s nothing to stop users mis-spelling label names or adding their own labels. This will seriously impact your ability to search and report on labels.
The key to managing this is regular maintenance of the labels added to your issues. We can maintain our lables using the search capability in Jira which we’ll look at next.
However, this strength of labels is also it’s down fall. That is you end up with lots of users just adding all sorts of labels. Jira will prompt you with suggested labels as you start typing (to encourage consistency) but there’s nothing to stop users mis-spelling label names or adding their own labels. This will seriously impact your ability to search and report on labels.
The key to managing this is regular maintenance of the labels added to your issues. We can maintain our lables using the search capability in Jira which we’ll look at next.
 To start out lets use the Jira search capability to find our ‘NewYork’ labelled issues. First navigate to the search page in Jira. From the project page you can get there with by selecting the ‘View all issues and filters’ link.
 To search on labels we’ll need to add that option to our search criteria using the ‘More’ drop down box:
 Once that’s selected we’ll be able to search for all our issues based on a label with ‘NewYork’. If you start out searching with the text ‘New’ you’ll see Jira shows us all the similar labels..
 From here we can select just the label ‘New-York’ and modify this lable to rename it ‘NewYork’. Then we’re keeping everything consistent…
 And modify the label by deleting it (click on the ‘x’) and re-typing as ‘NewYork’
 Now when we search for issues with the label ‘NewYork’ we get all our issues related to ‘NewYork’. Jira has even removed the label ‘New-York’ from it’s suggested labels list because nothing has the label ‘New-York’ anymore…
 What happens though if you have hundreds of labels incorrectly specified? You don’t want to go through 100’s of issues updating them manually. For this we can use a bulk change.
 I’ve added another 5 issues to my system that have the wrong label. Our search has identified and pulled up these five issues that have the wrongly formatted ‘New-York’ label. So we need to change the label from ‘New-York’ to ‘NewYork’. This time round we’ll do it with ‘Bulk Update’.
 Select the ‘Bulk Change’ – ‘All 5 issues’ option. From here Jira will walk us through 4 steps. First we select the issues (all or just some of them):
 Select all issues in the list and click ‘Next’. Then we select the operation. In our case that’s the ‘Edit issue’ operation.
 Select ‘Edit issues’ and click next. The following ‘Operation Details’ screen lets us set updated field values for all the issues in our bulk update operation. On the operation details page we need to update the labels section.
 Now the point to bear in mind here is that we’ll need to do this in two steps.
1. Apply the new label we want
2. Delete the old label we don’t want
So first we’ll select ‘Change labels’ – ‘Add to Existing’ and we’ll add the correctly formated label ‘NewYork’
Now the point to bear in mind here is that we’ll need to do this in two steps.
1. Apply the new label we want
2. Delete the old label we don’t want
So first we’ll select ‘Change labels’ – ‘Add to Existing’ and we’ll add the correctly formated label ‘NewYork’
 Check you have the right update defined and the correct list of Jira issues you want to update. Then click ‘Confirm’. At which point you should see the confirmation screen where you just need to ‘Acknowledge’ the update.
 Now our issues should have both the correct label and the incorrect label applied.
 Our search criteria for the incorrect label ‘New-York’ is still applied so we can continue again and run through the bulk update but this time round select the ‘Find and remove these’ options on the change label field.
 Proceed to complete this bulk update and you should be back to the search page.
 This time round though your search for issues with the label ‘New-York’ returns no results. So our replace operation has been successful. If we search for label ‘NewYork’ we get all our issues with the correct labels
 Labels are incredibly useful, very flexibile and absolutly key to finding the issues that important to you and your team. However, they can quickly become unmanagable as you end up with millions (slight exageration) of differnt labels that are impossible to work with. The trick is keeping them clean and well organised using search and bulk update.
For us we’re all straight and organised on the label front now. We’ll quickly apply a slightly more advanced search to demonstrate the flexibility of Jira and then we’re done.
Labels are incredibly useful, very flexibile and absolutly key to finding the issues that important to you and your team. However, they can quickly become unmanagable as you end up with millions (slight exageration) of differnt labels that are impossible to work with. The trick is keeping them clean and well organised using search and bulk update.
For us we’re all straight and organised on the label front now. We’ll quickly apply a slightly more advanced search to demonstrate the flexibility of Jira and then we’re done.
 From this you can see that you can build up quite complex search criteria easily and quickly. Filtering on just the issues you need to focus on depending on properties like Labels and priority.
It’s this sort of advanced and flexible search capability that gives Jira it’s power. It’s incredibly easy to apply these smart searches and find exactly the issues you need to focus on. So whilst we’ve touched on some advanced topics here, like configuring priority schemes in Jira, understanding the basics of searching by Priority and Labels will serve you well.
From this you can see that you can build up quite complex search criteria easily and quickly. Filtering on just the issues you need to focus on depending on properties like Labels and priority.
It’s this sort of advanced and flexible search capability that gives Jira it’s power. It’s incredibly easy to apply these smart searches and find exactly the issues you need to focus on. So whilst we’ve touched on some advanced topics here, like configuring priority schemes in Jira, understanding the basics of searching by Priority and Labels will serve you well.