Probably the most critical aspect of any automation project is the ability to reliably identify the objects you need to interact with. Fail to identify the objects at all and you’re dead in the water. End up with unreliable identification and you’re probably in an even worse position. When it works some times and not others you’ll spend inordinate amounts of time trying to work out why tests have failed…. is it your scripts or is it a bug? You have to get to a point where you can reliably identify application objects every-time. In this module we’ll walk you through how you can approach this with TestComplete.
Key to object identification in TestComplete is a feature called the Name Map. You can think of this as your list of objects in your application that you want TestComplete to interact with. More than that, this list contains all the properties that you want to use to identify those objects. But why would you really want this?
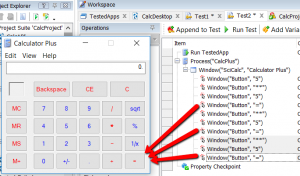
Well consider the situation where you write all your tests and each test item/step points directly to the object you want to interact with. More than that many test items/steps (maybe 100’s or even 1000’s) all point to the same object in various places in your scripts. Like testing the CalcPlus application. You’re going to have many test items/steps that point to and click on the ‘=’ button.
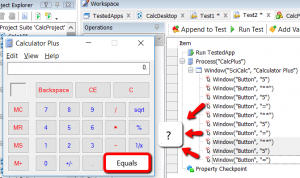
Now just say (and I know this sounds a bit daft but it highlights the issue) the developers change the application. They replace the ‘=’ button with a new button that has the text ‘Equals’. Now your test steps don’t have anything to point to. They don’t see the object that was there and they aren’t intelligent enough to work out that the button “=” is now the “Equals” button. Problem for you is that you have to go through all of your test steps, every single one, and update each one to point to the new object.
As you might have guessed this approach is not scalable. The solution is the TestComplete Name Map. Think of the name map as a layer that sits between your scripts and the objects you’re testing.
So rather than have your test steps point directly at the objects they all point at a single entry in the Name Map. The Name Map entry then points at the objects. Thus when the object changes…..
If the Equals button changes from “=” to “Equals” you don’t change all your test steps. In fact you don’t change any of them at all. You leave your test steps pointing at the entry in the nameMap. Then you change the NameMap to point at the new object. And that means just one change in the name map. Makes your life a lot easier.
Now that’s the main purpose of the name map but there are two more. So in total the NameMap presents us with 3 main advantages:
1. object reference abstraction (we’ve just discussed this)
2. object identification
3. object aliasing
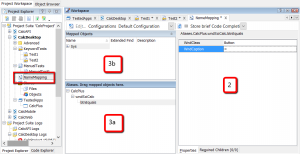
‘One’ we’ve already discussed. ‘Two’ is about using the name map to list the properties of the object that we want to use to find the object. And three is about allowing you to define your own name to reference an object (a name that might be more logical and easier to type). Let’s look at the name map and that take those other two points in turn. If you double click on the Name Map node in the Project Explorer panel you’ll see this….

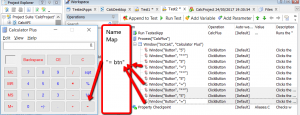
The nameMap workspace is split into 3 panels. The panel shown as ‘2’ is for our Object Identification. And the panels labled ‘3a’ and ‘3b’ are for our object aliasing (or naming).
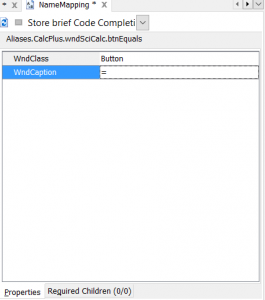
In panel 2 of the name Map we set the “Properties” that tell test complete what the object looks like. The only way TestComplete (and you for that mater) can find an object in your application is if you tell it what to look for. In the example we’ve defined two properties; WndClass and WndCaption. We’re telling TestCompplete that it needs to look for an object where WndClass=Button and WndCaption=”=”.
It’s up to you to make sure you define these properties so that TestComplete can uniquely identify the object… so you need to find unique properties and list them here. That might mean picking just 2 properties (as in the example) or 20 properties. Whatever you pick you must make sure the properties uniquely identify the object and that they don’t change (if the property values change each time you start the application or change dynamically during run time you’ll need to find different properties). Just remember to look for unique properties, static properties and you won’t go too far wrong.
It’s all very well having a layer of abstraction (to help manage changes) and the ability to identify those objects. You’ll still need a name to refer to the objects in your scripts though. And it’s no good if that name looks something like this….
Sys.Process(“CalcPlus”).Window(“SciCalc”, “Calculator Plus”, 1).Window(“Button”, “=”, 21)
That’s the full name that TestComplete will always be able to refer to the ‘=’ button object with. Bit difficult to say and even more difficult to type in. That’s were Aliases come in.
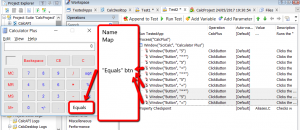
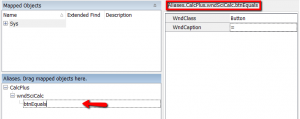
Once you have the object mapped and listed in the name map TestComplete gives the object a more logical, shorter name for you. In the Aliases panel (3a) you’ll see a much shorter, easier to say and type, name. …
Aliases.CalcPlus.wndSciCalc.btnEquals
In fact this is one that you can edit yourself by clicking on the name (as seen in the example). By clicking on the name twice you can edit the name yourself to give it an even more meaningful name. Also sometimes TestComplete’s best guess at a sensible name isn’t so clever. So it’s wise to review and modify these as you see fit.
If you’re wondering what the ‘Mapped Objects’ (3b) is that’s another way of looking at the same list of objects you’ve mapped. I like to think of this window as showing the Mapped Object names as TestComplete sees them. And the Aliases window as the Mapped Object names that you want to see them. To start with I’d recommend ignoring the Mapped Objects panel and just focus on the Aliases panel. This’ll keep you on the right track as you get used to mapping and referring to objects you’ve listed in the Name Map.
As mentioned before this concept of Name Mapping is absolutely key to TestComplete. It can be quite confusing to start with but persevere. It’ll make your life so much easier as you build your automated tests.