In the last module, Module 3, we looked at the TestComplete user interface. In this module we’re going to look in detail at how TestComplete manages projects and projects suites. In TestComplete there is a hierachy of items that you’ll create and work with as you implement your automation project. That hierarchy starts at the top with the ‘Project Suite’.
The Project Suite is just a container for 1 or more projects. Each project being a distinct group of test items that go together to make up a particular test automation effort. For example you might have an application to test that has, desktop, mobile and web client applications. It may also have a server component that’s accessed via an API.
In this example we’ve used TestComplete’s Project Suite to cover all the automated testing of one particular application that has a number of different components. Within the Project Suite we’ve created separate projects for the desktop, mobile, web and Api components of this application. You could even create another project that covers integrated testing across all 4 of these applications.
The key thing to remember is that each TestComplete project suite can hold 1 or more TestComplete projects. Each project is a container for the test components and artifacts needed to automate the testing of a distinct aspect of your application. Grouping projects into a project suite allows us to reuse artifacts across different projects whilst isolating the test effort for a particular aspect of our testing into neat manageable project containers.
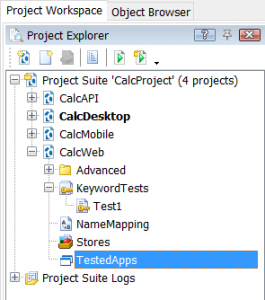
Each project will contain all the elements you need for a specific test effort. By default those elements include:
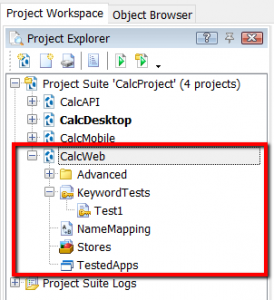
Project: the project node, when opened in the workspace, allows you to select which tests to run within the project and set project properties (e.g. enabled screen captures during test replays).
Advanced folder: in here you’ll find your scripted (e.g. Python) tests and other more advanced project components. Components like Events or Low Level Procedures. This folder is really designed to hide some of the more complex project elements whilst you get started with TestComplete.
Keyword Tests: Your automated tests.
NameMapping: a list of the objects in your application under test that you want to interact with. The Name Map allows you to specify the properties you want to use to identify those objects too. Much more on this later.
Stores: a container for lots of other objects you might need as part of your test automation project. For example objects to connect to databases, containers for storing images and containers to store files you might need to do comparisons against.
Tested Apps: this project object allows you to list the applications you are writing automated tests for. This helps because you can tell TestComplete to only focus on these applications during development and execution of your automated tests (and this helps because TestComplete then hides all the other unimportant stuff from you – to keep you focused on what’s important).
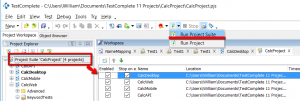
Lets look at the Project Suite entity in a little more detail then. To configure the Project Suite, double click project suite node in the Project Explorer. This gives you a list of Test Items for the suite. When you ‘run’ the suite, what you’ve selected here gets run. You want to run a series of Projects in turn? Select each of those projects here then run the Project Suite. TestComplete will run each project you’ve selected one after the other.
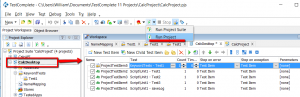
In the same vein if you double click on the Project node, open the project workspace, you’ll see a list of Project Test items. When you ‘run’ the Project, it’s the selected items in this list that get executed. You can add tests to this list of ‘Test Items’ just by dragging Key Word tests and scripted tests into this workspace.
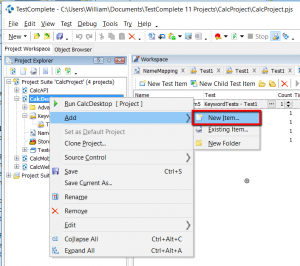
So we understand the concept of our test elements, all of which are listed in the Project Explorer. And we know that it’s that list of Test Items that gets executed when we run our Project. What if we want to do more than just run Keyword tests and/or scripted tests? Well TestComplete gives you a lot more capabilities that aren’t immediately visible to you. In the Project Explorer you can add other types of elements and test items to your project.
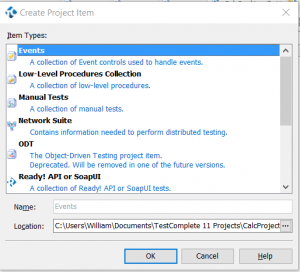
Right click on the project and select ‘Add’ followed by ‘New Item’. From here you’ll get a list of other project items that you can include in your project. You add other test elements like Manual Tests, Events and Low-Level Procedures. Each element giving you a new capability within your test project.
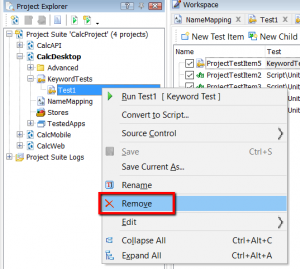 As well as adding you can remove and delete too. If you right click on an existing item and click on remove you can remove or delete a project element.
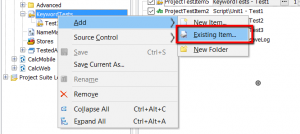
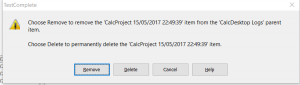
There is a clear distinction here. When you get prompted to ‘Remove’ or ‘Delete’ these options do very different things. Remove just stops displaying the item in your ‘Project Explorer’ view. The related files on your computers file system still exist. Once you’ve removed you can add ‘Existing’ items to include the item back in your project at a later date.
If you choose ‘Delete’ it does what it says. Not only does it remove it from the ‘Project Explorer’ view but it deletes the assoicated files on your computers files system. You won’t be able to add these items back into your project ever again. Gone for good they are.
This same concept applies to the Project log files. Here though you may well want to delete log files for good. As you run your tests log files build up over time and you’ll want to purge and delete many of them.
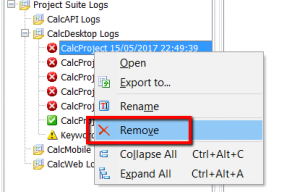
Again though, if you want to keep the files and only remove them from the displayed list in your Project Explorer then select ‘Remove’. Then you can add them back in later if you need them. If you don’t need them any more (ever!) then select delete.
Next up, Module 5, where we look at some of the more important options and settings you’ll find in TestComplete. There are millions of settings and options (slight exaggeration) so we’ll only focus on the important ones for now.