1. Jenkins Installation 2. Installing Jenkins Plugins 2. Jenkins Configuration 3. Deploying and Building the Application Under TestBy the time we’ve completed the module we will have Jenkins running on our Windows Master machine. The Jenkins configuration will be completed so that it will carry out six main actions…
i. Run up a new/clean EC2 Ubuntu instance (client) ii. Install the Jenkins client on the Ubuntu client iii. Download the AUT from GitHub to the Ubuntu client iv. Build the AUT on the Ubuntu client machine v. Install and start the AUT running on the client machine vi. Run some simple post build checks
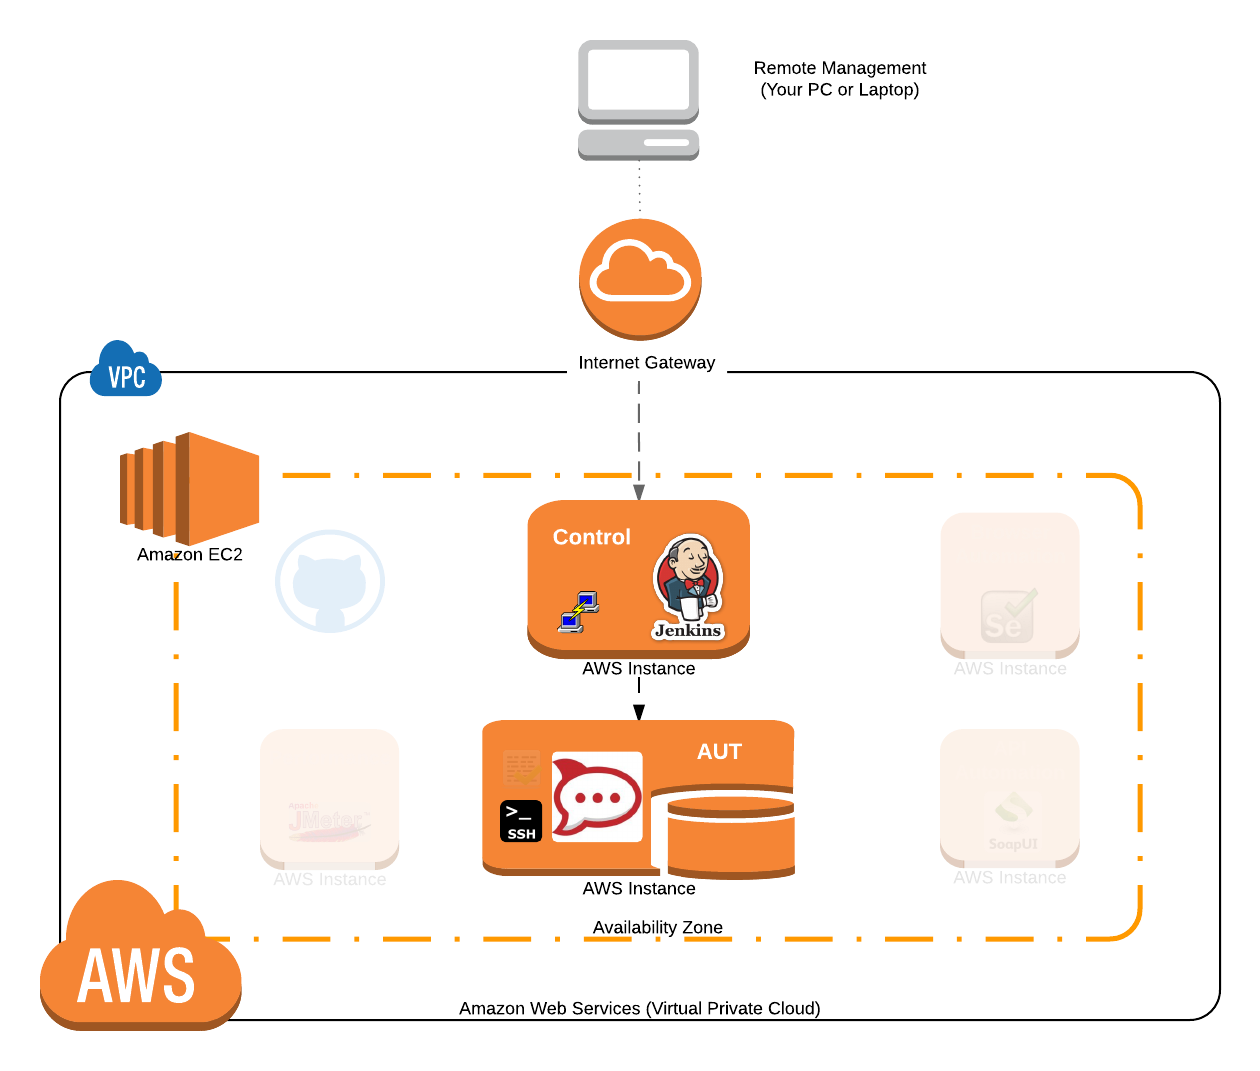 Note that we’re building on top of the AWS infrastructure we built in the first module by adding Jenkins and a bit of configuration. Whilst we created a client Ubuntu machine in in the first module we’re not actually going to be using that machine. What will happen is that Jenkins will fire up a completely new instance of the Ubuntu machine automatically whenever it’s needed. This is an ideal use case for bringing up Amazon Instances as and when we need them. More on how we do this in a minute.
 2. Once started open an RDP session on this Windows machine.
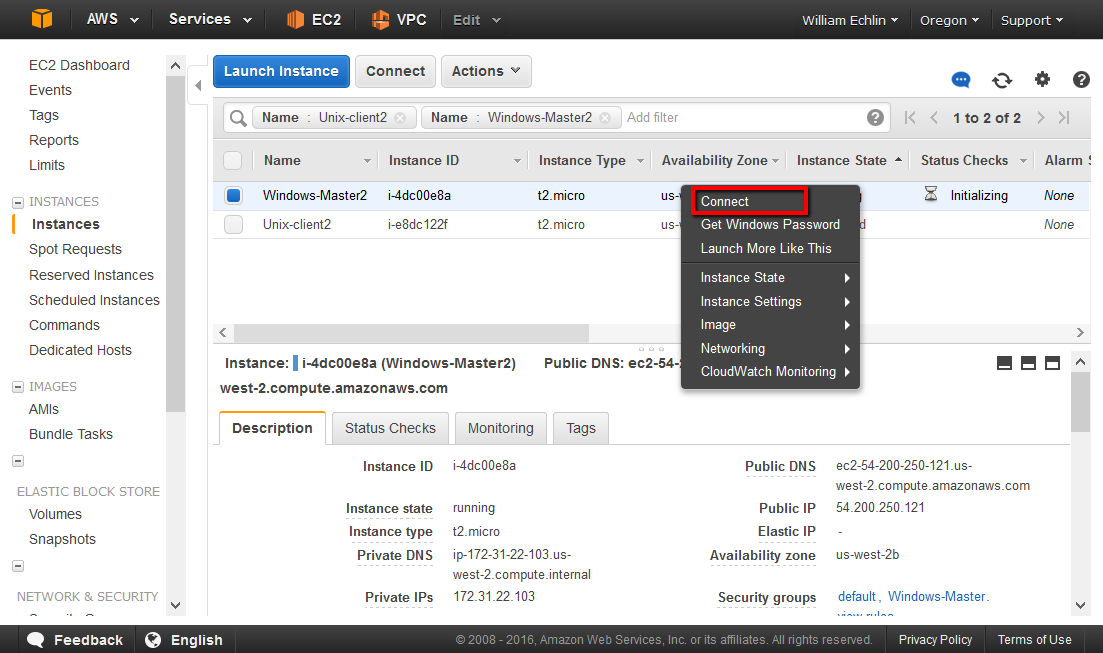 Then enter the password to open up the desktop session (you may need your .pem private key file to decrypt the password if you’ve forgotten it) .
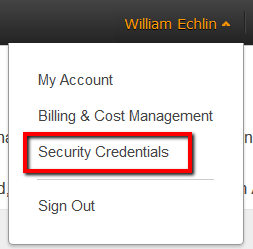 3. Expand the ‘Access Keys’ section and click on ‘Create New Access Key’
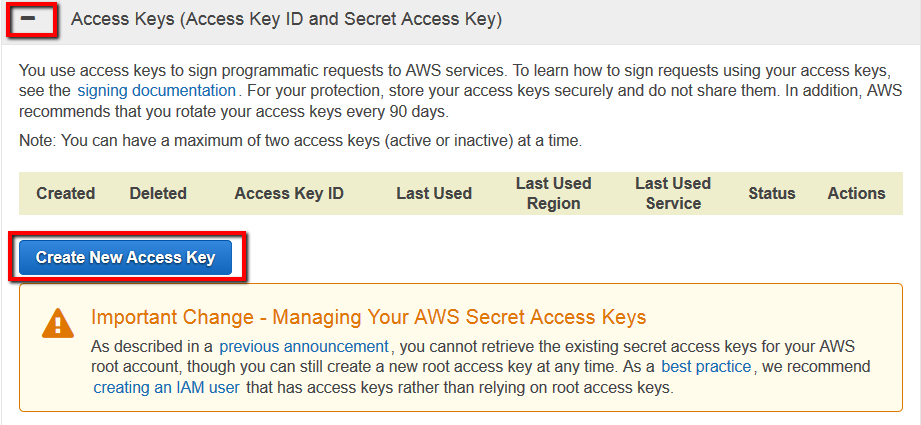 4. You can either download or show the access key. Either way you need to record these two parts of the key
Access Key Id Secret Access KeyNOTE: once you’ve downloaded or viewed the secret access key you CAN NOT obtain it again. If you lose it you’ll have to create another access key (no big deal but it’s easier if you just look after it now).
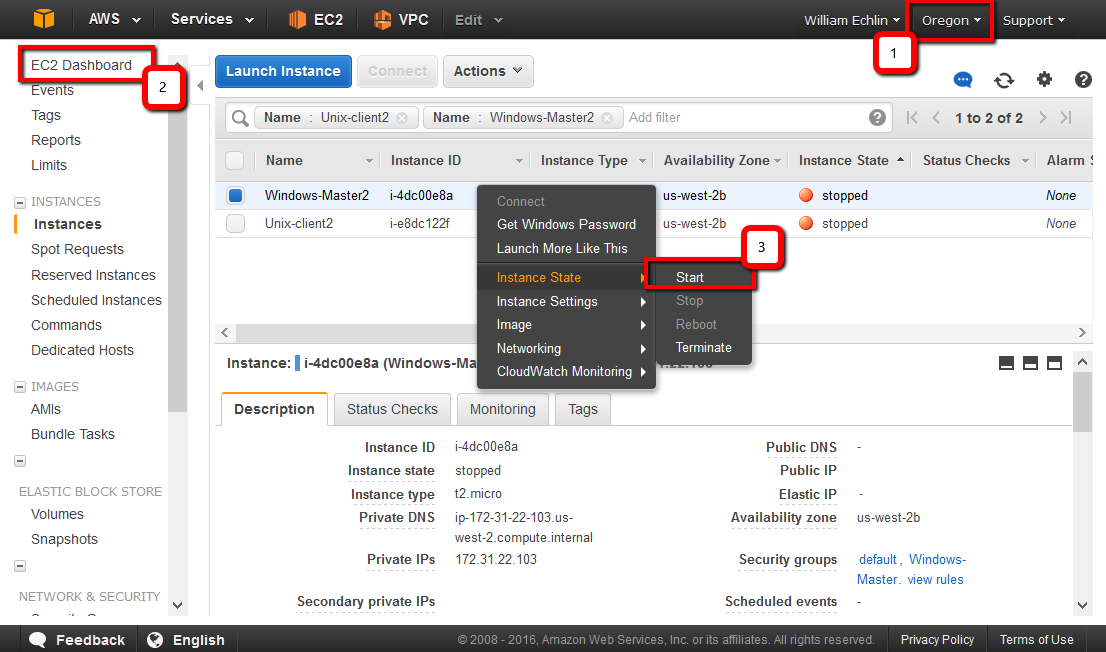
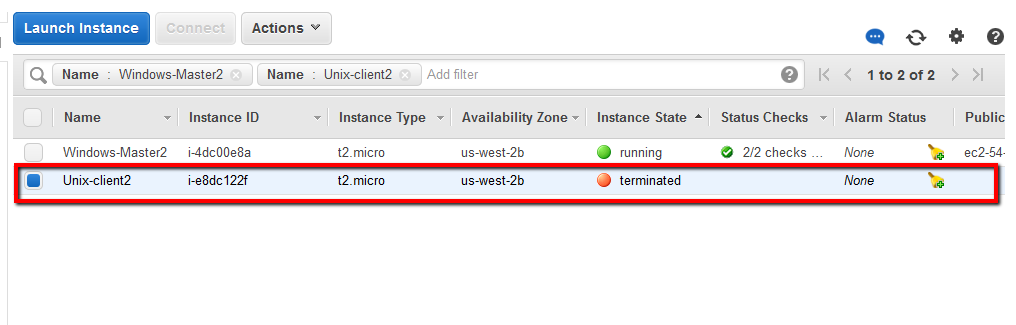
i. login to your AWS management console ii. go to your AWS EC2 dashboard iii. select the correct region iv. click ‘instances’ in the side menu v. in the list of instances select your Unix-client instance vi. right click the Unix-client entry, select ‘Instance State’ followed by ‘Terminate’ vii. in the list of instances you should now see this:
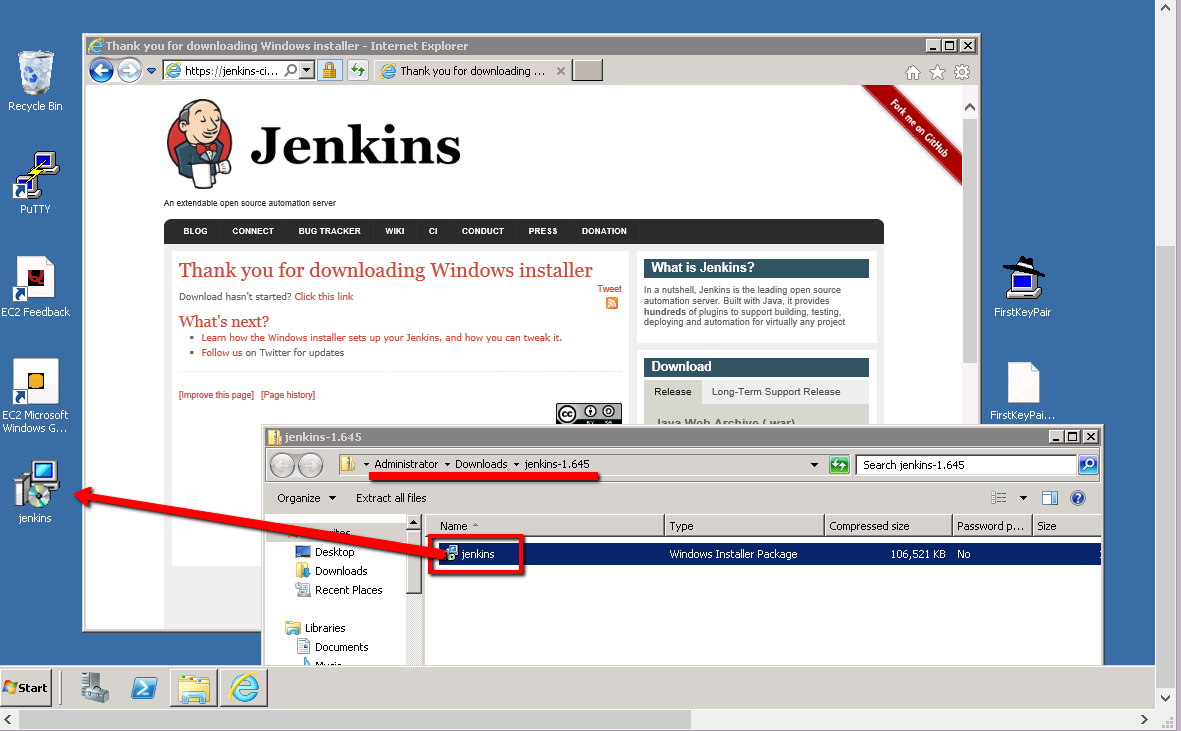
 3. Open the download folder and drill down into the Jenkins zip file. Extract the file in the zip file by dragging it to the desktop
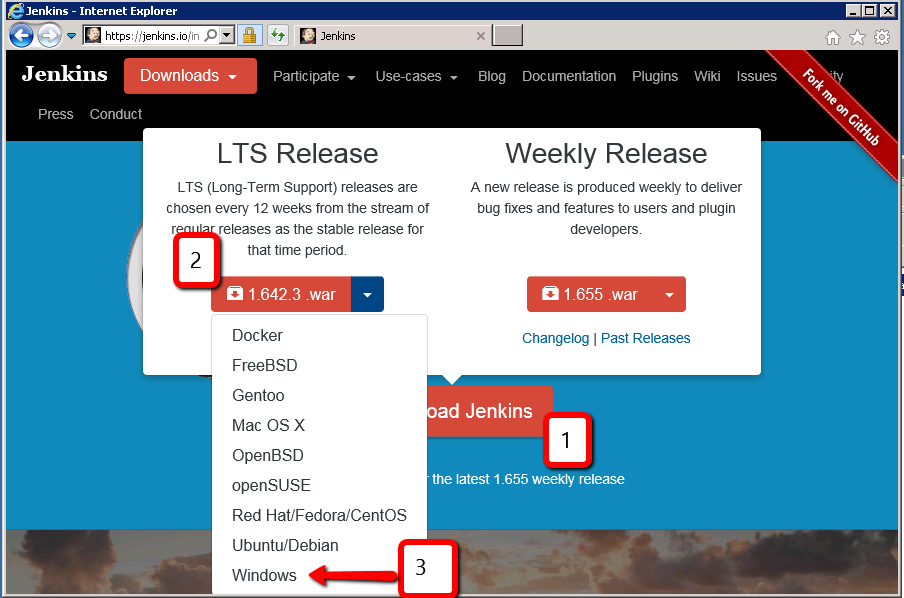
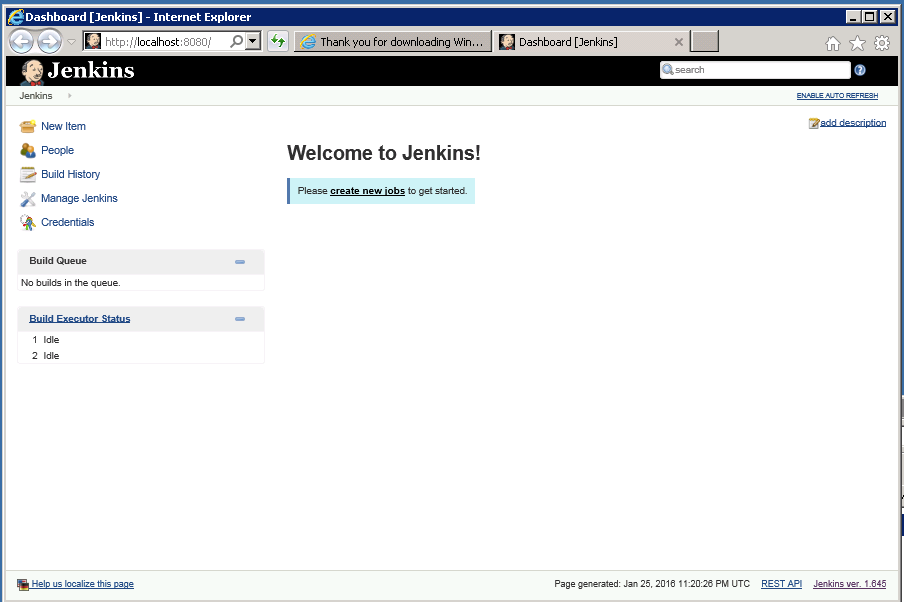
 4. Run the installer accepting all the default install options. Nothing very exciting seems to happen on completion of the install. Except that after a while a new tab should open in Internet Explorer with the following:
 If this page doesn’t open automatically you can type in this Url:
http://localhost:8080/https://wiki.jenkins-ci.org/display/JENKINS/Plugins
Source Code Management: Whilst Jenkins supports source code tools like Subversion and CVS out of the box there are other source code tools you might want to work with. Source Code Management plugins support all sorts of other source code tools. We’ll be working with Git and GitHub so we’ll need to add a plugin for GitHub in a minute. Build Triggers: When do you want, or need, to build and test the AUT? Well plugins for Build Triggers allow you to monitor external activities and trigger a build of your AUT when certain conditions are met. For example a developer may check in some code and you’ll want to trigger a build off that check in. Cluster Management and Distributed build: Typically with lots of automation activities being carried out, and many builds to process, you’ll distribute these activities to other client machines. You won’t run everything on your main Jenkins server. Distributed build plugins allow you to run up, communicate and control other machines. We’ll be using an Amazon EC2 Plugin that runs up and controls our Amazon EC2 Linux Ubuntu slave machine. Slave Launchers and controllers: Depending on the type of slave machines you run up you’ll want to find different ways of communicating with those slaves. You’ve already seen how we’ll be communicating between our Windows master machine and Ubuntu client machine with SSH. So we’ll be installing the SSH Slaves plugin so that our Windows master Jenkins machine can communicate and control the Linux Ubuntu slave machine over SSH. Other Post Build Actions: Once the build is complete you may want to complete other actions like running Windows Power shell scripts or Unix shell scripts. Things like this can be setup with ‘Post Build Action’ plugins. We’ll be using Hudson Post build task’ plugin to run some install completion scripts.There are many other categories of plugins, including Build notifiers, Artifact up-loaders and build reporting. There are hundreds of plugins so chances are any automation task you need to complete will be covered either by features native to Jenkins or a plugin. If it’s not you can always write your own plugin too (but that’s a topic for another day).
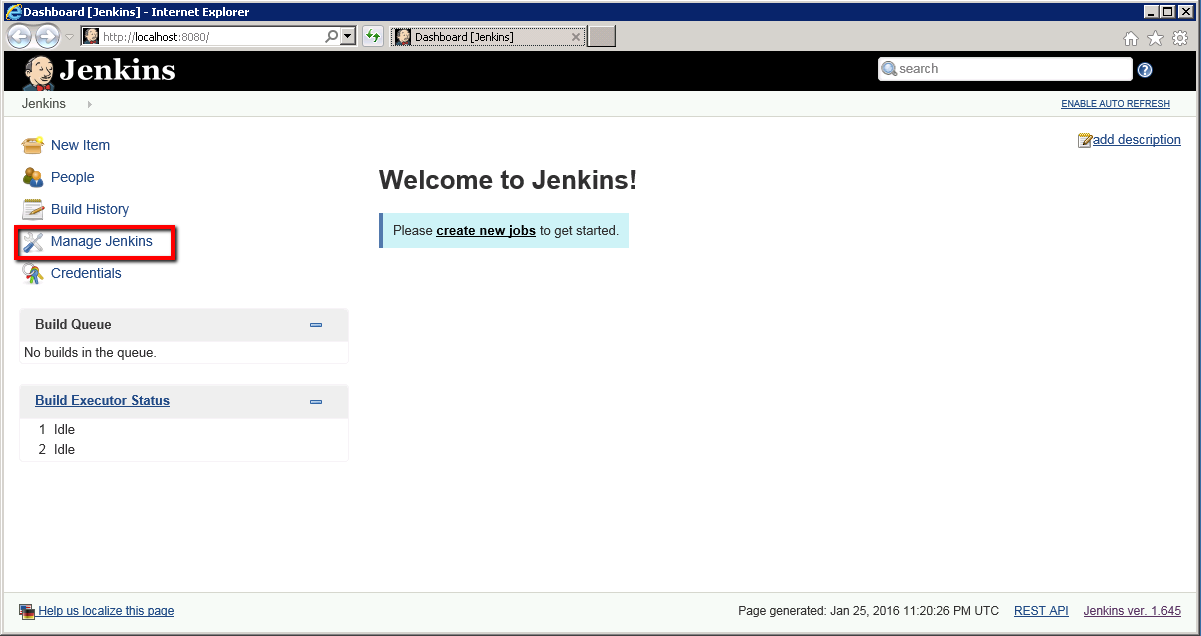 2. Click ‘Manage Plugins’ in the control panel
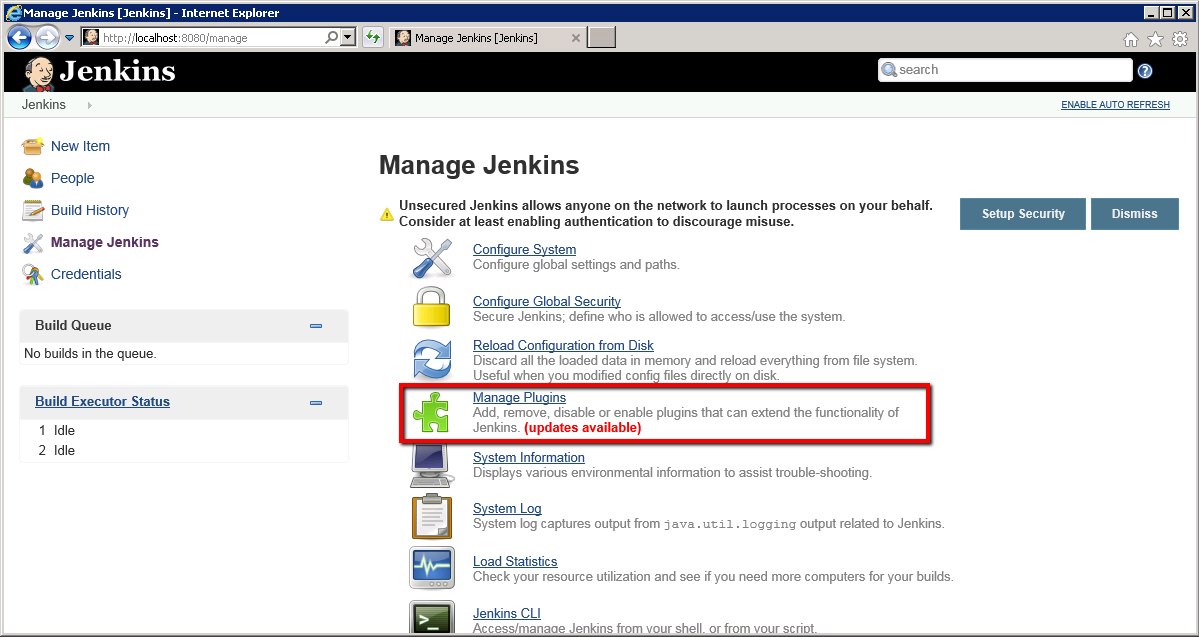 On the Plugin Manager screen you should see a list of plugins grouped by tabs that cover; Updates, Available, Installed and Advanced tabs. First we’ll need to update one plugin.
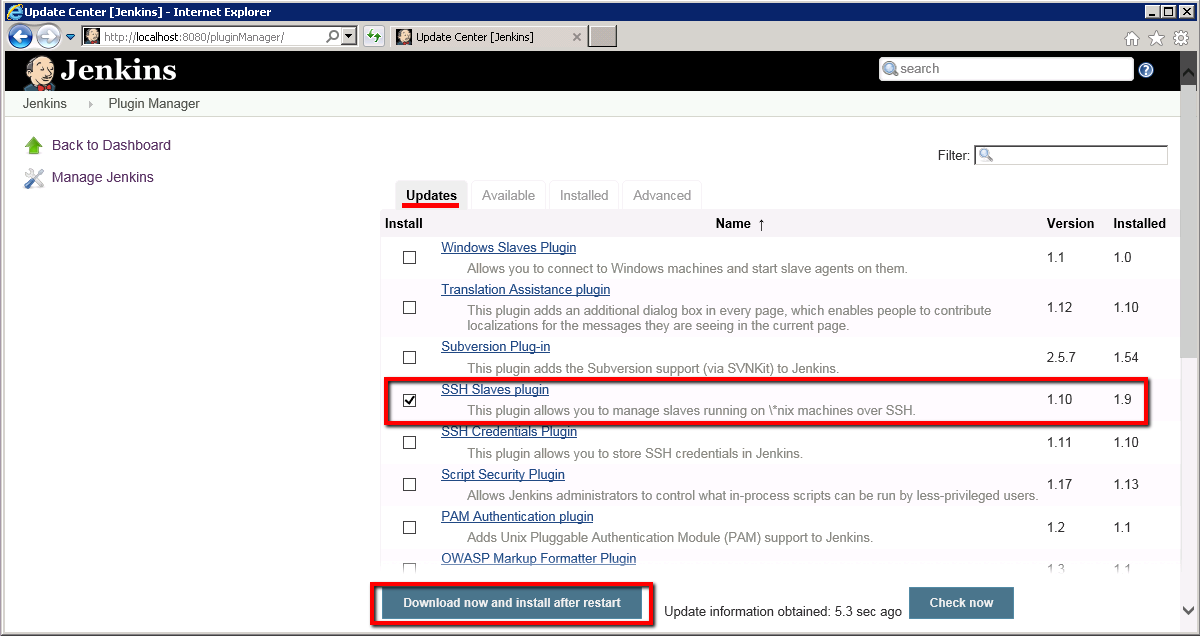
3. On the ‘Update’ tab find the ‘SSH Slaves plugin’, check the ‘install’ check box and click the ‘Download now and install after restart’ button.
On the Plugin Manager screen you should see a list of plugins grouped by tabs that cover; Updates, Available, Installed and Advanced tabs. First we’ll need to update one plugin.
3. On the ‘Update’ tab find the ‘SSH Slaves plugin’, check the ‘install’ check box and click the ‘Download now and install after restart’ button.
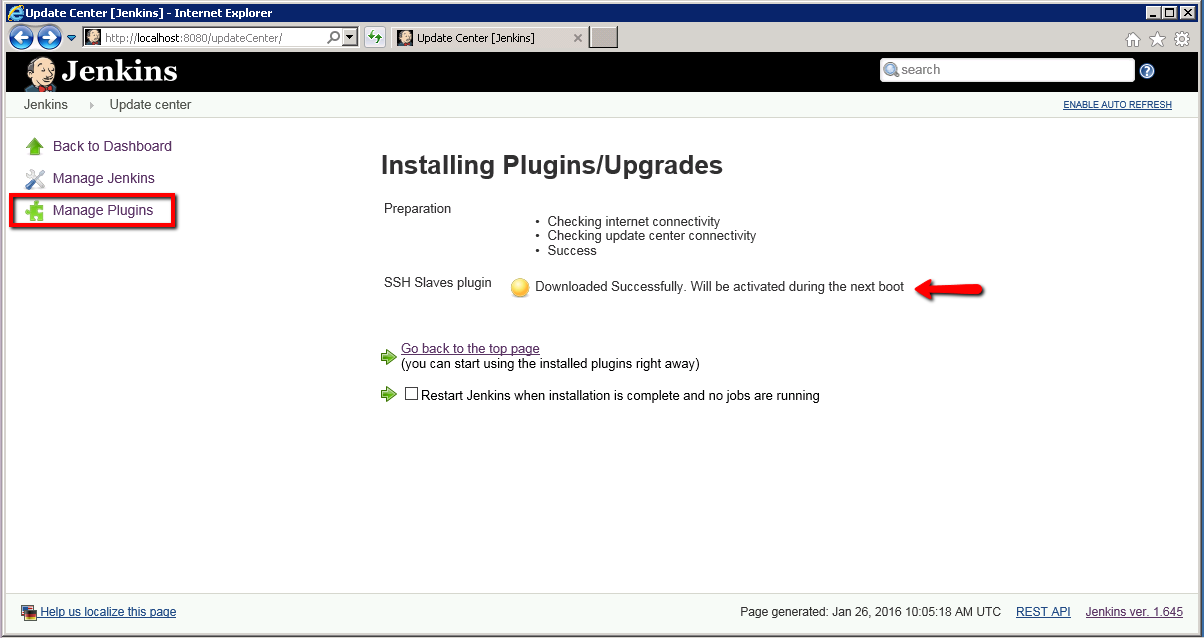
 5. Let the install and upgrade complete so that ‘Download Successfully’ is displayed. Click the ‘Go back to the top page’ link.
 So that’s one plugin updated just another 3 to install now. To install these plugins..
 GitHub PluginHudson Post build task
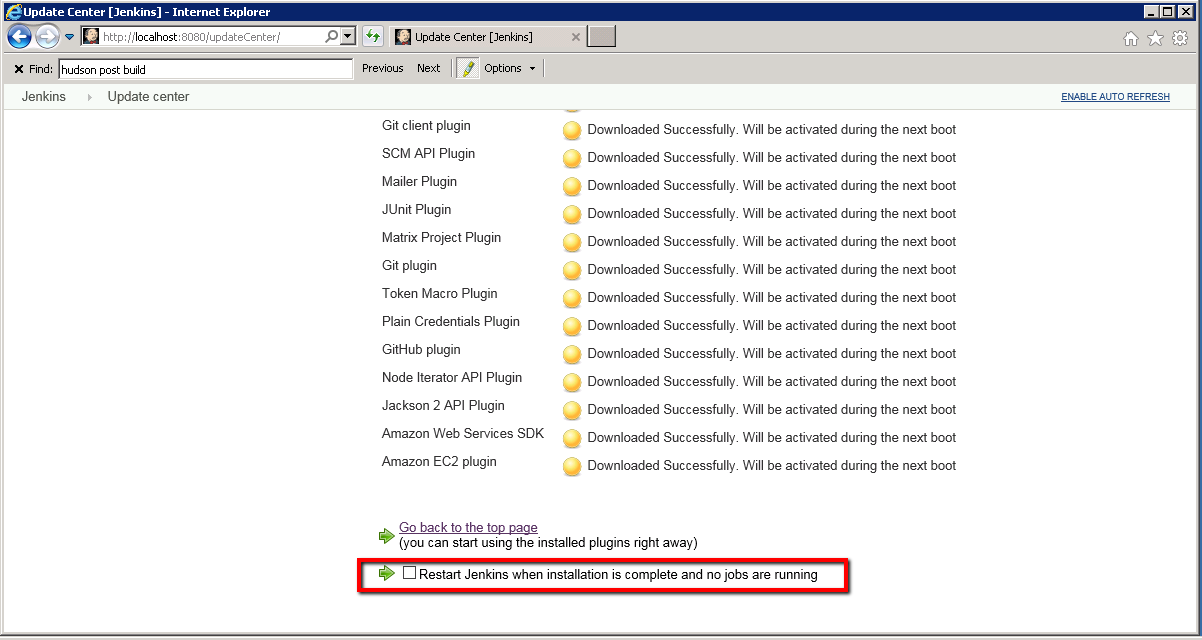 At which point you should see this restart message:
 With all our plugins installed we’re ready to start configuring Jenkins.
2. click the ‘Configure System’ option
With all our plugins installed we’re ready to start configuring Jenkins.
2. click the ‘Configure System’ option
 There are a lot of options for configuring Jenkins. All we need to concern ourselves with is the ‘Cloud’ section (at the bottom of the page). The Cloud section is where we define our Amazon EC2 instance start up details.
3. Scroll to the bottom of the Jenkins ‘Configure’ page where you should find the ‘Cloud’ section. Then click ‘Add a new cloud’ and select the ‘Amazon EC2’ option
There are a lot of options for configuring Jenkins. All we need to concern ourselves with is the ‘Cloud’ section (at the bottom of the page). The Cloud section is where we define our Amazon EC2 instance start up details.
3. Scroll to the bottom of the Jenkins ‘Configure’ page where you should find the ‘Cloud’ section. Then click ‘Add a new cloud’ and select the ‘Amazon EC2’ option
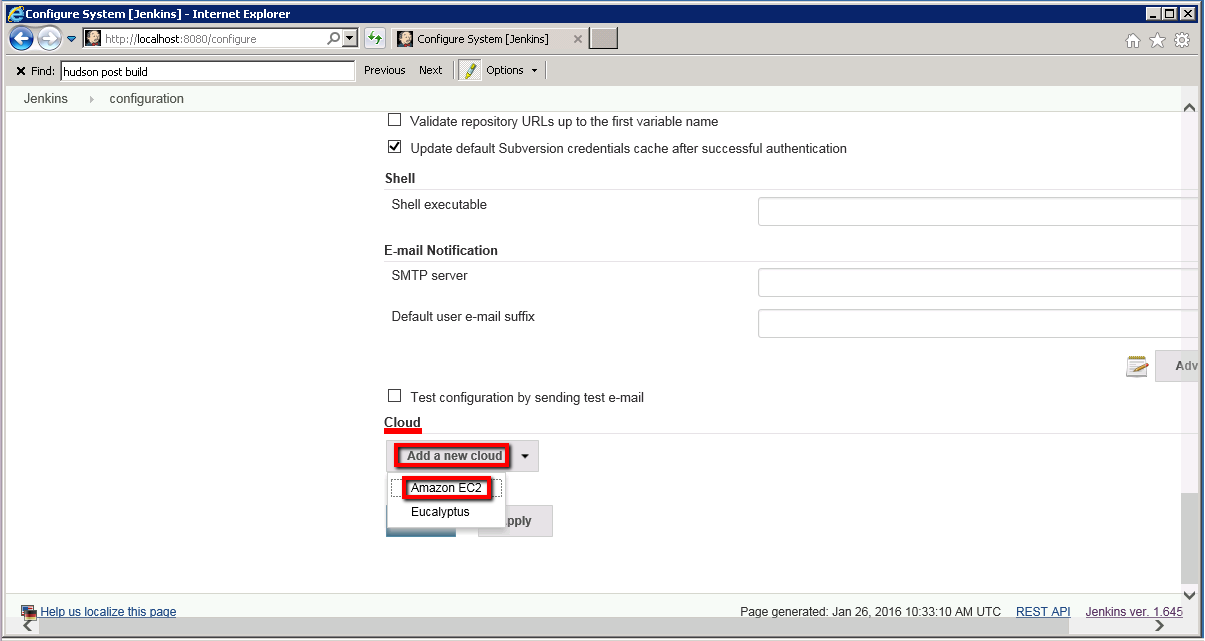 From here we can enter all of the details needed to run up our EC2 Ubuntu instance. Before we can complete this though we’ll need to get our Amazon ‘Access Key ID’ which you should have from going through the Prerequisites Section of this module.
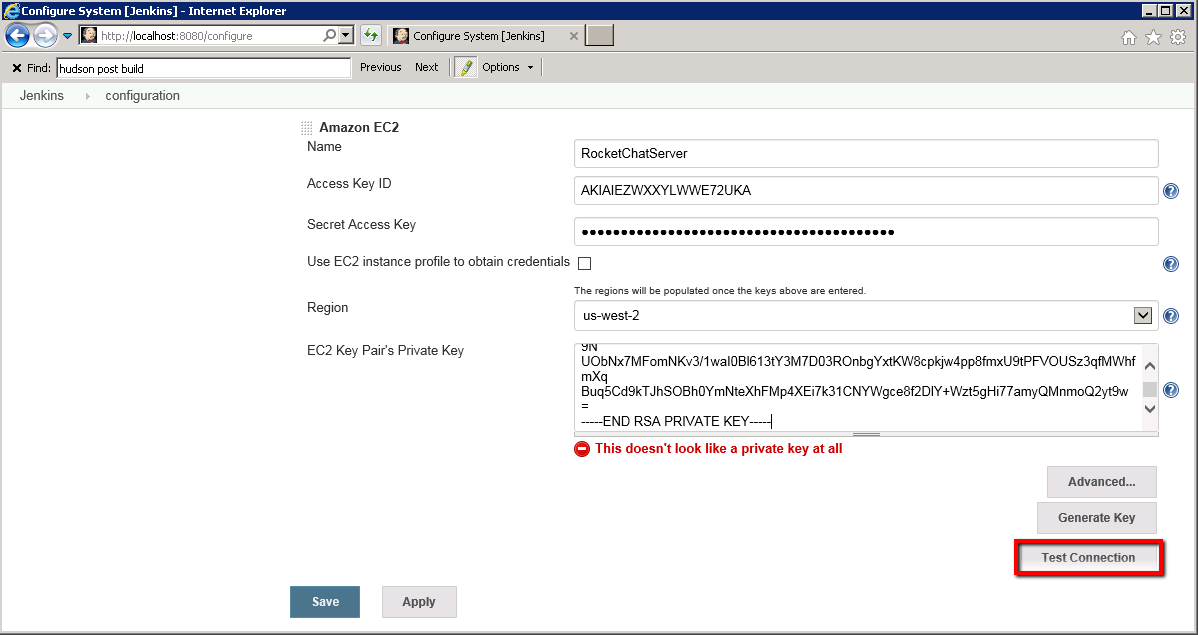
4. Enter the following details for your Amazon EC2 instance
From here we can enter all of the details needed to run up our EC2 Ubuntu instance. Before we can complete this though we’ll need to get our Amazon ‘Access Key ID’ which you should have from going through the Prerequisites Section of this module.
4. Enter the following details for your Amazon EC2 instance
Name: RocketChatServer Access Key ID: <key created in prerequisite stage of module> Secret Access Key: <key created in prerequisite stage of module> Region: <select your region>*1 EC2 Key Pair’s Private Key: <copy in the contents of your .pem file>*2*1 – make sure you select the same region that your Windows 2008 server machine is running in. Login to the AWS management console and check the region if you’re not sure. It’s critical that you select the right region. *2 – in the Prerequisite section in this module we talk through getting your .pem private key file that you created in module 1. You’ll need to open this .pem file in a text editor and paste the contents in to the Jenkins ‘EC2 Key Pair’s Private Key’ text box. NOTE: if you see this error message once you’ve pasted in your private key you can usually just ignore it:
 Once all of these fields are configured you can click the ‘Test Connection’ button.
 Once you’ve completed the test you should see the word ‘Success’ to the left of the ‘Test Connection’ button.
 Now we’re connected to our AWS account we’re ready to start configuring the details for the Linux Ubuntu slave machine we need to start up.
 6. Enter the following details for your AMI instance
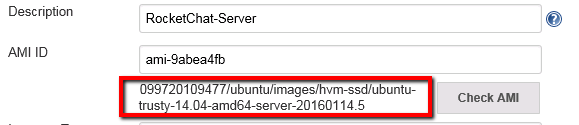
Description: RocketChat-Server AMI ID:<see below>So the AMI id is the Amazon Machine Image number that correlates with our Linux Ubuntu machine that we want to run up. So it’s the same Id as the Linux Ubuntu machine instance that we already have configured in our AWS account. We find this ID with …
i. login to your AWS management console ii. go to your AWS EC2 dashboard iii. select the correct region iv. click ‘instances’ in the side menu v. in the list of instances select your Unix-client instance vi. in the instance details panel (bottom of page) look for this:
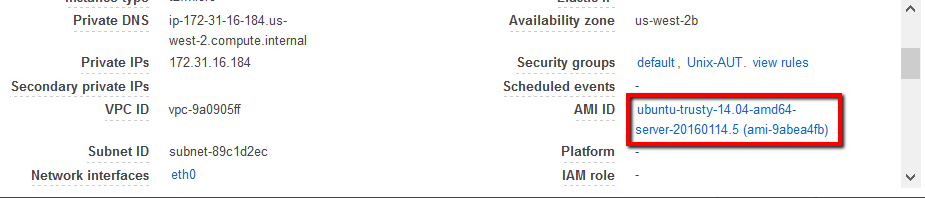 From here you can pick out the ‘ami’ which should be something like:
ami-9abea4fbThen we just need to click on the ‘Check AMI’ button. This should give you confirmation that AWS can find the image you need. It should look like this:
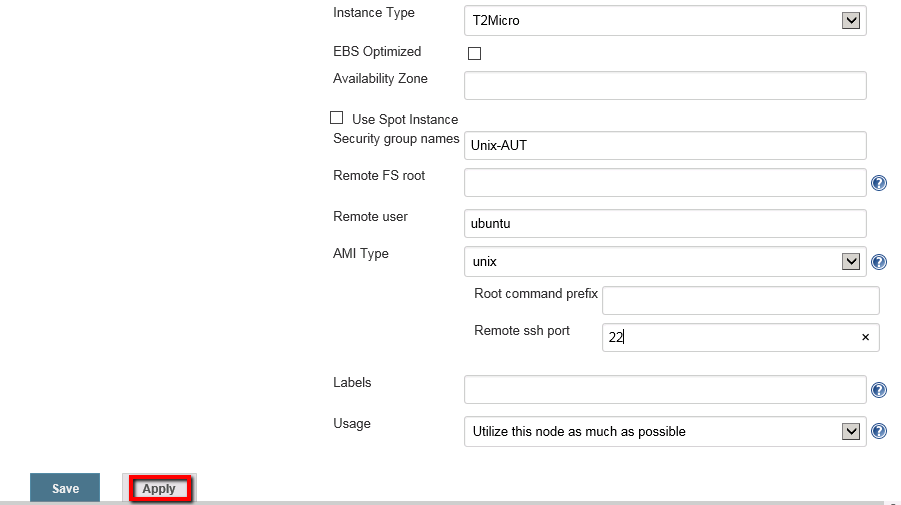
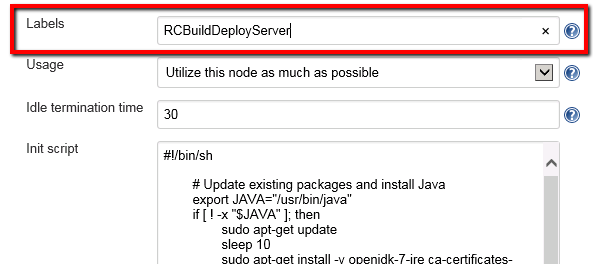
Instance Type: t2.micro (IMPORTANT*) EBS Optimized: Un-checked Availability Zone: <leave blank> Use Spot Instance: Un-checked Security Group Names: default, Unix-AUT (see below) Remote FS root:<leave blank> Remote user: ubuntu AMI Type: unix Root command prefix:<leave blank> Remote ssh port: 22 Labels: RCBuildDeployServer Usage: Utilize this node as much as possible Idle termination time: 30 Init script:<leave blank>*-make sure you select ‘t2.micro’ here as this is the only Instance Type on the free tier. Select anything else and you’ll be charged for it! The security groups you configure here will be determined by what you’ve setup in your AWS account. To find the right value:
i. login to your AWS management console ii. go to your AWS EC2 dashboard iii. make sure you have the correct region selected iv. click ‘Security Groups’ in the side menu v. in the list of security groups find your Unix-AUT group name vi. find the ‘Group Name’. You’re looking for this:
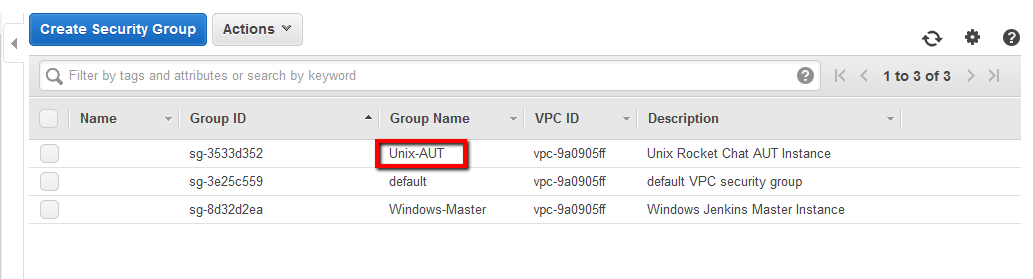 This group will be specific to you. You may have used the same name as me but it’s best to check using the steps above. You’ll need to use both the Unix security group (Unix-AUT) and the default security group (default)
That should give us everything we need for this initial stage. Once you have the settings looking like this click the ‘Apply’ button.
This group will be specific to you. You may have used the same name as me but it’s best to check using the steps above. You’ll need to use both the Unix security group (Unix-AUT) and the default security group (default)
That should give us everything we need for this initial stage. Once you have the settings looking like this click the ‘Apply’ button.
 Now we’re ready to check that Jenkins can run up an Amazon EC2 Linux Ubuntu instance for us automatically.
8. Return to the Jenkins home page (click ‘Jenkins’ link top right)
9. Click the ‘Build Executor Status’ link on the home page
Now we’re ready to check that Jenkins can run up an Amazon EC2 Linux Ubuntu instance for us automatically.
8. Return to the Jenkins home page (click ‘Jenkins’ link top right)
9. Click the ‘Build Executor Status’ link on the home page
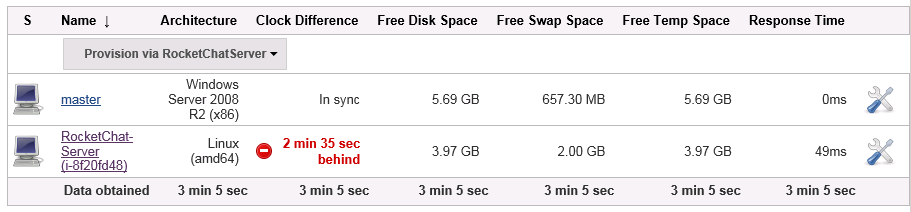
 This will take you to the ‘Nodes’ page. On this page you’ll have a list of nodes that can act as build machiens. You’ll already see your Windows 2008 Master machine listed. You won’t see a slave machine in the list yet because it’s not running yet. However, we can run the salve machine up from here.
10. Click the ‘Provision via RocketChatServer’ button and select the AMI we defined earlier
This will take you to the ‘Nodes’ page. On this page you’ll have a list of nodes that can act as build machiens. You’ll already see your Windows 2008 Master machine listed. You won’t see a slave machine in the list yet because it’s not running yet. However, we can run the salve machine up from here.
10. Click the ‘Provision via RocketChatServer’ button and select the AMI we defined earlier
 At this point you should see a message from Jenkins that ‘This node is being launched’
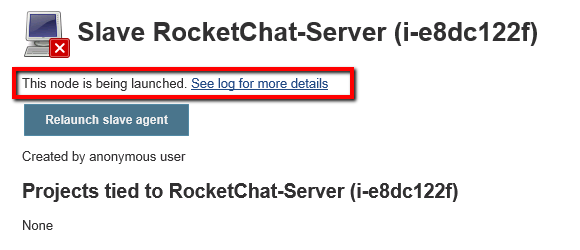 From here we can do two things:
11. Check the Jenkins log by clicking ‘See log for more details’ At this point Jenkins is logging all the actions carried out as it brings up this Ubuntu instance. What you need to check for is this…
- check the Jenkins log to make sure the node is launched correctly
- check our AWS account to see the running node
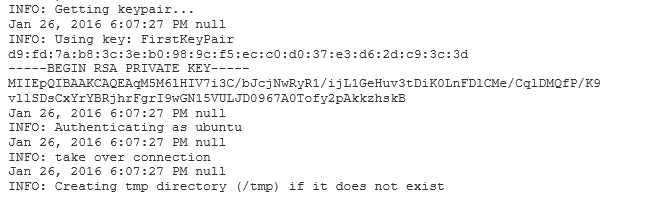 This just tells us that the instance was started and that Jenkins successfully logged in using our private key under the account ‘ubuntu’. You may see some warning messages but as long as the machine is running and the login worked we’re on the right track.
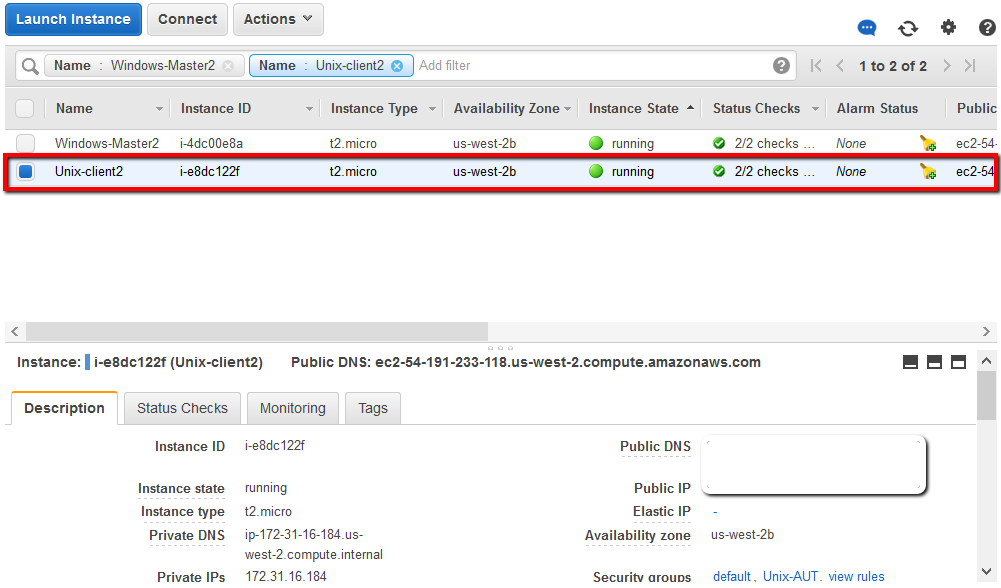
12. Check the AWS management console
On the AWS management console we shold be able to see our new instance running now.
This just tells us that the instance was started and that Jenkins successfully logged in using our private key under the account ‘ubuntu’. You may see some warning messages but as long as the machine is running and the login worked we’re on the right track.
12. Check the AWS management console
On the AWS management console we shold be able to see our new instance running now.
i. go to your AWS EC2 dashboard ii. make sure you’ve selected the right region iii. click ‘Instances’ in the side menu iv. in the list look for Unix-client (or similar) v. select the Unix-client in the list and check it’s runningAt this point you should see something like this…
 We’ve successfully run up our Linux Ubuntu instance automatically from Jenkins. Great!
A few things worth mentioning…
Firstly, you may have noticed that one of the parameters we configured in Jenkins for this instance was:
We’ve successfully run up our Linux Ubuntu instance automatically from Jenkins. Great!
A few things worth mentioning…
Firstly, you may have noticed that one of the parameters we configured in Jenkins for this instance was:
Idle termination time: 30This means that if the instance hasn’t done anything for 30 minutest Jenkins will automatically shut the machine down for us. No need to do anything ourselves we can just leave it to Jenkins to shut the system down when it’s not needed. Secondly, you may have noticed, in the Jenkins logs, that there were some error messages around the installation of Java. Something along the lines of:
WARNING: Failed to download JavaWe’ll solve that in the next step when we get Jenkins to run some initialisation scripts on the server. We do need Java though as the Jenkins Java client needs to be installed on this Ubuntu machine in order for Jenkins to have full control over it.
So we’ll need to add some Unix shell commands to this Init script field. The purpose of these commands is to: a. update software already on the system b. install Java (Jenkins needs Java to run it’s remote client app) c. install npm (more on this later) You don’t really have to understand this script (it’s just a unix shell script) but as long as you understand why it’s there that’s the important part. So copy the following into the Init Script field:
- return ot the main Jenkins dashboard (click the ‘Jenkins’ link top left)
- click the ‘Manage Jenkins’ link
- click the ‘Configure System’ link
- scroll to the bottom of the page where we configured our Amazon EC2 setup
- the last section on the page should be the ‘Init script’ field
#!/bin/sh
# Update existing packages and install Java
export JAVA="/usr/bin/java"
if [ ! -x "$JAVA" ]; then
    sudo apt-get update
    sleep 10
    sudo apt-get install -y openjdk-7-jre ca-certificates-java tzdata-java libcups2 libcups2 libjpeg8 icedtea-7-jre-jamvm openjdk-7-jre-headless openjdk-7-jdk git npm
    sleep 5
fi
# Add Swap Space
SWAP=/mnt/swap1
if [ ! -f $SWAP ]; then
    sudo dd if=/dev/zero of=$SWAP bs=1M count=2K
    sudo chmod 600 $SWAP
    sudo mkswap $SWAP
    # add new swap to config and start using it
    echo "$SWAP none swap defaults 0 0" | sudo tee -a /etc/fstab
    sudo swapon -a
fi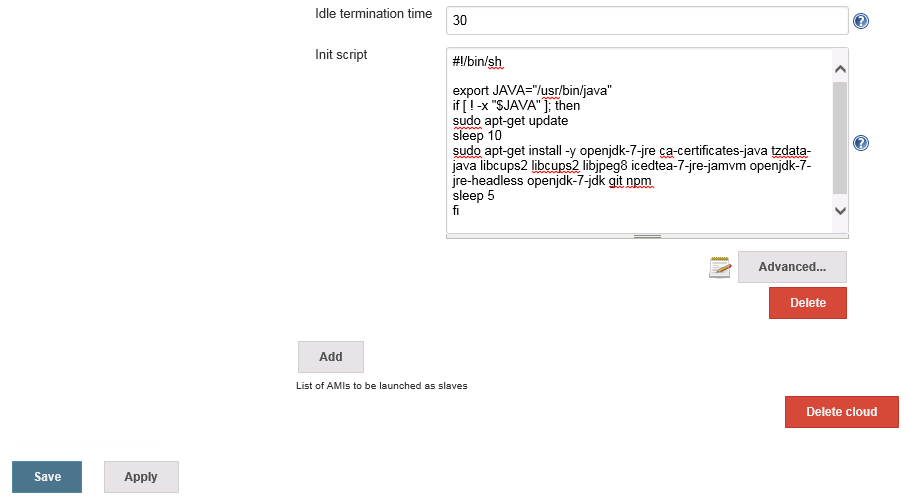 14. Return to the Jenkins home page (click ‘Jenkins’ link top right)
15 .Click the ‘Build Executor Status’ link on the home page
16. Click the ‘Provision via RocketChatServer’ button and select the AMI we defined earlier
At this point you should see a message from Jenkins that ‘This node is being launched’. This time round when you click on the ‘See log for more details’ you should see a bit more going on. In summary the log file should show you …
14. Return to the Jenkins home page (click ‘Jenkins’ link top right)
15 .Click the ‘Build Executor Status’ link on the home page
16. Click the ‘Provision via RocketChatServer’ button and select the AMI we defined earlier
At this point you should see a message from Jenkins that ‘This node is being launched’. This time round when you click on the ‘See log for more details’ you should see a bit more going on. In summary the log file should show you …
i. the Instance launching (INFO: Launching instance: i-1ebaa1c7) ii. the ssh connection (INFO: Connected via SSH) iii. execution of the Init Script (INFO: Executing init script) iv. updates to existing software packages v. installation of Java (INFO: Verifying that java exists) vi. launching the Jenkins slave (INFO: Launching slave agent)And then the final entry in the log…
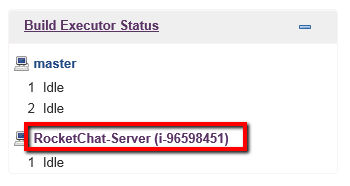
Slave successfully connected and online17. Go back to the Nodes dashboard (click ‘Jenkins-> Nodes’ in the top menu bar) In the node list we should now see our RocketChat-Server node up and running:
 At which point we have a fully configured Jenkins slave machine, running all the software we need that’s ready for us to start installing our AUT on. Next we’ll look at how to configure Jenkins to get that AUT built and installed automatically.
 This tells Jenkins that if the slave is inactive for more than 30 minutes to ‘Terminate’ this slave Linux EC2 instance. Great for keeping control of our Amazon charges (don’t want to be spending money on machines that are standing idle). Not great if we have data on that machine that we need as we’ll lose it all when it’s terminated. For us though we’re not worried about losing data so this’ll be just fine.
 Viewing details for our slave you’ll see a number options in the left hand menu. These options allows us to:
Delete Slave: select this and you’ll Terminate the Amazon EC2 instance for this slave.
Configure: from here you can view and modify some of the configuration parameters for this slave
Build History: details about builds we’ve run on this slave.
Load Statistics: stats on how hard this machine is having to work.
Script Console: feature allowing us to run Groovy script on the slave machine from our Jenkins master machine
Log: details about the running up and install activities that took place when we created this instance
System Information: full list of system properties
Disconnect: the ability to disconnect Jenkins from the slave but leave the instance running still (you can reconnect later if you need to)
https://rocket.chat
 5. Click the ‘Save’ button
 3. On the Job configuration page set these key values
Restrict where this project can be run: RCBuildDeployServer

Source Code Management: None

Build Triggers: Build periodically
 No need to add a schedule here yet. We’ll kick our jobs off manually for now.
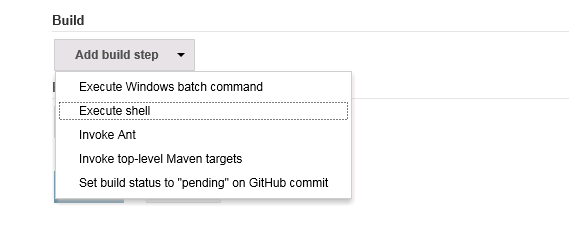
4. Click on the ‘Add Build Step’ button and select ‘Execute Shell’
No need to add a schedule here yet. We’ll kick our jobs off manually for now.
4. Click on the ‘Add Build Step’ button and select ‘Execute Shell’
 5. In the command text box we need to add our build script. Remember you don’t need to understand the detail here. Just that for our demo app these actions build and install the app. You’ll have a completely different set of actions for your application.Copy and paste all of the scripts below into the ‘Command’ field:
#Clean up if any left overs from last build
SCREEN_RUNNING=’/usr/bin/pgrep SCREEN’
ifSCREEN_RUNNING fi NODE_RUNNING=’/usr/bin/pgrep node’ ifNODE_RUNNING fi if [ -f master.zip ]; then rm -f master.zip fi INSTDIR=./Rocket.Chat-master if [ -dINSTDIR fi MONDIR=/home/ubuntu/db if [ -d $MONDIR ]; then rm -Rf /home/ubuntu/db fi pwd #Install packages we need for the build sudo apt-get install unzip curl https://install.meteor.com/ | sh sudo npm install -g n sudo n 0.10.40#Configure Mongo Database
MONDIR=/home/ubuntu/db
if [ ! -d $MONDIR ]; then
mkdir /home/ubuntu/db
fi
pwd#Build and install Rocket Chat
export PUBLIC_HOSTNAME=”$(curl http://169.254.169.254/latest/meta-data/public-hostname 2>/dev/null)”
wget https://github.com/RocketChat/Rocket.Chat/archive/master.zip
unzip -o master.zip
cd ./Rocket.Chat-master
meteor build –server $PUBLIC_HOSTNAME –directory .
cd ./bundle/programs/server
npm install
cd ../..#Make sure processes continue to run when Jenkins script completes
echo -e “\n”
ps -ef
export BUILD_ID=dontKillMe
echo -e “\n”#Start mongo DB and Rocket Chat
screen -d -m /home/ubuntu/.meteor/packages/meteor-tool/.1.1.10.ki0ccv++os.linux.x86_64+web.browser+web.cordova/mt-os.linux.x86_64/dev_bundle/mongodb/bin/mongod –bind_ip localhost –dbpath /home/ubuntu/db/ –smallfiles
sleep 10
export MONGO_URL=mongodb://localhost:27017/rocketchat
export ROOT_URL=http://localhost:3000
export PORT=3000
screen -d -m node /home/ubuntu/workspace/BuildRocketChatOnNode/Rocket.Chat-master/bundle/main.js
sleep 10# list system details and what's running on the system before we complete script
echo -e "\n"
pwd
echo -e "\n"
env
echo -e "\n"
ps -ef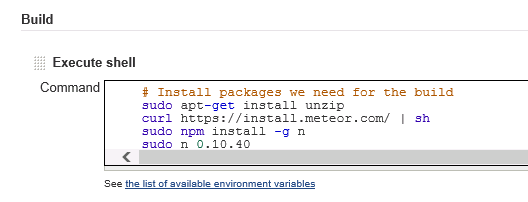 Like I’ve said this little lot is particular to the Rocket Chat app we’re using for this example. When you come to implement this in the real world you’ll work with your developers to determin what goes in here.
We can then click on the ‘Save’ button
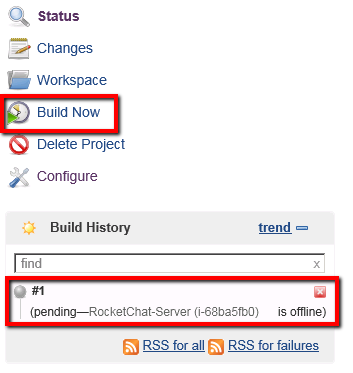
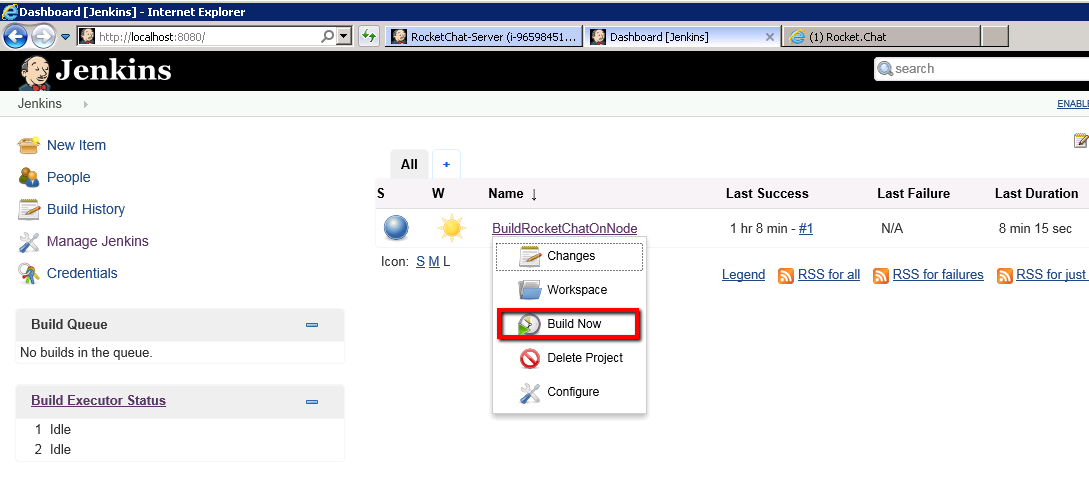
6. On the Job summary page click the ‘Build Now’ button
7. Jenkins will go through a few steps now. First it will run up a Linux Ubuntu EC2 slave machine. This is the slave machine Jenkins needs to buid and install the application on.
Like I’ve said this little lot is particular to the Rocket Chat app we’re using for this example. When you come to implement this in the real world you’ll work with your developers to determin what goes in here.
We can then click on the ‘Save’ button
6. On the Job summary page click the ‘Build Now’ button
7. Jenkins will go through a few steps now. First it will run up a Linux Ubuntu EC2 slave machine. This is the slave machine Jenkins needs to buid and install the application on.
 If you check your AWS dashboard you should see this instance initializing. It may take a while as it has to run through all the initialisation scripts we defined too.Then, once the slave is ready, we’ll see the build start.
 This is our first build, as indicated by the ‘#1’ tag. We can view the detail and progress on this build by clicking on the ‘down arrow’ next to the #1 and selecting ‘Console Output’
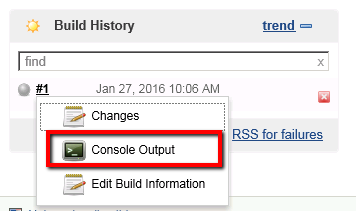 The console output will list all of the actions being carried out as part of this build and install.
This may take some time!
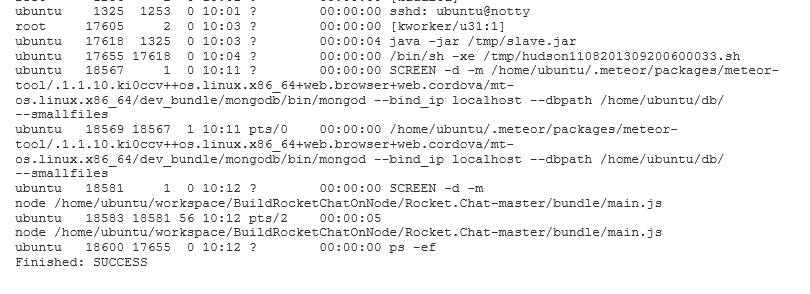
Once the build and install is complete you should something like this at the end of the log file
The console output will list all of the actions being carried out as part of this build and install.
This may take some time!
Once the build and install is complete you should something like this at the end of the log file
 From here we can check if the application is actually running on our slave EC2 Linux Ubuntu instance.
7. On your Windows RDP session, open a new tab in Internet explorer. Enter the following address: http://localhost:3000
You should see the application running like this:
From here we can check if the application is actually running on our slave EC2 Linux Ubuntu instance.
7. On your Windows RDP session, open a new tab in Internet explorer. Enter the following address: http://localhost:3000
You should see the application running like this:
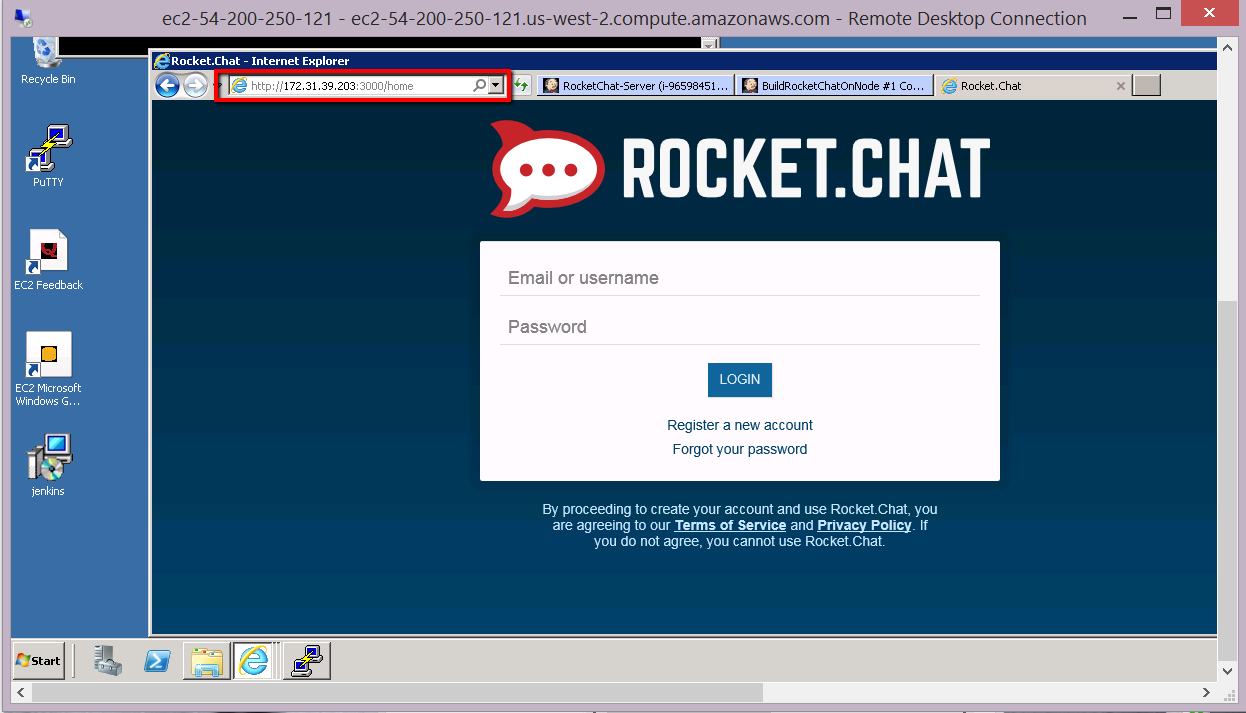 If you want to login and play with Rocket Chat you can click on the ‘Register a new account’ link (you don’t need to follow any email confirmation process – the first login can be created direct from the GUI).
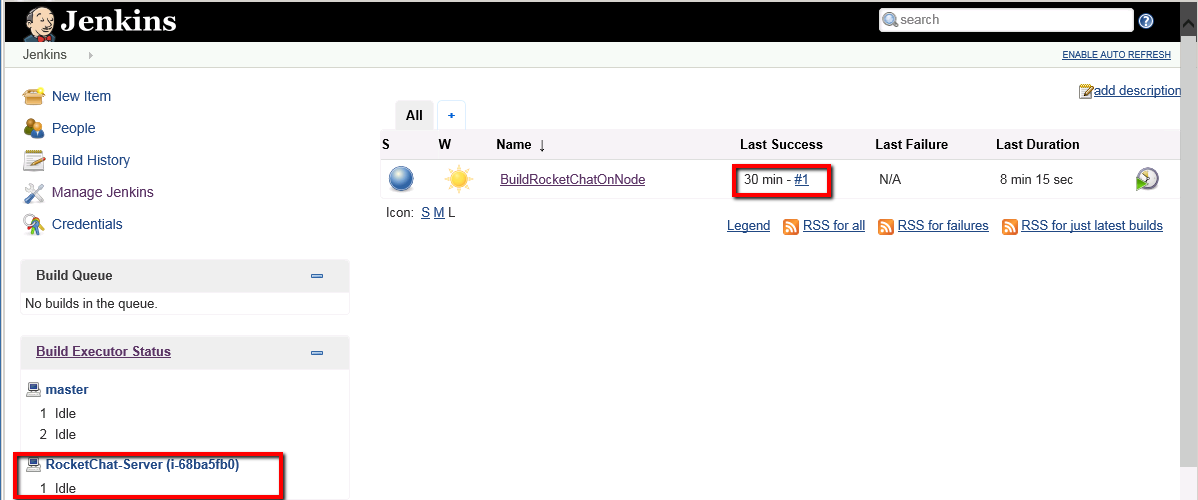
If you go back to your Jenkins home page you should see the successful build reported as follows:
If you want to login and play with Rocket Chat you can click on the ‘Register a new account’ link (you don’t need to follow any email confirmation process – the first login can be created direct from the GUI).
If you go back to your Jenkins home page you should see the successful build reported as follows:
Note that this will only work if your security groups are configured correctly and Public DNS settings are configured. See module 1 of this course for more info. All that remains now is to setup a few clean up actions and a few tests to make sure Jenkins reports the build/install as a success.
- in your EC2 management console select the Linux host
- find the ‘Public DNS’ value
- Construct the following Url: http://<public-dns-value>:3000
- Enter this Url in your browser
a) check the logs for successful install messages b) use ‘wget’ to check that the Rocket Chat home page is displayedWe can set these up by following these steps: 1. go back to the Job configuration by selecting configure on the home page.
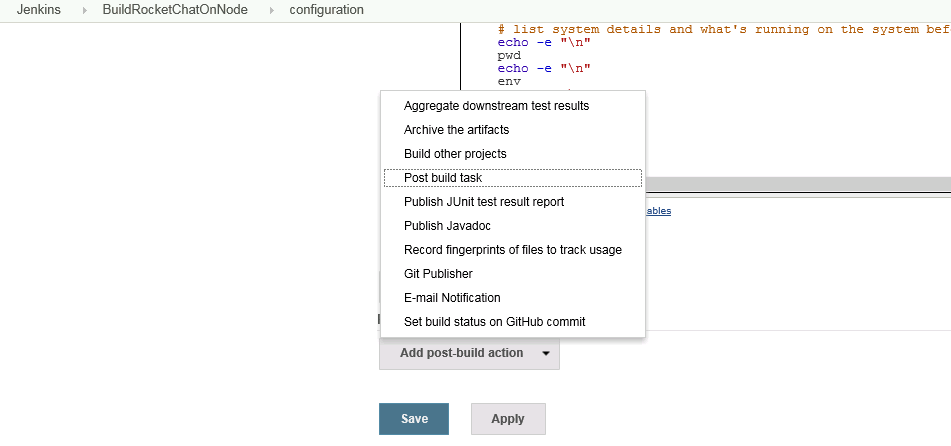
 2. Scroll to the bottom of the configuration page to find the Post Build Actions section
3. Click the ‘Add post-build action’ button and select the ‘Post Build Task’ option
2. Scroll to the bottom of the configuration page to find the Post Build Actions section
3. Click the ‘Add post-build action’ button and select the ‘Post Build Task’ option
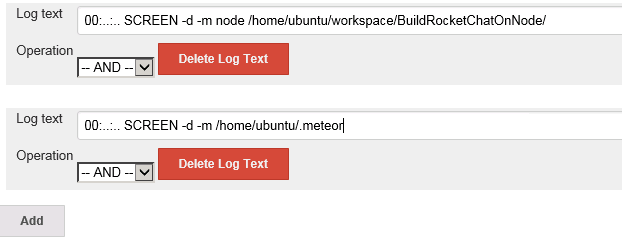 These checks are specific to the Rocket Chat application install. Again when you build this for your own application you’ll have to replace these with checks specific to your build. For info though these messages are checking that the Rocket Chat processes were successfully started and running.
5. In the Script field enter this shell script text
These checks are specific to the Rocket Chat application install. Again when you build this for your own application you’ll have to replace these with checks specific to your build. For info though these messages are checking that the Rocket Chat processes were successfully started and running.
5. In the Script field enter this shell script text
!/bin/bash
#keep checking to see when Rocket Chat is up and running
for I in 1 2 3 4 5 6 7 8 9
do
sleep 60
# use wget to see if we can download index page
# if wget returns true we can download index page
# -T 3 => wait 3 seconds for response
# -t 1 => means only retry once
if (exec /usr/bin/wget -T 3 -t 1 http://localhost:3000)
then
echo “Rocket Chat now running ”
exit 0
else
echo “Waited $I minute(s) - Rocket Chat not running yet ”
fi
done
echo “ Rocket Chat didn’t start ”
exit 1
Idle termination time: 30Well your Linux slave machine has probably been idle for 30 minutes now. As a result it’s probably shut itself down. Then again maybe you went through this really quickly and it’s still running. Either way, depending on the state of this slave machine Jenkins will do one of two things when we start a new build: a. If it has shut itself down:
When we kick off a new build it will start from the beginning and create a new EC2 instance.

NOTE: if the node has been shutdown and then a new node run up for a subsequent build then the new node with have a NEW IP ADDRESS and HOSTNAME.
The slave is still running, so Jenkins just needs to start a new build and install using the existing slave machine
 Assuming you didn’t have a slave running the whole process will kick off again, starting with the running up of the Amazon EC2 instance. Then the build/install will take place. Then we’ll run our completing checks/tests.
Don’t forget it can take a few minutes for these Amazon EC2 instances to run up. It can also take up to 10 minutes to complete the full job including the build and install. This is because we’re using free tier instances within AWS. Please be patient.
If the build, install and tests all succeed then we’ll see this Blue lamp and the sun icon on the Jenkins home page:
Assuming you didn’t have a slave running the whole process will kick off again, starting with the running up of the Amazon EC2 instance. Then the build/install will take place. Then we’ll run our completing checks/tests.
Don’t forget it can take a few minutes for these Amazon EC2 instances to run up. It can also take up to 10 minutes to complete the full job including the build and install. This is because we’re using free tier instances within AWS. Please be patient.
If the build, install and tests all succeed then we’ll see this Blue lamp and the sun icon on the Jenkins home page:
 If anything fails we’ll see a red lamp and the weather will start to turn cloudy:
 Getting it badly wrong over a number of builds and the weather turns to Thunder and Lightning.
 In short the lamp indicates the state of the last job. The weather is an indication of job stability. So an aggregation of results across the last few builds.